
Adding an RDP Zero Trust application
Check Point SASE allows you to create an RDP Zero Trust Application (ZTA) as either:
- Web Client Type - A browser-based solution providing convenient and quick remote desktop access without installation.
- Native Client Type - A locally installed application offering robust performance and advanced features for remote desktop access.
For networks created or upgraded after September 2024, the administrators can configure a property in the IdP Attribute for Host and/or Port fields, that allows each member to access the dedicated RDP server. For more information, see RDP Server Access Based on IdP.
Prerequisite
Make sure you have the credentials to access the application over RDP.
Known Limitation
Native applications launched directly from the Check Point Portal Applications Management page might disconnect after a few minutes. To avoid this issue, launch them from Access for Members.
Adding an RDP ZTA
To add an RDP Zero Trust Application:
- Access the Check Point SASE Administrator Portal and click Private Access > Applications.
- Click Add Application.
.png) The Add application window appears.
The Add application window appears.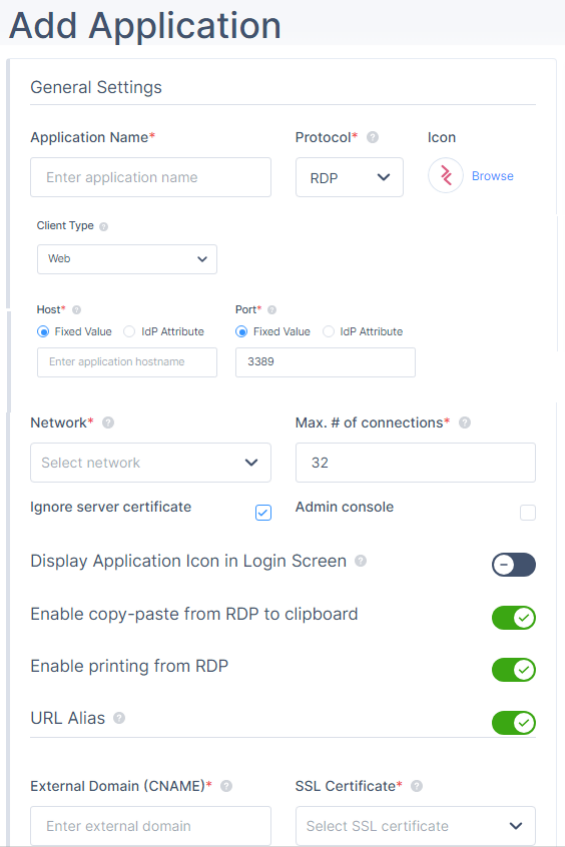
- In the General Settings section, enter these:
- Application Name - Name of the application.
- Protocol - RDP
- Icon - Icon for the application.
- Client Type- Select one of these:
- Web
- NativeNote - For Native Client Type, these are the supported clients: Windows 10, Windows 11, Android, iOS, Mac, with latest MSTSC or MSRDC applications from Microsoft.
- Host - Internal IP address of the server to which you want to connect. Select one of these and enter the value:
- Fixed Value - A predefined, unchanging value set by the administrator.
- IdP Attribute - Information provided by the Identity Provider during user authentication. For more information, see RDP Server Access Based on IdP.Notes:
- IdP Attribute:
- This feature is available only for networks created after September 2024. To use it for existing networks, contact Check Point Support.
- This feature is supported only for Active Directory/LDAP and Azure Active Directory IdPs.
- The administrator must store the hostname and/or port number in the IdP for each member.
- IdP Attribute:
- Port- Select one of these and enter the value:
- Fixed Value - 3389
- IdP Attribute
- Network - Network that hosts the application.
- Max number of connections- Maximum number of concurrent RDP sessions.Note - Disabled when you select Client Type as Native.
- Ignore server certificate - Select Yes to ignore the SSL certificate, unless you activate RDP over SSL.
- Admin console - Select the checkbox to connect directly to the console session on the Windows server.
- (Optional) Display Application Icon at Login Screen- Displays the application icon for the member in the login page.Note - Disabled when you select Client Type as Native.
- (Optional) Enable copy-paste from RDP to clipboard - Enables to copy data from RDP to clipboard.
- (Optional) Enable printing from RDP- Enables to print data from RDP.
- Native RDP - Once enabled, the user's local printer should appear in the list of available printers in addition to the remote printers on the remote site.
- Web RDP - Once enabled, the Perimeter81 VirtualPrinter printer appears in the list of available printers and lets you download a PDF file to the user's machine that can be printed using the user's local printer.
- (Optional) URL Alias - URL for members to access the application.Important - You cannot add a URL alias after you create the application.
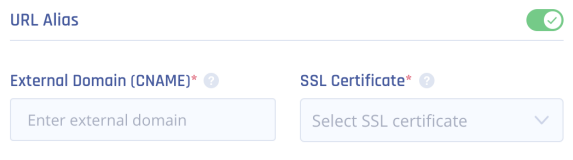
- In the External Domain (CNAME) field, enter a CNAME associated with your domain.
- From the SSL Certificate list, select the application domain SSL certificate uploaded in Certificate Manager.
- Go to your DNS administrator (for example, GoDaddy or R53 in AWS).
Under your domain, use the CNAME specified in the previous step and point it to the application FQDN. The FQDN appears in the application settings after you click Apply.
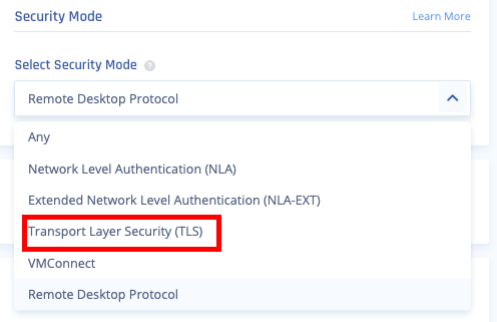
- From the Select Security Mode list, select a security mode. It indicates the encryption and authentication mode.
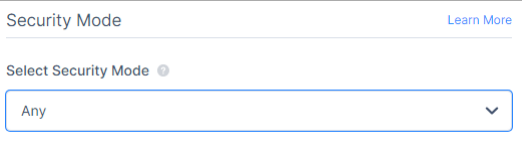
- Any (default) - Select the security mode automatically based on the security protocols supported by the client and the server.
- Network Level Authentication (NLA) - Uses the TLS encryption and requires credentials to access the application. Also referred to as hybrid or CredSSP (the protocol that drives NLA).
- Extended Network Level Authentication (NLA-EXT) - Sends Early User Authorization Result from the server to the client after the NLA handshake.
- Transport Layer Security (TLS) - RDP authentication and encryption through TLS (RDPTLS). This is suitable for load balancing where the primary RDP server redirects the connection to secondary servers.
- VMconnect - Selects a security mode supported by Hyper-V or VMConnect automatically based on the supported protocol by client and server.
- Remote Desktop Protocol (RDP)- Suitable for machines running old Windows version where a login screen is required.Note - Disabled when you select Client Type as Native.
- In the Authentication section, enter these:
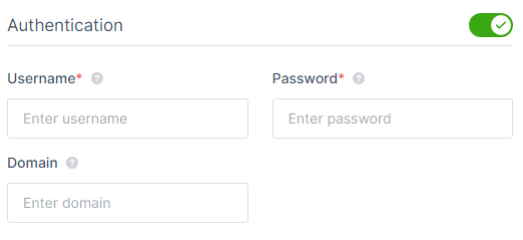
- Username and Password - Server credentials.
- Domain- Your active directory FQDN.Notes:
- If you disable Authentication, then the member must enter the credentials when accessing the application.
- This section is disabled when you select Client Type as Native.
- In the Access Groups and Members section, in the Groups and Members list, select the member groups that can access the application.
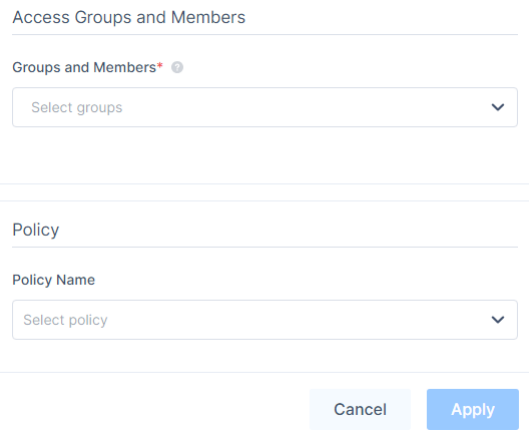
- (Recommended) In the Policy Name list, select an application policy.
- Click Apply.
The system lists the application in the Applications page and enables it by default.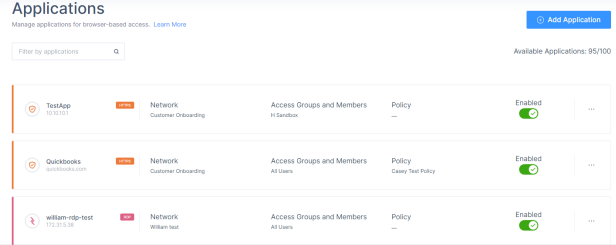
RDP Server Access Based on IdP
For the RDP Zero Trust Application, the administrators can configure a property in the IdP Attribute for Host and/or Port fields, that allows each member to access the dedicated RDP server.
- Hostname must be an IP address or Fully Qualified Domain Name(FQDN).
- The administrator must store the hostname and/or port number in the IdP to redirect the member to the appropriate RDP server.
- For the list of supported IdP Attribute properties, see Microsoft Graph User Properties.
- Custom properties are not supported.
- For Azure AD, make sure to configure the Azure application to have these permissions:
- Directory.Read.All
- User.Read
For more information, see Microsoft Entra ID (formerly Azure AD) (Enterprise Application).
- To map the AD/LDAP attributes to the property name in AD/LDAP, see Map AD/LDAP Profile Attributes to Auth0 User Profile.
- Working with Active Directory Federation Services (ADFS) is available on demand. For more information, contact Check Point Support.
Additional Registry Configuration
Windows 7
- Open the Registry Editor.
- Navigate to HKEY_LOCAL_MACHINE > Software > Microsoft > Windows NT > Terminal Services.
- Select fServerEnableRDP8.
- Set the value type to REG_DWORD.
- Set the value to 1.
- Reboot the machine.
Windows Server 2016
- Open the Registry Editor.
- Navigate to HKEY_LOCAL_MACHINE\SYSTEM\CurrentControlSet\Control\Terminal Server\WinStations\RDP-Tcp
- Select SecurityLayer and change the value to 1.
- Select UserAuthentication and change the value to 0.
Windows Server 2019
- Open the Registry Editor.
- Navigate to HKEY_LOCAL_MACHINE\SYSTEM\CurrentControlSet\Control\Terminal Server\WinStations\RDP-Tcp
- Select SecurityLayer and change the value to 0.
- Reboot the machine.
Troubleshooting
Upstream Error
- If Authentication is enabled, verify the credentials. If it is disabled, change the security mode to Transport Layer Security (TLS).
Additional Troubleshooting Steps
- Disable NLA on the remote machine:
- Open the Control Panel.
- Click System and Security and under System, click Allow remote access.
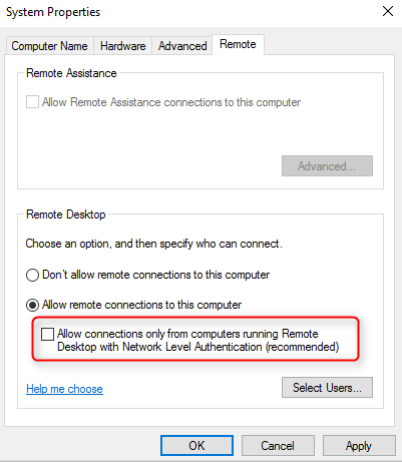
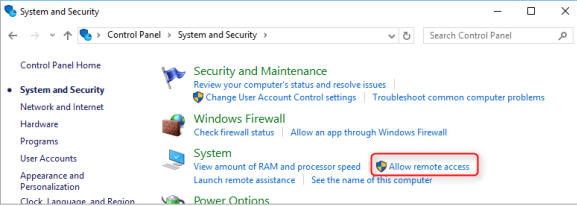 The System Properties window appears.
- Go to the Remote tab and in the Remote Desktop section, clear the Allow connections only from computers running Remote Desktop with Network Level Authentication (recommended) checkbox.
- Click OK.Check Point Support