Model Context Protocol (MCP) is an open-source standard that enables AI assistants to securely connect with external data sources and tools. By integrating MCP with Check Point Check Point SASE, you can query your infrastructure through natural conversation with AI.
Features
Query Check Point SASE networks and their configurations.
Retrieve and analyze gateway deployments across regions.
List and inspect Zero Trust Architecture (ZTA) applications.
Get all available Network regions.
Get all the deployed Gateways, regions, and tunnels in the Network.
Supported Actions
MCP server provides to run these actions through your AI assistant:
Network Management:
list_networks- Lists all Check Point SASE networks.get_network / find_network- Fetches details for a specific network by ID.
Gateway Management:
get_gateway- Provides gateway details for a specified network and gateway identifier.
Region Management:
list_network_regions- Lists all available regions.get_region- Retrieves detailed information for a specific region.
Application Management:
list_applications- Lists all applications.get_application- Retrieves detailed information for a specified application.get_application_status- Provides the deployment status of a specified application.
Note: Administrators can perform supported actions using free-text queries, not just predefined commands.
Security Guidelines
API keys and credentials are never shared with the model.
Only use client implementations you trust.
Make sure that you only use models and providers that comply with your organization's policies for handling sensitive infrastructure data and Personally Identifiable Information.
Check Point SASE MCP Server Configuration
Prerequisites
Administrator access to the Check Point SASE Administrator Portal.
API key generated from the Check Point SASE Administrator Portal.
Node.js version 18 or higher.
npm version 10 or higher.
MCP compatible AI client. For example, Claude, Cursor, GitHub Copilot, and Windsurf.
High-Level Procedure
Step 1 - Generate API Credentials
Access the Check Point SASE Administrator Portal.
Go to Settings > API Support.
Click Generate New Key.
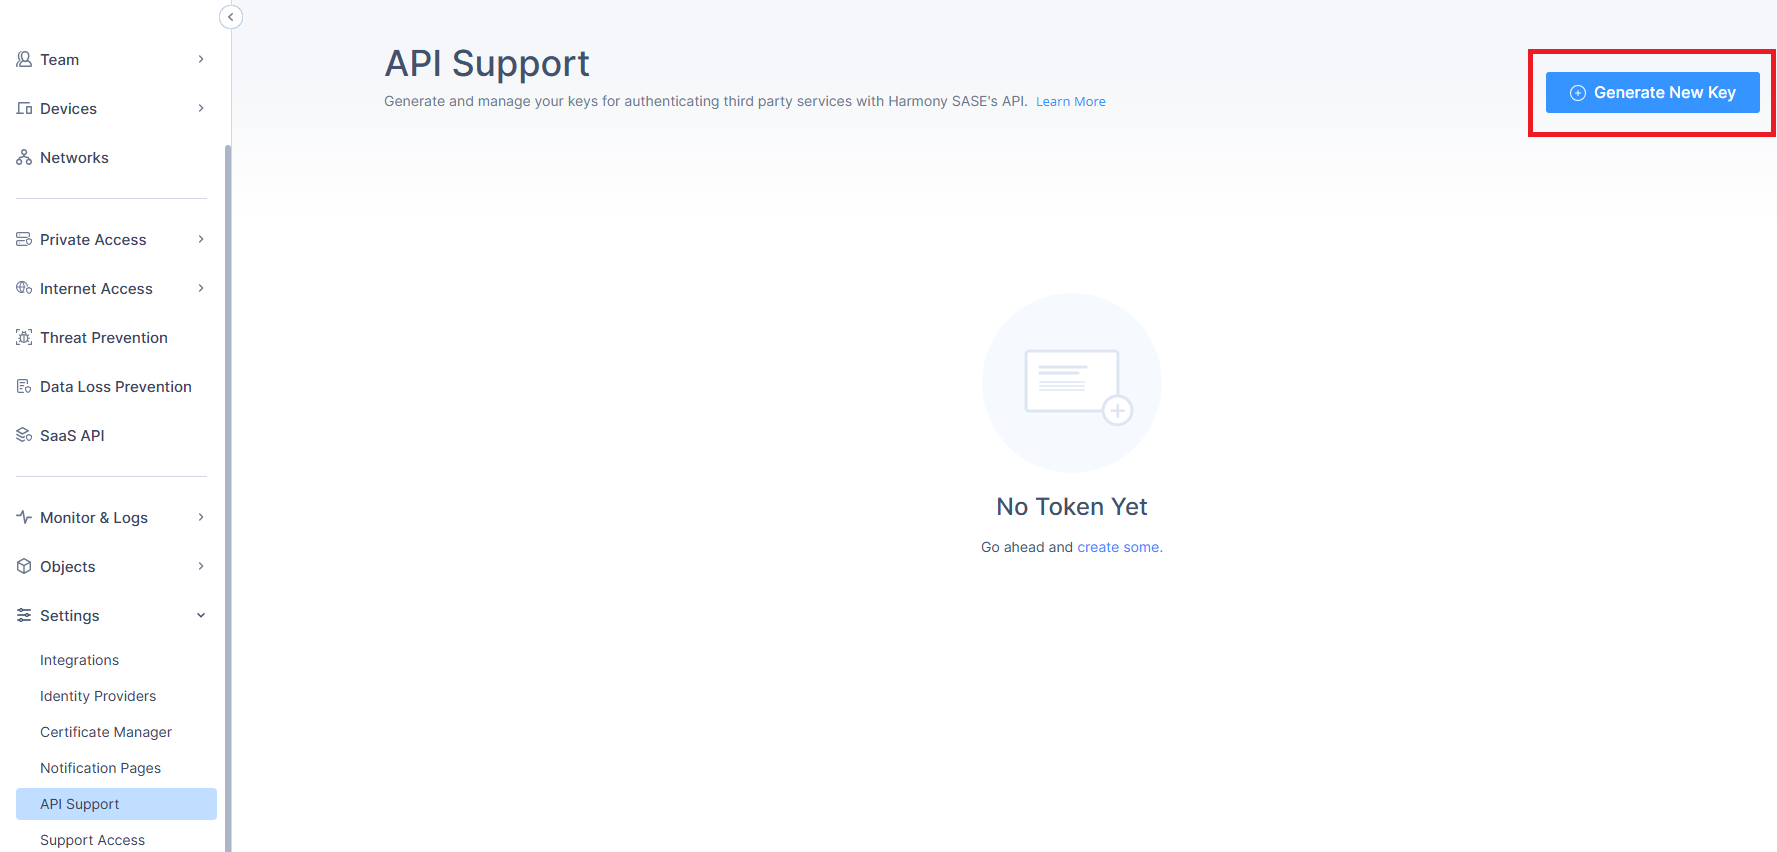
The Generate New API Key window appears.
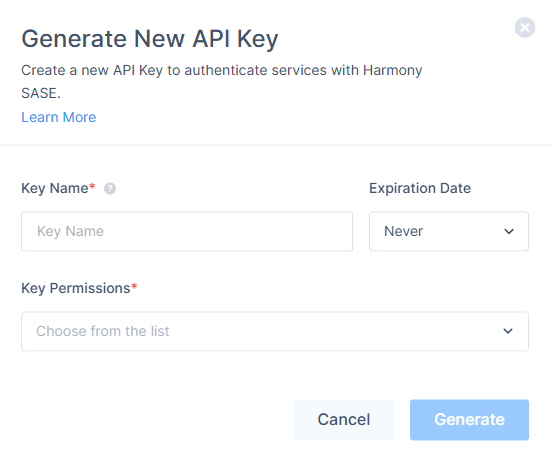
In the Key Name field, enter a name for the token.
From the Expiration Date list, select one of these:
Never (Default)
1 Month
3 Month
6 Month
1 Year
From the Key Permissions list, select the required permission(s).
Click Generate.
The system generates the API Token.To copy the API key, go to the Active Tokens tab, hover over the generated token, and click
 .
.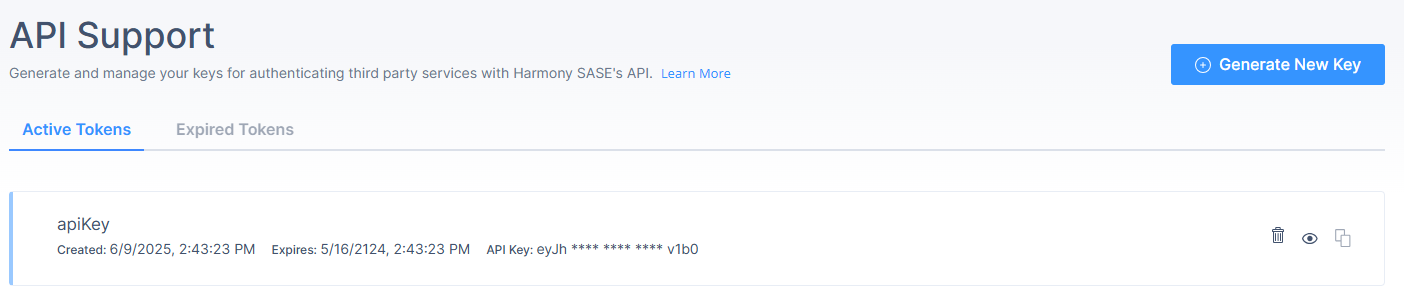
Note: Make a note of the API key. These values are required during Client configuration.
Step 2 - Configure Bypass Rule for the AI Client
Click Internet Access and go to Bypass Rules.
Click Add New Rule.
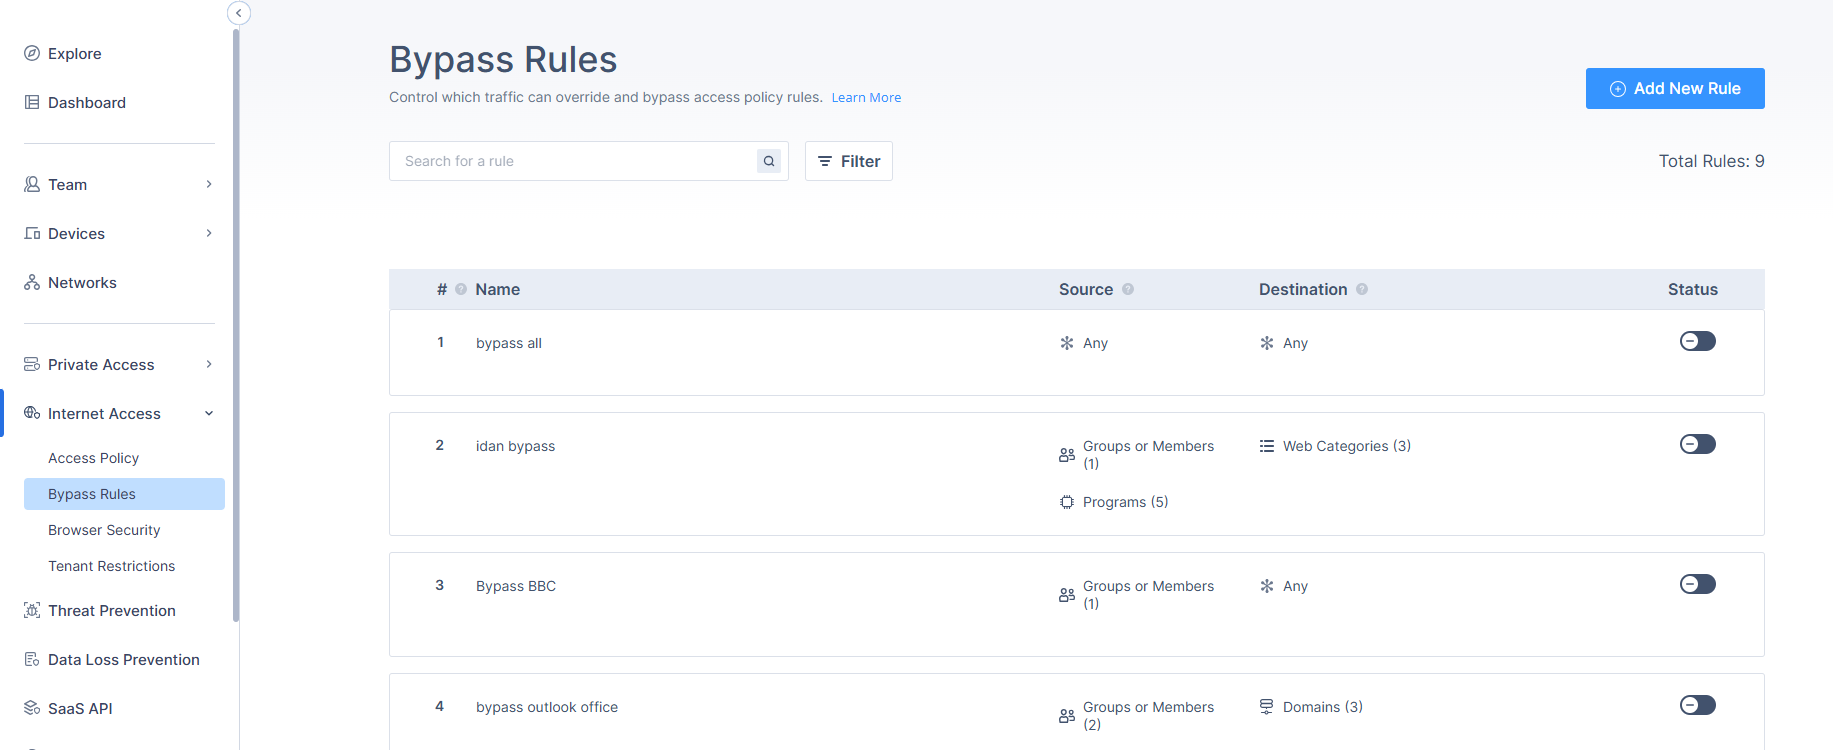
A new rule appears in the table.
Specify these:
Name
Source
Destination - For example, enter these:
*.claude.ai
*.api.anthropic.com
For more information on adding a new rule, see the Bypass Rules section in Manage Secure Web Gateway.
Turn on the Status toggle button.

Click Apply.
Step 3 - Configure the AI Client
Supported Client
Claude Desktop
GitHub Copilot
Cursor
Windsurf
Any MCP compatible AI Client
Note: Due to the nature of Check Point SASE API calls and the variety of server tools, using this server may require a paid subscription to the AI client provider to support token limits and context window sizes.
For smaller models, you can reduce token usage by limiting the number of enabled tools in the client.
Management Host and Origin
Use these values according to your regions:
For US Data Residency:
MANAGEMENT_HOST:
https://api.perimeter81.com/apiORIGIN:
https://tenant.perimeter81.com
For Other Regions:
MANAGEMENT_HOST:
https://api.<region>.sase.checkpoint.com/apiORIGIN:
https://tenant.<region>.sase.checkpoint.com
Replace, <region> with your Check Point SASE region (for example: eu, in, au).
Note:
Using incorrect region values will result in authentication or connection failures.
Configuring Claude Desktop
For macOS:
Open Terminal.
Run this command to check if the claude_desktop_config.jsonfile is available:
JSON
ls"$HOME/Library/Application Support/Claude/claude_desktop_config.json"If the file is not available, create the file using this command:
JSON
touch "$HOME/Library/Application Support/Claude/claude_desktop_config.json"To open the file in TextEdit, run:
JSON
open -e "$HOME/Library/Application Support/Claude/claude_desktop_config.json"Add the below configuration to the JSON file:
JSON
{
                        "mcpServers": {
                        "harmony-sase": {
                        "command": "npx",

                        "args": ["@chkp/harmony-sase-mcp"],

                        "env": {
                        "API_KEY": "your-harmony-sase-api-key",

                        "MANAGEMENT_HOST": "<MANAGEMENT_HOST>",

                        "ORIGIN": "<ORIGIN>"
                        }
                        }
                        }
                        }
Replace:
your-harmony-sase-api-keywith your Check Point SASE API Key. See step 8 in Generating API Credentials.<MANAGEMENT_HOST>and<ORIGIN>. See, Management Host and Origin.
For Windows:
Press Win+R.
The Run window appears.From the Open list, select cmd.
To open the configuration file, run:
JSON
code %APPDATA%\Claude\claude_desktop_config.jsonAdd the below configuration to the JSON file:
JSON
{
                        "mcpServers": {
                        "harmony-sase": {
                        "command": "npx",

                        "args": ["@chkp/harmony-sase-mcp"],

                        "env": {
                        "API_KEY": "your-harmony-sase-api-key",

                        "MANAGEMENT_HOST": "<MANAGEMENT_HOST>",

                        "ORIGIN": "<ORIGIN>"
                        }
                        }
                        }
                        }
Replace:
your-harmony-sase-api-keywith your Check Point SASE API Key. See step 8 in Generating API Credentials.<MANAGEMENT_HOST>and<ORIGIN>. See, Management Host and Origin.
Configuring Visual Studio (VS) Code
Open Visual Studio (VS) Code.
Open the Command Palette (Ctrl+Shift+P).
Search for MCP: Open User Configuration.
Edit the mcp.json.
Add these configuration:
JSON
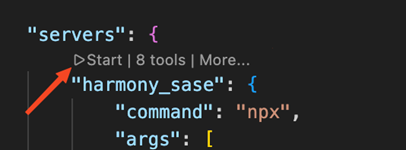
    "servers": {
        "harmony_sase": {
            "command": "npx",
            "args": [
                "@chkp/harmony-sase-mcp"
            ],
            "env": {
                "API_KEY": "<API_KEY>",
                "MANAGEMENT_HOST": "<MANAGEMENT_HOST>",
                "ORIGIN": "<ORIGIN>"
            },
            "type": "stdio"
        }
    }
Replace:
your-harmony-sase-api-keywith your Check Point SASE API Key. See step 8 in Generating API Credentials.<MANAGEMENT_HOST>and<ORIGIN>. See, Management Host and Origin.
Save the file and click Start to launch the server.
(Optional) To validate the configuration, open your AI assistant (for example, Copilot Chat in Visual Studio Code) and ask: List all Check Point SASE networks.
A successful response confirms the MCP server is configured correctly.
Configuring Windsurf
Open Windsurf.
Go to Windsurf Settings.
In the search bar, search for mcp.
Add the below configuration to the JSON file:
JSON
{
                "mcpServers": {
                "harmony-sase": {
                "command": "npx",

                "args": ["@chkp/harmony-sase-mcp"],

                "env": {
                "API_KEY": "your-harmony-sase-api-key",

                "MANAGEMENT_HOST": "<MANAGEMENT_HOST>",

                "ORIGIN": "<ORIGIN>"
                }
                }
                }
                }
Replace:
your-harmony-sase-api-keywith your Check Point SASE API Key. See step 8 in Generating API Credentials.<MANAGEMENT_HOST>and<ORIGIN>. See, Management Host and Origin.
Configuring Cursor
Open Cursor.
Go to Settings > Cursor Settings > MCP.
Click Add new MSP server.
Add the below configuration to the JSON file:
{
                "mcpServers": {
                "harmony-sase": {
                "command": "npx",

                "args": ["@chkp/harmony-sase-mcp"],

                "env": {
                "API_KEY": "your-harmony-sase-api-key",

                "MANAGEMENT_HOST": "<MANAGEMENT_HOST>",

                "ORIGIN": "<ORIGIN>"
                }
                }
                }
                }
Replace:
your-harmony-sase-api-keywith your Check Point SASE API Key. See step 8 in Generating API Credentials.<MANAGEMENT_HOST>and<ORIGIN>. See, Management Host and Origin.
Step 4 - Install and Access the Check Point SASE MCP Server
Install the MCP Server Tool Globally.
Open Terminal or Command Prompt.
Run:
Shell
npm install -g @chkp/harmony-sase-mcp
To clone the repository, run:
Shell
git clone <repository-url>
                cd mcp-servers/packages/harmony-sase
To install dependencies, run:
Shell
npm installTo build the project, run:
Shell
npm run buildRun the server locally:
Shell
node /path/to/packages/harmony-sase/dist/index.js
                --api-key YOUR_API_KEY
                --management-host <MANAGEMENT_HOST>
                --origin <ORIGIN>
Replace:
your-harmony-sase-api-keywith your Check Point SASE API Key. See step 8 in Generating API Credentials.<MANAGEMENT_HOST>and<ORIGIN>. See, Management Host and Origin.
Note: You can also run the server locally for development using MCP Inspector or any compatible client.