
This guide describes how to establish a WireGuard VPN connection with a network using Linux.
Prerequisites
A Linux machine with these specifications:
Kernel: Any of these packages installed:
Ubuntu (Server/Desktop) 22.04 LTS or higher
CentOS 9 or CentOS 10
RHEL 9 or RHEL 10
Packages installed:
Ubuntu - curl; dig; software-properties-common
CentOS - curl, bind-utils
For RHEL 9 or RHEL 10, install the iptables-nft-services package.
To verify that the iptables service is enabled and active, run:
systemctl status iptablesOutput:

To activate iptables, if not enabled and active, run:
systemctl enable iptablessystemctl start iptables
20 GB free disk space
2 GB RAM
Static internal IP address
Network adapter that supports bridge connection
Note - For Linux deployed on a Windows host, enable virtualization on Windows BIOS.
For High Availability (Optional)
To configure High Availability, you need:
Two Linux computers on the same local network (same LAN segment).
Both computers must reach each other through IP.
VRRP protocol (IP protocol 112) must not be blocked between the two computers.
The keepalived package (the script installs this automatically if it is missing).
A unique Virtual Router ID (VRID) on the LAN. The default is 81 and the valid range is 1–255.
Configuring a WireGuard Connector Tunnel
Configuring the Connector in the Check Point SASE Administrator Portal
Access the Check Point SASE Administrator Portal and click Networks.
Select the network.
For the gateway to which you want to add the WireGuard Connector tunnel, click and click Add Tunnel.
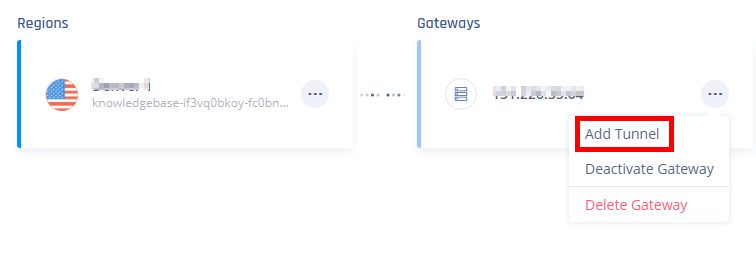
The Choose Tunnel Protocol window appears.
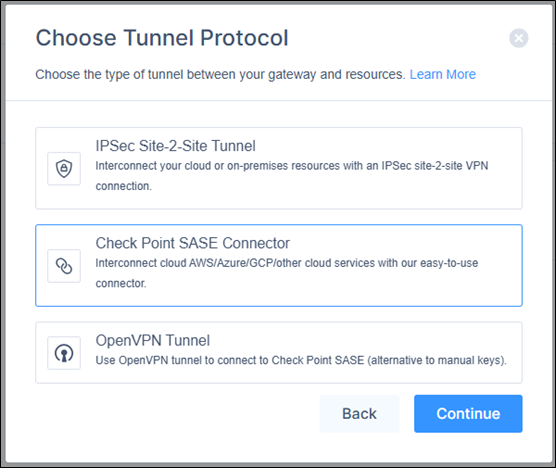
Select Check Point SASE Connector and click Continue.
The Check Point SASE Connector window appears.

In the Requirements section, read the requirements and make sure they are met. Click Next.
In the Configuration section, enter these:
Name - Name for the connector.
Endpoint - IP address of the Linux server that has the WireGuard Connector installed.
If you are using a dynamic public IP address, enter 0.0.0.0
Note - If you do not know the IP address, query the server by running this command in your Linux terminal:
dig +short myip.opendns.com @resolver1.opendns.comSubnets - Subnets of your local network.
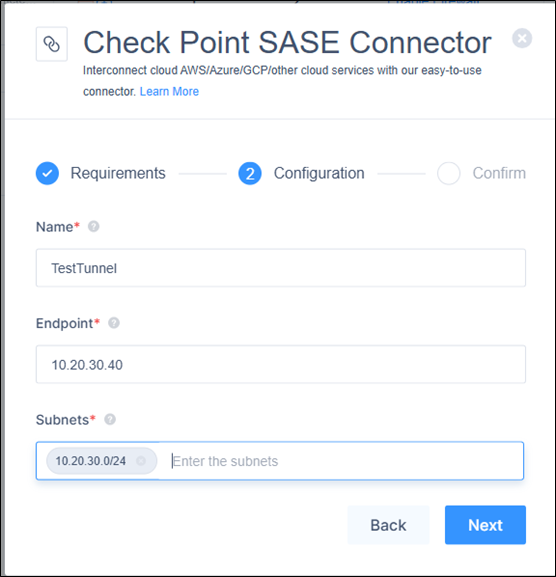
Click Next.
In the Confirm section, click Apply.
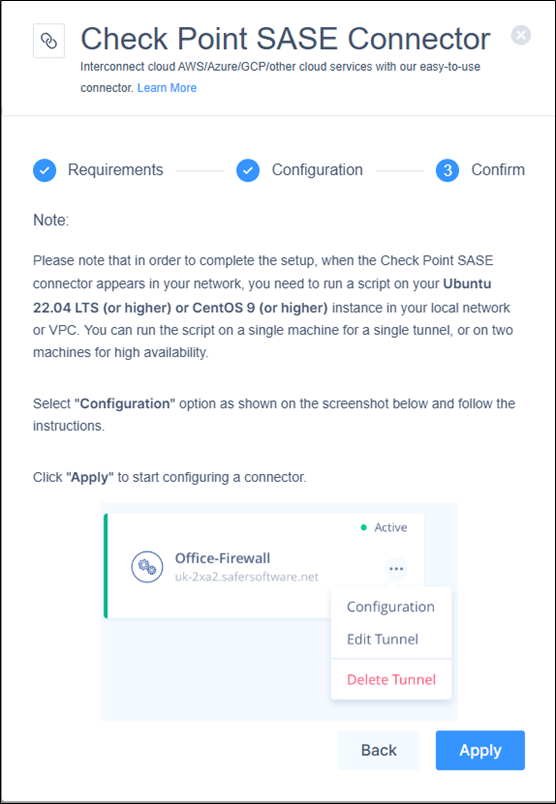
After deployment, the connector appears in the Networks page.
Installing the WireGuard Connector on a Linux Server
Access the Check Point SASE Administrator Portal and click Networks.
Click for the WireGuard Connector tunnel that you just configured and then click Configuration.
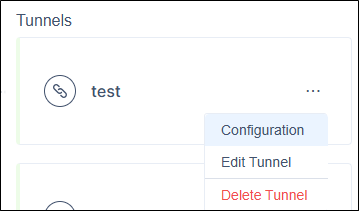
The Linux Connector window appears.
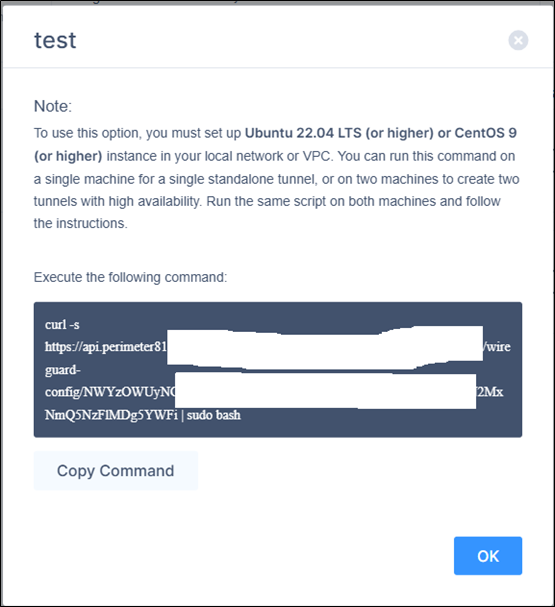
Click Copy Command.
Note -
The command is unique to each connector.
The command contains a security token that is valid for 6 hours. The 6-hour window starts when you click Configuration in Step 2, not when the command is copied. Run the command on the Linux server before the window ends.
You can run the same command multiple times within the 6-hour window. For example, on both computers in a High Availability deployment.
After the window ends, the command expires. To get a new command, access the Networks page, click ⋮ and click Configuration for the connector, then click Copy Command. This starts a new 6-hour window.
Open the Linux terminal and connect as Root user.
Run the copied command.
Select Yes at Stage 4 for access or mode - Remote Access only and follow the instructions to install the connector.
Configuring High Availability (Optional)
Overview
WireGuard Connector supports active-passive High Availability using keepalived (VRRP). Two computers are configured on the same network one actively runs the tunnel, and the other is on standby. If the active computer fails, the standby automatically takes over the tunnel within seconds. When the failed computer recovers, it becomes the new standby with no pre-emption, ensuring seamless failover without manual intervention.
Setup Flow
Run the same installation script on two computers, one after the other.
Your title goes here
Both computers use the same command. Run it on both computers within the same 6-hour window. The window starts when you click Configuration. If the window expires before you finish the second computer, open Configuration again in the portal to start a new 6-hour window, then copy and use the command.
Machine 1 (First):
Run the installation script (same command from the portal).
When prompted "Do you want to enable High Availability (HA) mode?", select Yes.
Select 1 (first computer).
Enter the IP address of the second computer.
Note the Virtual Router ID displayed (default: 81). You need this for Machine 2.
The script installs and configures keepalived, adds firewall rules for VRRP, and starts the tunnel.
Machine 2 (Second):
Run the installation script on the second computer.
Enable HA and select 2 (second computer).
Enter the IP address of the first computer.
Enter the Virtual Router ID from Machine 1 (default: 81).
The script verifies connectivity to Machine 1, configures keepalived, and enters standby mode.
How Failover Works
Both computers run keepalived, which exchanges VRRP heartbeats every second (unicast).
If the active computer stops responding after 3 missed heartbeats, the standby takes over and starts the WireGuard tunnel.
When the failed computer recovers, it becomes the new standby. No disruptive switchback occurs.
Failover completes in approximately 3 seconds.
Important - The WireGuard service is managed by keepalived in HA mode. Do not start or stop WireGuard manually with systemctl. keepalived handles this automatically.
Notes -
The Virtual Router ID (VRID) must be unique on the LAN. If another keepalived instance uses 81, the script detects the conflict and prompts for an alternative.
Firewall rules for VRRP (protocol 112) are added automatically by the script (iptables or firewalld).
Verifying the Setup
Connect to your network using the Check Point SASE Agent on a device.
Open the command line and run:
ping <Internal resource IP address>Make sure that outbound port UDP/8000 is not blocked in your firewall/router, and that you have followed all the steps.
If the issue persists, on the Linux server, collect these logs and contact Check Point Support. The logs are available in:
##Configuration file
/etc/wireguard/wg0.conf

##Connection logs
/tmp/p81-wg-connector.log
For HA deployments
On both computers, run this command to verify that keepalived is running:
systemctl status keepalivedCheck the VRRP state by running:
journalctl -u keepalivedOne computer shows MASTER and the other shows BACKUP.
Removing the WireGuard Connector
Connect to the command line of Linux server where you have installed the WireGuard Connector and run:
# Locate the WireGuard packages # (the output of this command will show you all wireguard packages installed on the machine)
dpkg -l | grep wireguard

# Delete all packages found that are associated with WireGuard
# (Run this command for each package found, replace  with the output from the previous command)
apt-get remove --purge # Locate the WireGuard packages # (the output of this command will show you all wireguard packages installed on the machine)
dpkg -l | grep wireguard
# Locate the WireGuard packages # (the output of this command will show you all wireguard packages installed on the machine)
yum list installed | grep wireguard
# Delete all packages found that are associated with WireGuard# (Run this command for each package found, replace with the output from the previous command)
yum remove # Locate the WireGuard packages # (the output of this command will show you all wireguard packages installed on the machine)
yum list installed | grep wireguardFor HA deployments
Before removing WireGuard, stop and disable keepalived:
systemctl stop keepalived
systemctl disable keepalived
Remove the keepalived configuration and helper scripts:
rm /etc/keepalived/keepalived.confrm /usr/libexec/keepalived/p81-wg-*