
Understanding Internet Access Policy
Internet Access policies allows you to enhance your organization's web security, using predefined categories constantly updated by Check Point SASE, or your own custom configurations.
Administrators and IT managers can use our Internet Access policy to enforce organization security policies directly on endpoint devices to control the web traffic generated by each Member and device while managing the actual Rules, the Members on which they apply.
The Internet Access policy provides the ability to control Member or Member Groups' access to URLs and/or IP addresses based on predefined categories, custom URLs, used devices, time-based conditions, and more.
.png)
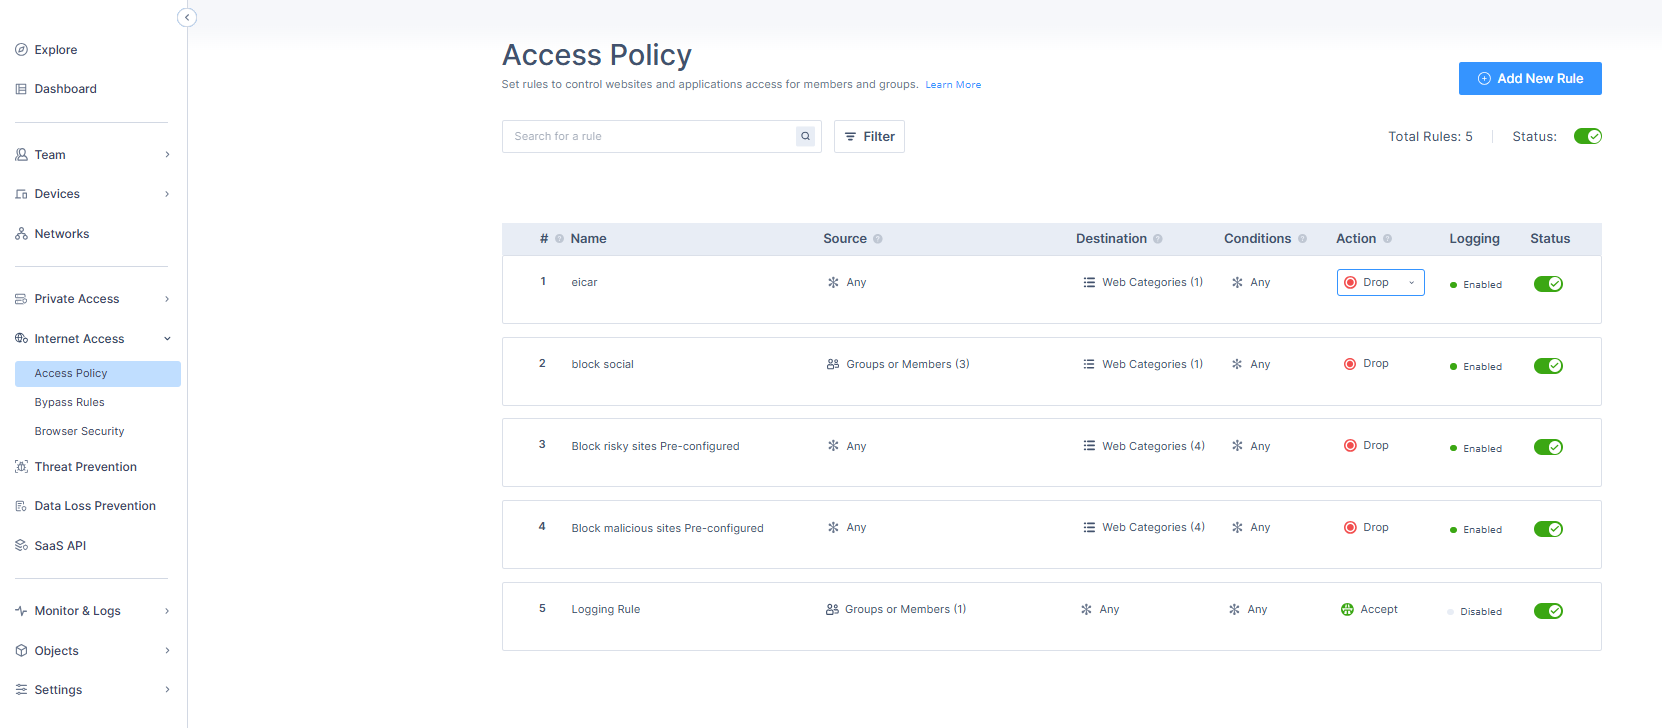
Access Policy
The Access Policy defines what users are allowed or denied access to when browsing the internet. It enables administrators to:
- Control access to web categories, for example, social media, news, gambling
- Allow or block specific URLs or domains
- Manage access to cloud-based and web applications, for example, Dropbox, YouTube, ChatGPT
These controls can be tailored per user or user group, ensuring policies are aligned with business roles and security requirements. For example, marketing teams might be granted access to social media platforms, while finance users are restricted to business-related sites only.
For Check Point SASE Linux clients, Secure Web Gateway (SWG) Access Policy rules do not support wildcard domain patterns (for example, *.example.com). Using wildcards may cause incorrect traffic evaluation or policy bypass. Use explicit domain names instead.
To view the Access Policy page, access the Check Point SASE Administrator Portal and click Internet Access > Access Policy.
| Column | Description |
|---|---|
| Name | Name of the Rule. |
| Action | Action for web traffic:
|
| Source |
|
| Destination | Destination of the web traffic generated by the source (Any, Web Categories, Custom URLs, Applications, or Updatable Objects). |
| Conditions | Allows admin to define time-based constraints for each rule. When a condition is applied, the rule is enforced only during the specified time frame (example: weekdays between 9:00 AM and 6:00 PM). This enables administrators to create policies that adapt to business hours, shift schedules, or specific access windows, for example, restricting access to social media sites outside of working hours. If no condition is set, the rule applies at all times. |
The end user needs to confirm the warning message, so it do not show the alert for the inspected resource for the next 24 hours.
Application Policy
Application Policy enables you to monitor, manage, and enforce access control over the SaaS applications used in an organization. It uses state of the art applications catalog and detection engine to accurately recognize and classify SaaS applications based on their behavior, signatures, and traffic patterns.
Support
Minimum agent version supported is 11.5.
Configuring Access Policy
To configure Access Policy, go to the Internet Access tab in the Check Point SASE Management Console platform:
- Go to Internet Access > Access Policy.Note - The access policy is a first-match-rule base.
- Add the relevant Access Policy by clicking on (+) Add New Rule:
- Name - Enter a name for the rule.
- Action - The type of Action that should be applied on the web traffic when the Rule is matched (Accept, Drop, or Warn).
- Drop - Web traffic is blocked.
- Accept- Web traffic is allowed.
- Warn - Web traffic is allowed, and an alert is triggered in the Monitoring Logs.
- Source- The specific Groups or Members to which the Access Policy Rule should be applied. Add user or group list to which you want to apply the rule.
- Click Add Source.
- Select Any or groups or members from the list.

- Click Apply.
- Destination - The destination of the web traffic generated by the Source (Web categories and/or Custom URLs and/or Applications and/or Updatable Objects).
- Click Add Destination.
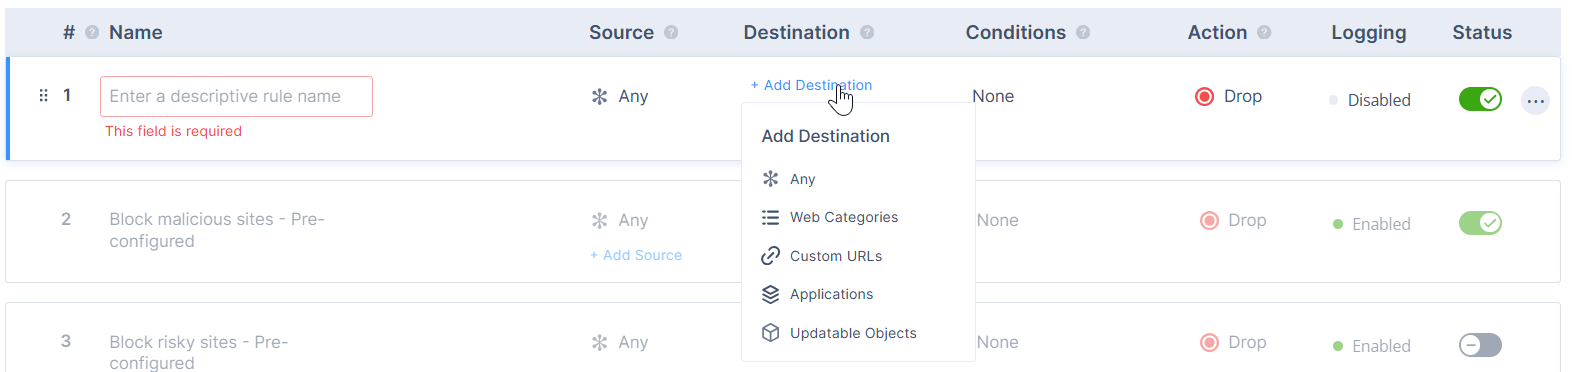
- To apply the rule to all destinations, select Any.
- Click Apply.
- To add web categories, select Web Categories.
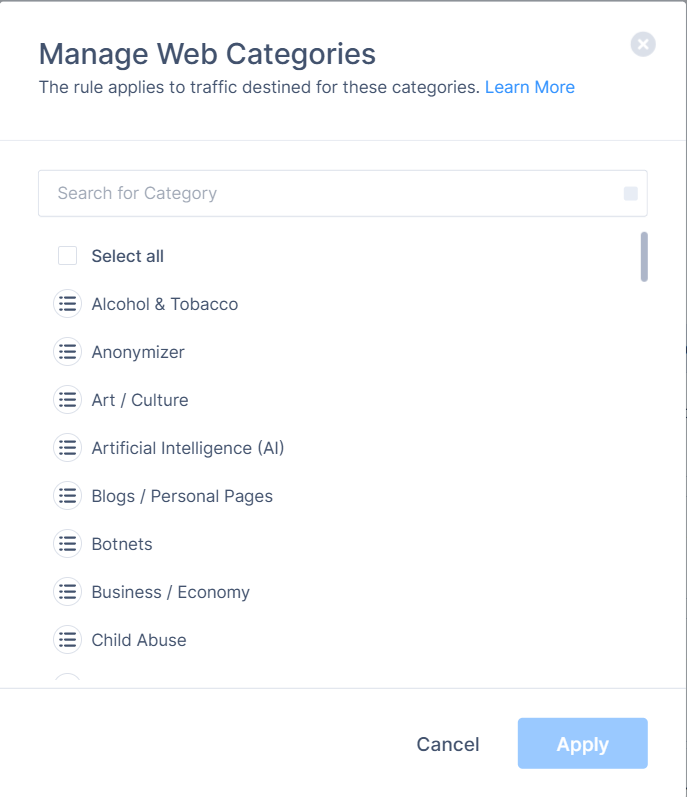 The Manage Web Categories window appears.
 - Select the categories from the list.
- Click Apply.
- To add custom URLs, select Custom URLs.
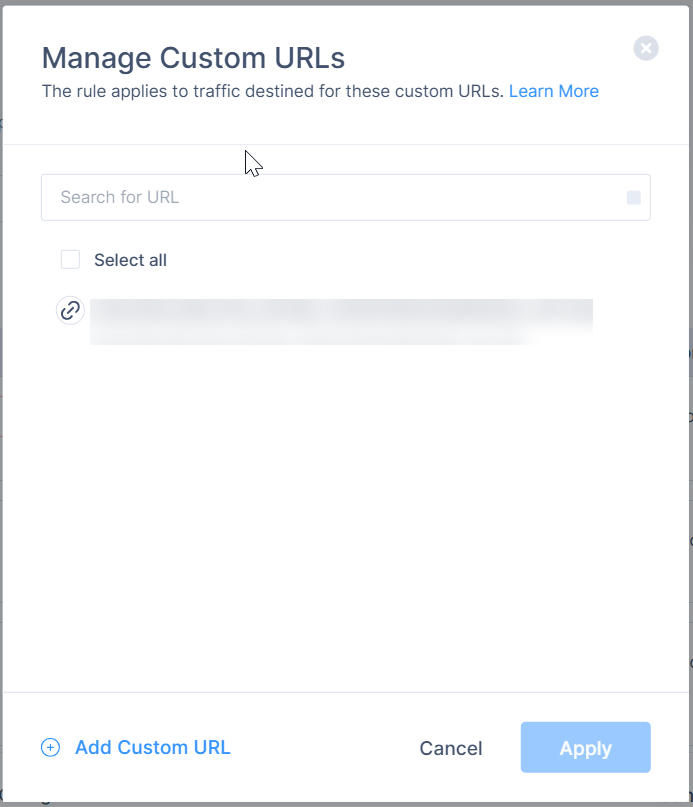 The Manage Custom URLs window appears.
 - Select the custom URL. If the URL is not listed, click Add Custom URL and specify these and click Add URL:
- Name
- Description
- URL
Optionally, click Upload .CSV to upload a .csv file with list of URLs.
- Click Apply.
- To add Application, select Applications.
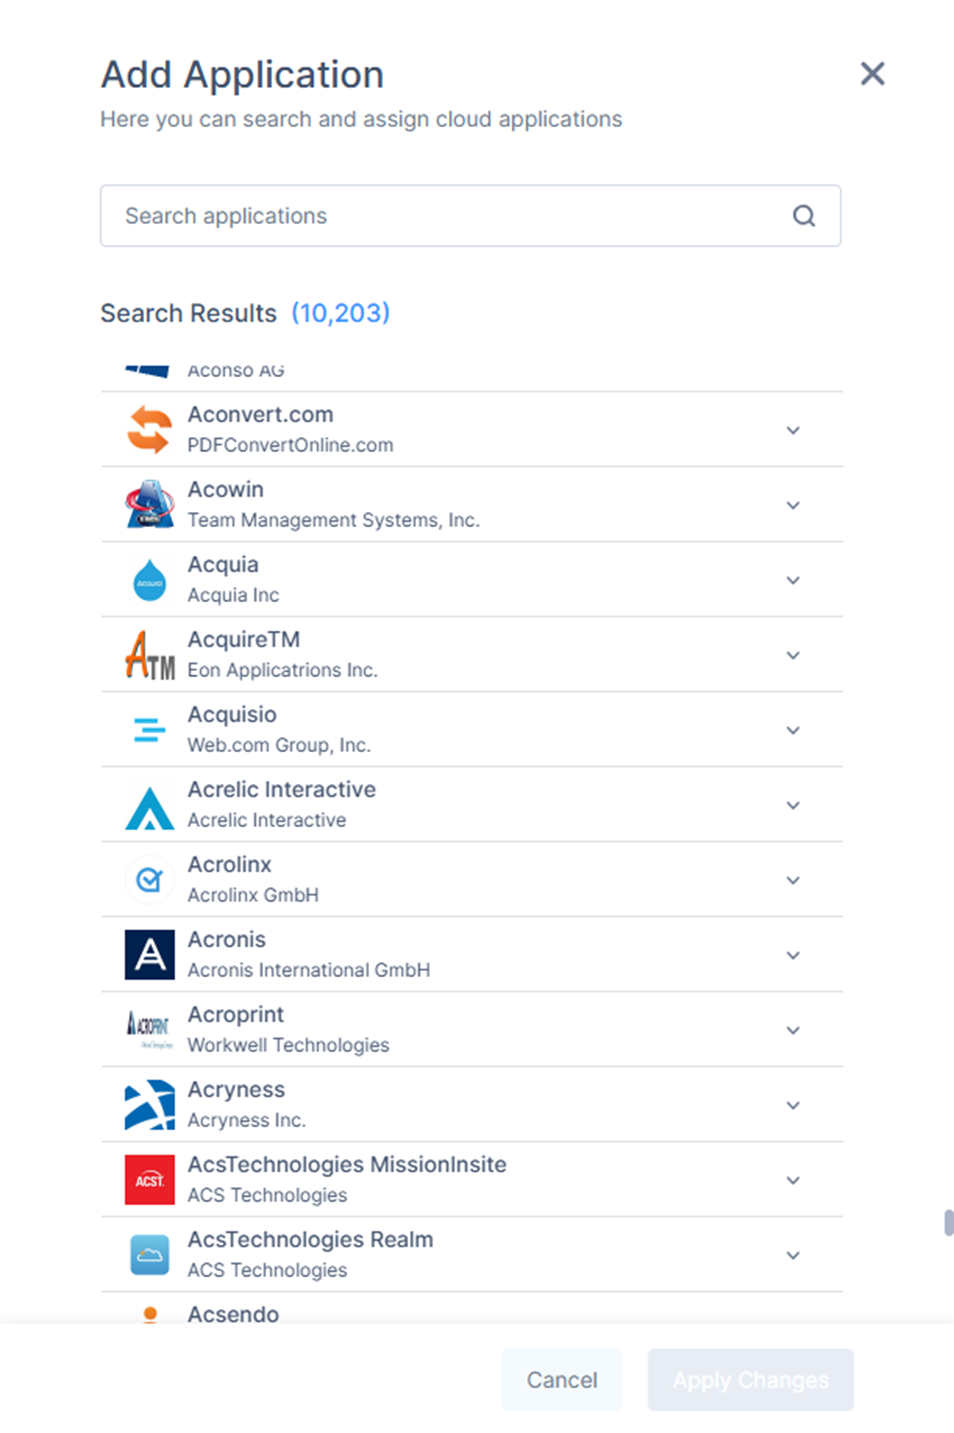 The Add Application window appears.
 - Search the application and click + to select the application.
- Click Apply Changes.
- To add updatable objects, select Updatable Objects.
For more information, see Updatable Objects.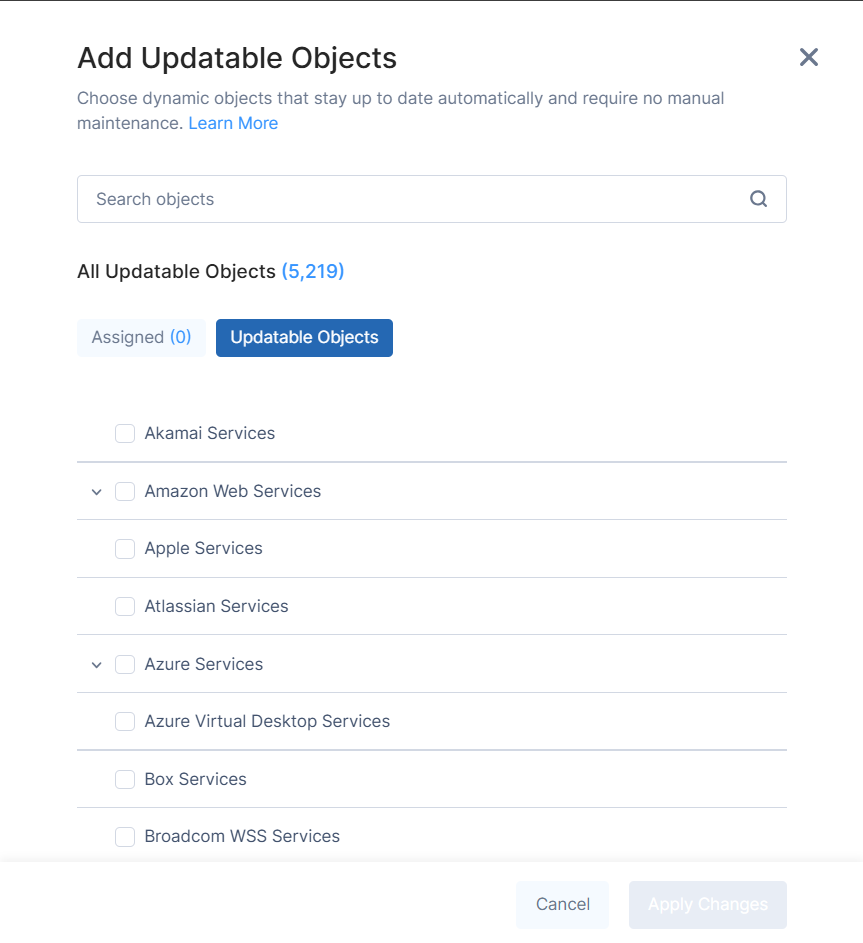
The Add Updatable Objects window appears. - Use the Search Objects field to find services, or click Updatable Objects to select the required services.
Selected services appear under the Assigned tab. - Click Apply Changes.
- Click Add Destination.
- Conditions - When the Access Policy should be enforced (Anytime / At specific days and times)
- Turn on the Status toggle button, to activate this rule.
- Once the Access Policy are defined, Click Apply.

- Click Apply.DisclaimerURLs containing protocols, queries, parameters, or anchors are not supported.
Tenant Restrictions
For more details, see Tenant Restrictions.
HTTPS Inspection Policy
The HTTPS Inspection
To view the HTTPS Inspection Policy page, access the SASE Administrator Portal
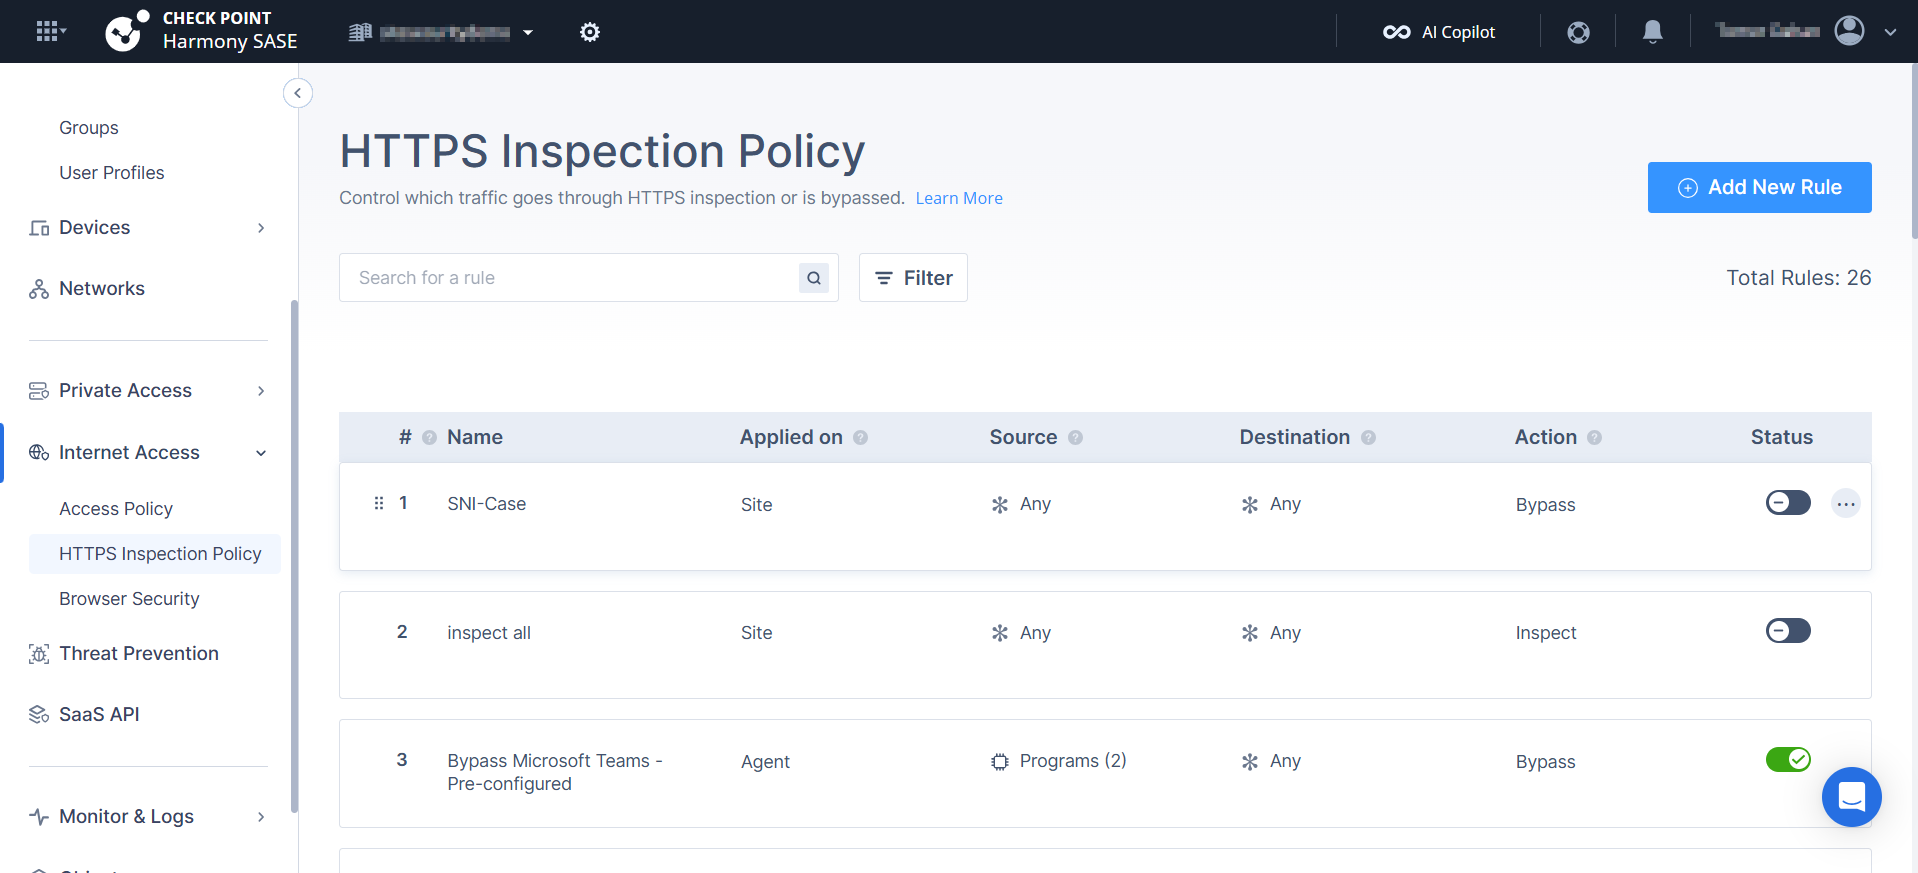
Column | Description | ||||||||
|---|---|---|---|---|---|---|---|---|---|
Name | Name of the rule. | ||||||||
Source | Programs, groups, or members to which the rule is applied. When multiple items of the same type are configured, OR logic is used. Programs, groups or members to which the bypass rule is applied. Source value depends on value selected in Applied on column:
| ||||||||
Destination | Destination of the web traffic. | ||||||||
Action | Action for web traffic:
| ||||||||
Logging | Enables logging for the rule. | ||||||||
Status | Enables or disables the rule. |
Creating an HTTPS Inspection Policy Rule
Access the SASE Administrator Portal
Click Add New Rule.
A new rule appears in the table.
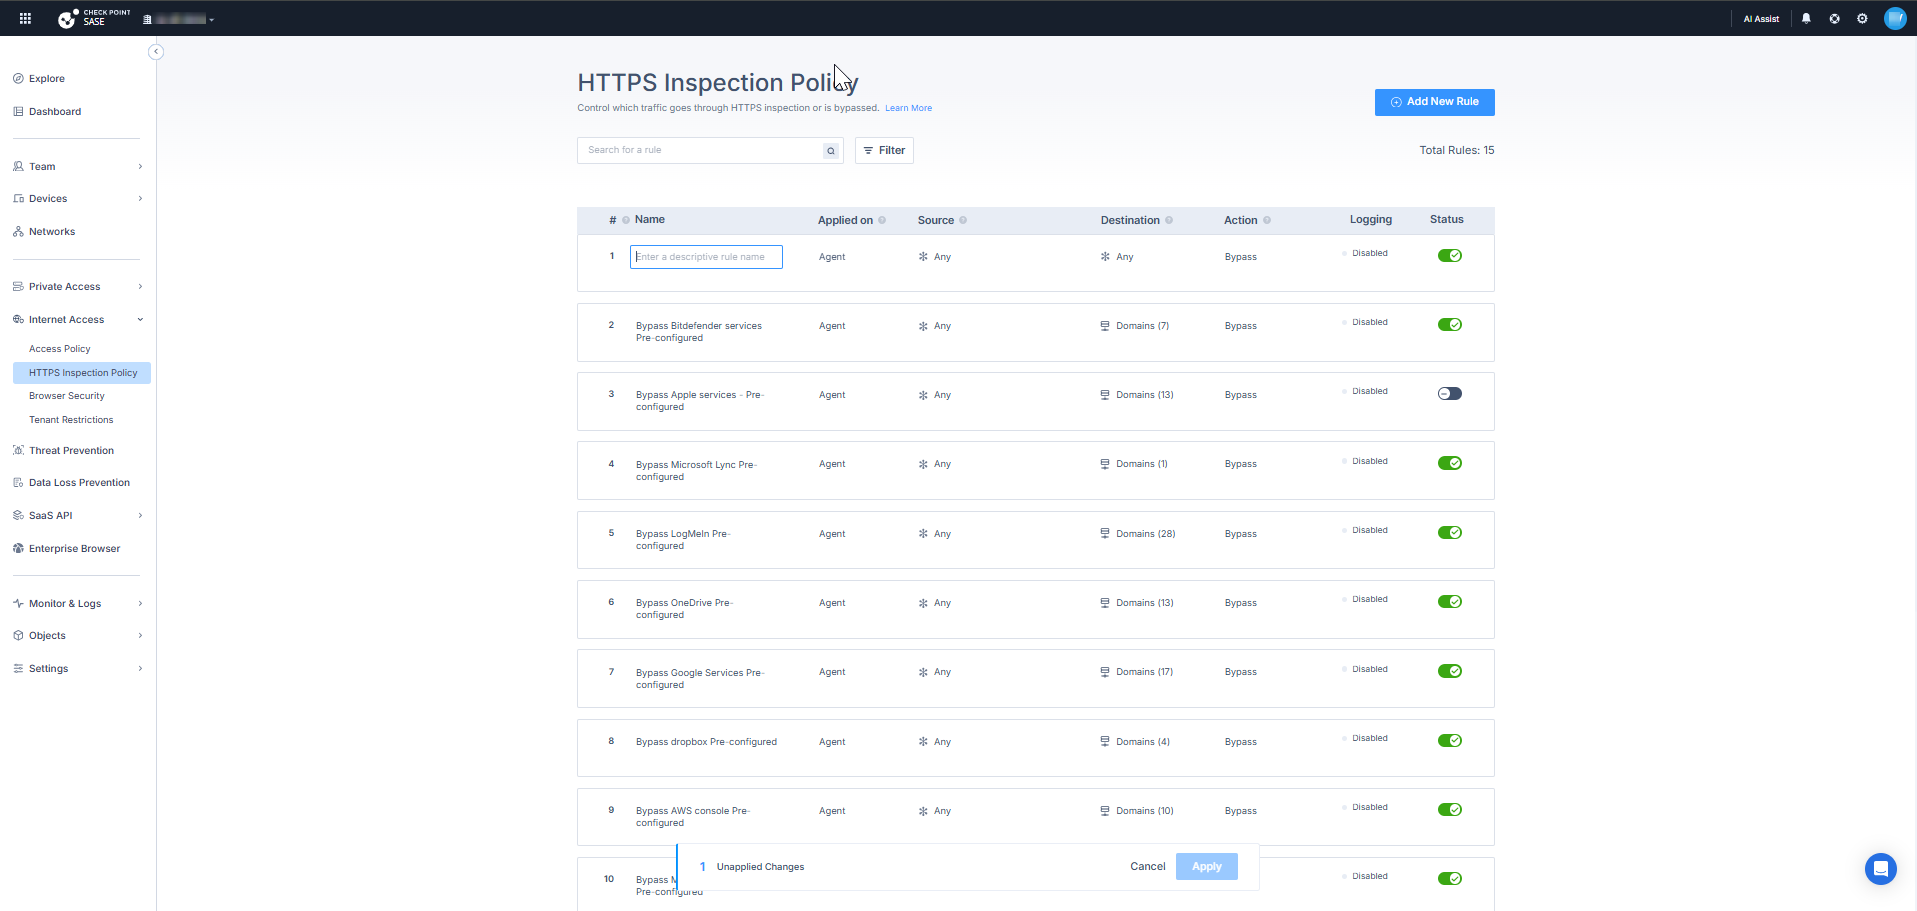
In the Name field, enter a name for the rule.
In the Applied on field, select these options:
Site
Agent
- Note -Action for the rule. Inspect is available only when Applied on is set to Site. For Agent and Agent & Site, the action is Bypass only.
In the Source field, add user or group list to which you want to apply the rule. Default is Any.
Click Any > Add Source.
Configuring the Source
To add groups or members:
Select Groups or Members.
The Manage Groups or Members window appears.
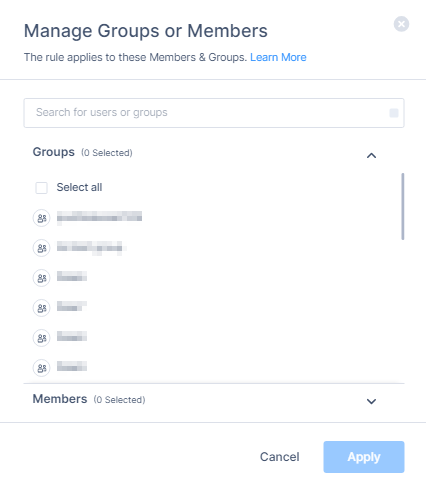
Select group(s) or member(s) from the list.
Click Apply.
To add programs:
Select Programs.
The Manage Programs window appears.
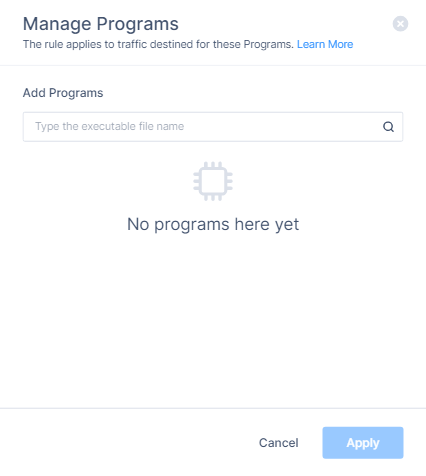
Enter the program name and press Enter.
Click Apply.
Note -- When both Groups / Members and Programs are defined in the Source field, the bypass rule is enforced only when both conditions match (AND relationship).
- Traffic must originate from a user or group that matches the Groups / Members selection and from a process that matches the Programs selection. If only one condition is met, the rule is not triggered.
- Within the Destination field, multiple items use OR logic. The rule matches if the traffic targets any one of the defined destinations.
Configuring the Destination
In the Destination field, select the destination. Default is Any.
Click Any > Add Destination.
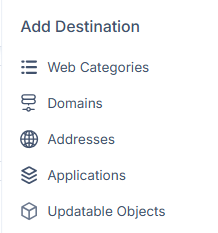
You can add these destination types:
- Web Categories
- Domains
- Addresses
- Updatable Objects
Web Categories
To add web categories, select Web Categories.
The Manage Web Categories window appears.
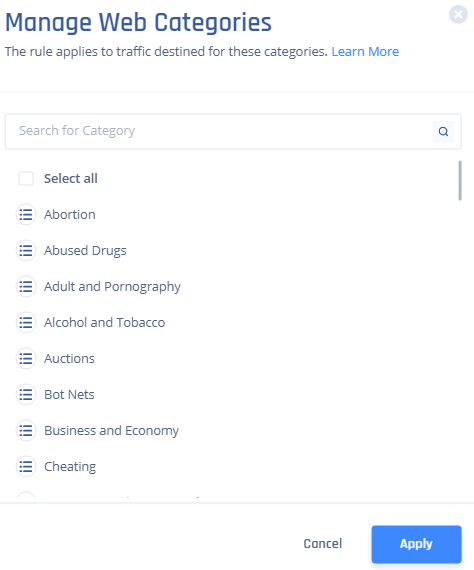
Select the categories from the list.
Click Apply.
Domains
To add domains, select Domains.
The Manage Domains window appears.
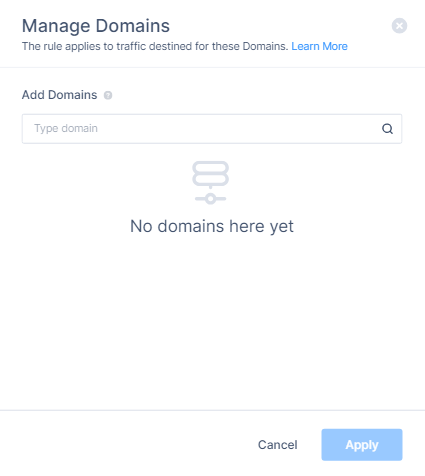
Enter the domain name and press Enter. For example,
google.com.Click Apply.
Addresses
To add addresses, click Addresses.
The Manage Addresses window appears.

Select the address from the list and click Apply.
To add new address, click Add New Address.
The Add Address window appears.
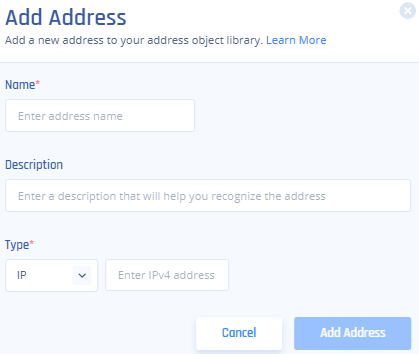
In the Name field, enter address name.
In the Description field, enter a description.
In the Type list, select IP, Subnet, List, or FQDN.
Enter a value, For example:
For IP, enter the IPv4 address 139.1.1.1.
For subnet, enter 10.10.10.0/24.
For list, enter IP addresses separated by commas 172.16.254.1, 172.16.254.2.
For FQDN, enter the Fully Qualified Domain Name www.example.com.
Click Add Address.
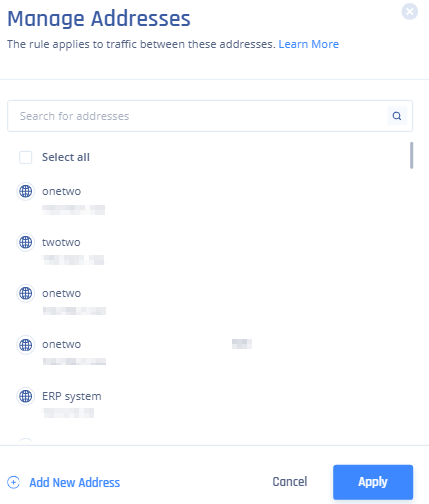
Select the address from the list and click Apply.
Note -The application list available for bypass rules is a curated subset of the APPI catalog, filtered to applications that have reliable pre‑inspection identification signals. Not every application in the Access Policy catalog is available in the bypass picker. Application availability may vary.
Updatable Objects
- To add updatable objects, select Updatable Objects.
For more information, see Updatable Objects.
The Add Updatable Objects window appears.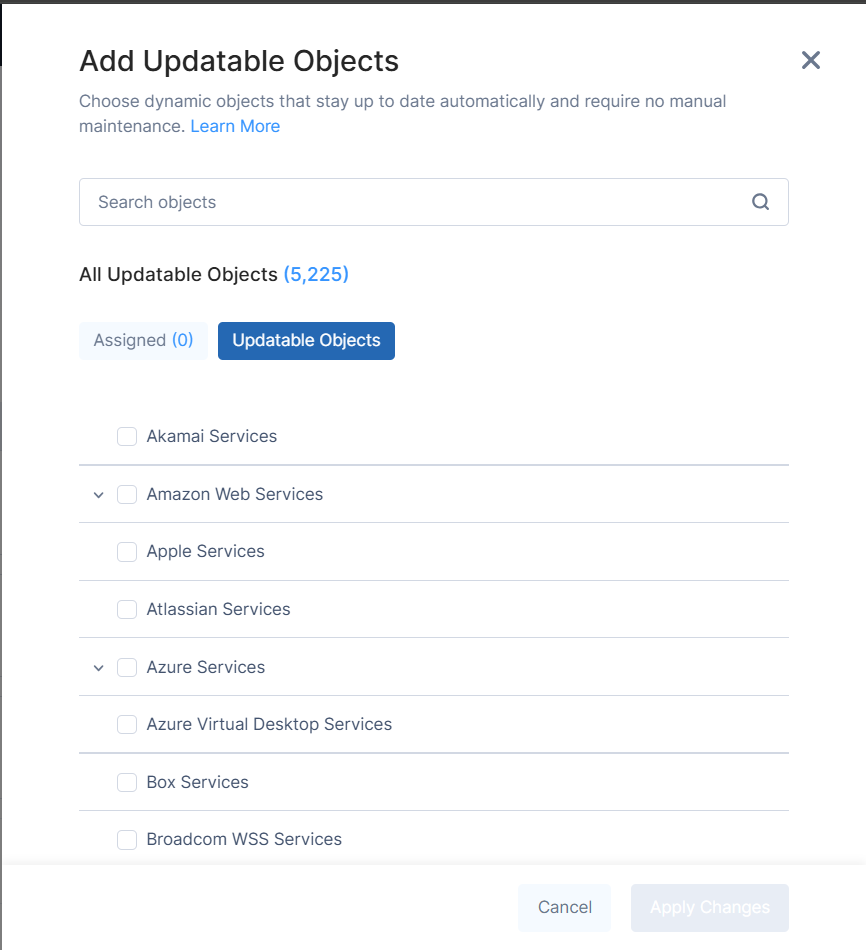
- Use the Search Objects field to find services, or click Updatable Objects to select the required services.
- Selected services appear under the Assigned tab.
- Click Apply Changes.
HTTPS Inspection Logs
When HTTPS Inspection is active, some traffic is bypassed instead of inspected. This can occur because of bypass rules, certificate pinning requirements, or program-based exclusions. Without visibility into bypassed traffic, it can be difficult to troubleshoot application issues or confirm that sensitive traffic is excluded correctly.
HTTPS Inspection Logs show bypassed traffic per session. Each log entry includes the source user, destination domain, URL category, and the rule that triggered the bypass.
You can use HTTPS Inspection Logs to:
- Troubleshoot applications that break under inspection, such as those using certificate pinning
- Verify that bypass rules are matching the intended traffic
- Audit which users and destinations are excluded from inspection
- Identify misconfigured rules generating unexpected bypasses
Enabling logging
To enable logging:
- Open your HTTPS Inspection policy.
- Locate the rule for which you want to collect logs.
- Click ... and click Enable logging.
 After logging is enabled, bypassed traffic that matches the rule appears in HTTPS Inspection Logs.
Prerequisites
Check Point SASE Agent version 12.7 or later.
What gets logged
Each log entry represents a browsing session to a domain, not individual requests. For example, navigating to facebook.com generates one log entry for facebook.com. Embedded assets and artifact requests from that page are not logged separately.
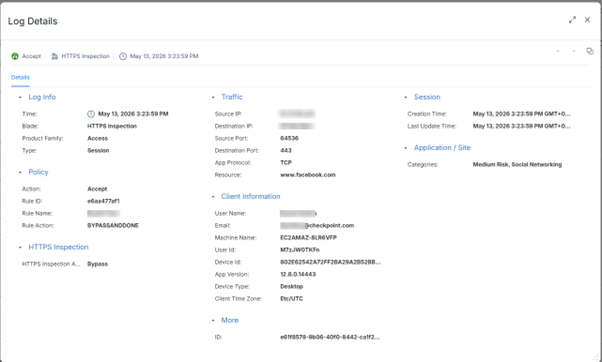
Each entry includes the source user, destination domain and URL, URL category, the rule that matched, and, where applicable, the program that initiated the connection.
Limitations
- Logs are only available for rules where Applied On is set to Agent.
- Logs are off by default for all rules. Enable logging per rule as required. Enabling logging on broad rules can generate a high volume of log entries.
- Only bypass actions are logged in this view. Inspected traffic is not logged in this view. To log inspected traffic, configure logging in your Access Policy rules.
- Application enrichment is not available, as it requires full inspection.
- Program-based bypass rules do not generate logs.
Finishing the Rule
- Turn on the Status toggle button.
- Click Apply in the bottom of the page.

- Click Apply.