
Introduction
In this guide, you'll learn how to set up redundant tunnels between your Check Point SASE network and Google Cloud Platform (GCP).
Implementing redundancy ensures consistent connectivity, minimizing potential downtime, and maintaining secure access to your cloud resources at all times.
Breakdown of topics
- Pre-requisites
- Configuration Steps
- Verifying the Setup
- Troubleshooting
- Support Contacts
Pre-requisites
To successfully follow this guide, you should have:
- An active Check Point SASE account and network.
- The Check Point SASE app is installed on your devices.
- An active GCP account with admin permissions.
Configuration Steps
Create Check Point SASE Gateways
- Your Check Point SASE Network will need to have at least two different gateways in the same network, as listed below.
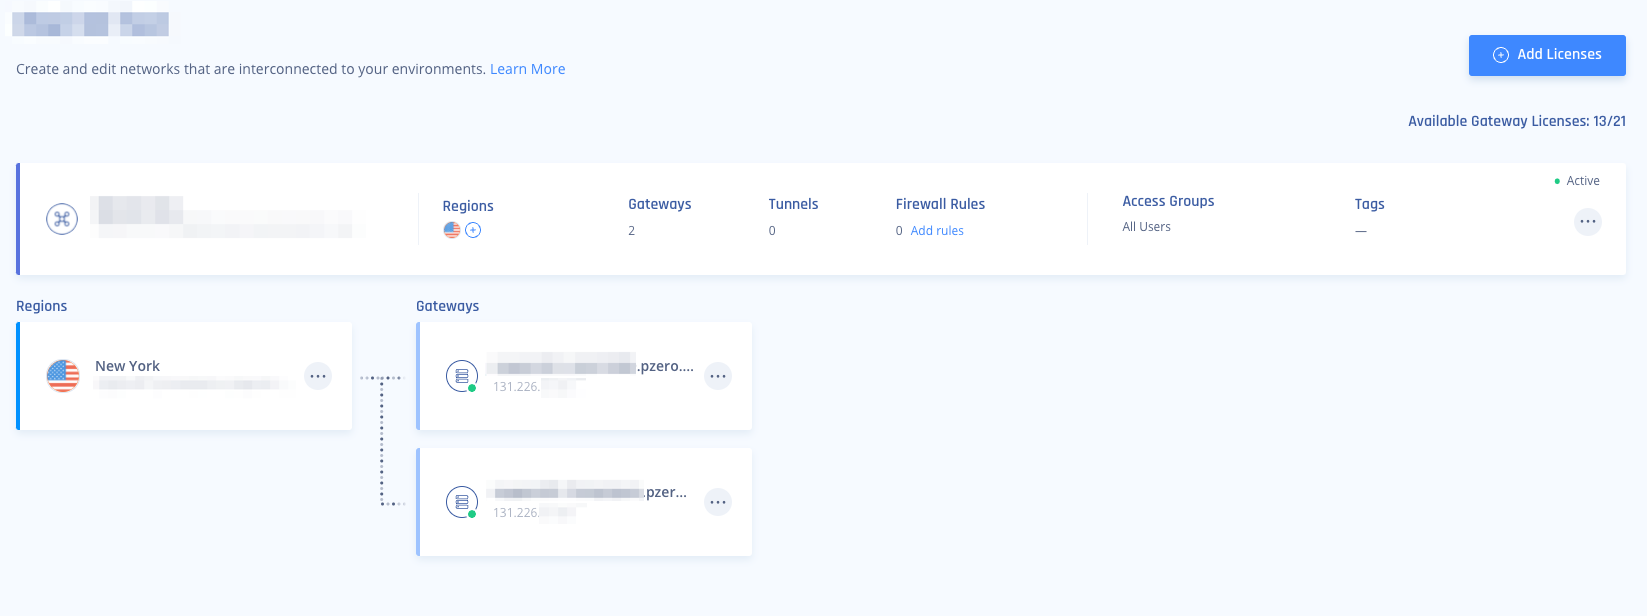
- These gateways can be deployed in two separate Regions for comprehensive ISP redundancy.
- The network can be scaled up and adding another region should not affect the connection.
Configuring a VPN Gateway in GCP
You will need to create a VPN Gateway in your Google Cloud Platform, configure a GCP Cloud router, and add a High Availability tunnel matching the Check Point SASE Gateways above.
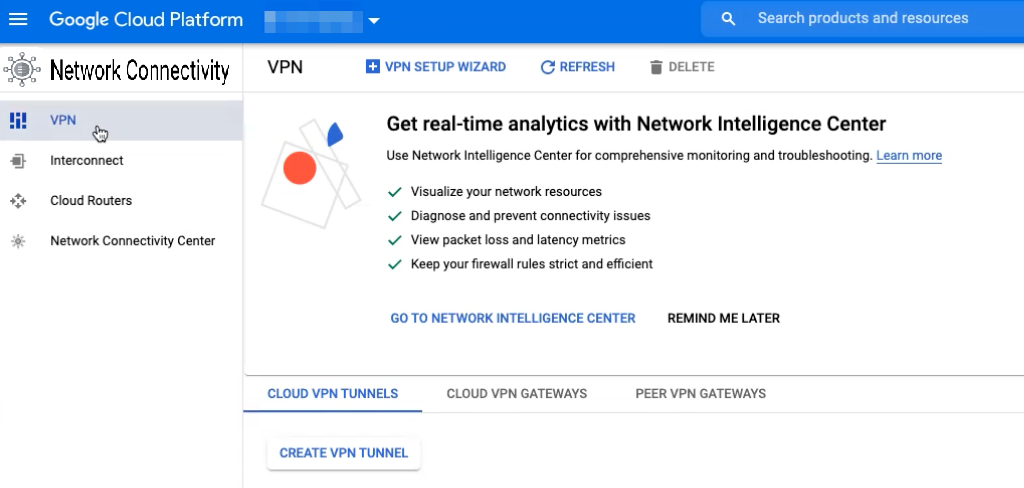
- In your GCP portal under Network Connectivity Click VPN.
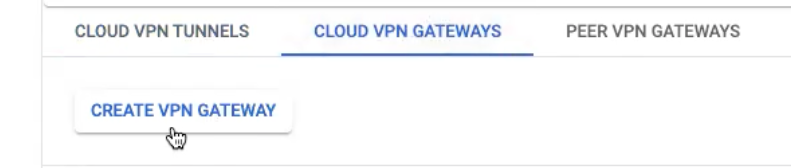
- Click Cloud VPN Gateways -> Create VPN Gateway.
- Configure the VPN Gateway and click Create.
- Name: Select a name that will represent the Check Point SASE gateway you are connecting to.
- Network: Select the GCP Network you would like to access remotely via Check Point SASE.
- Region: Make sure you select the correct region where your resources are.
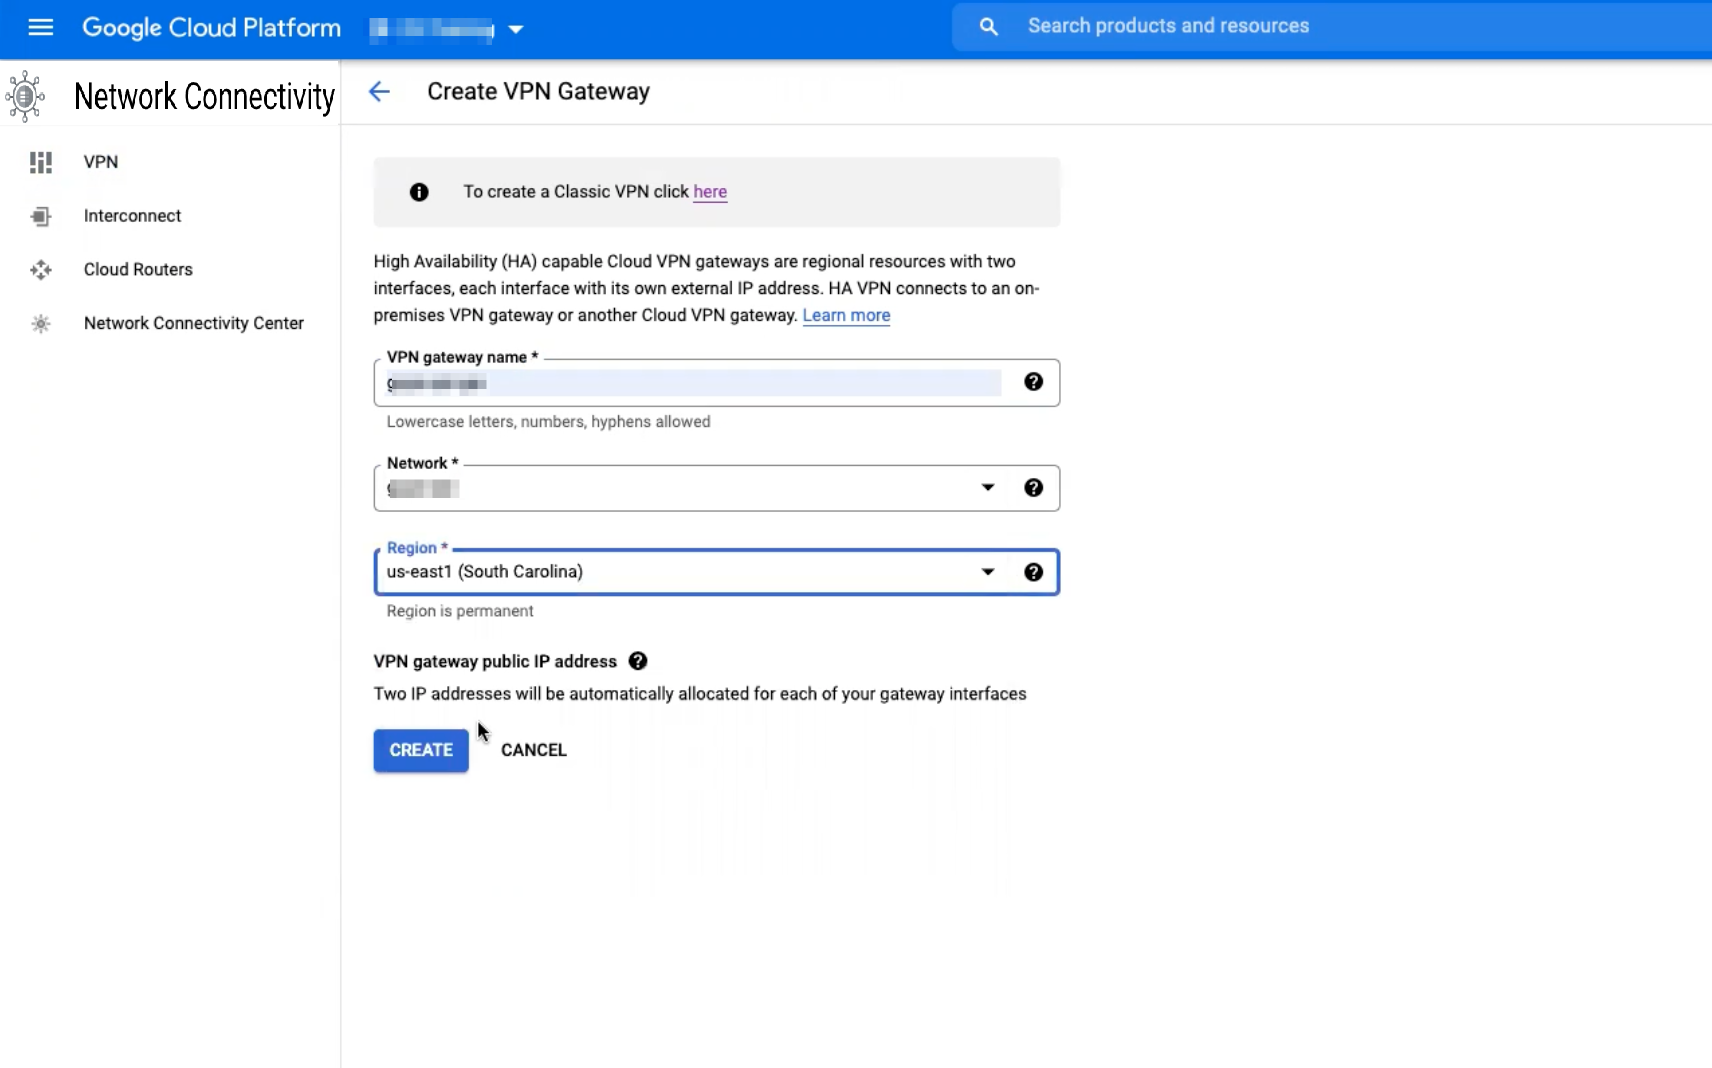
- Two interfaces are created (Interface 0/Interface 1)
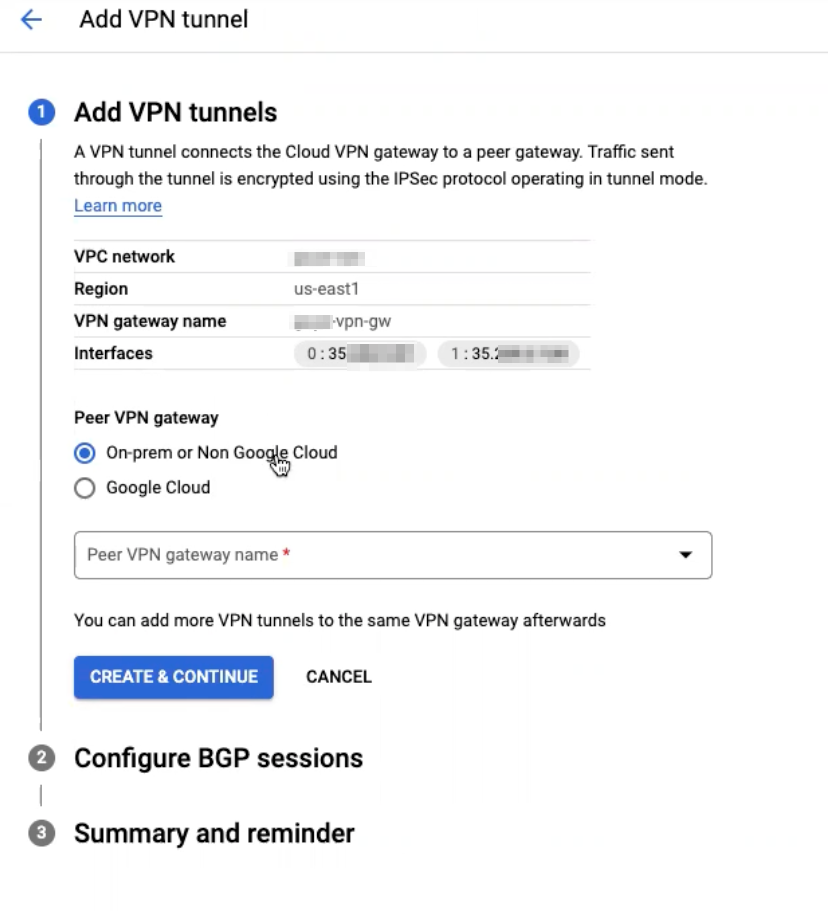
- Click"Add VPN Tunnel".
.png)
- Click"Add VPN Tunnel".
Add a redundant VPN tunnel in GCP
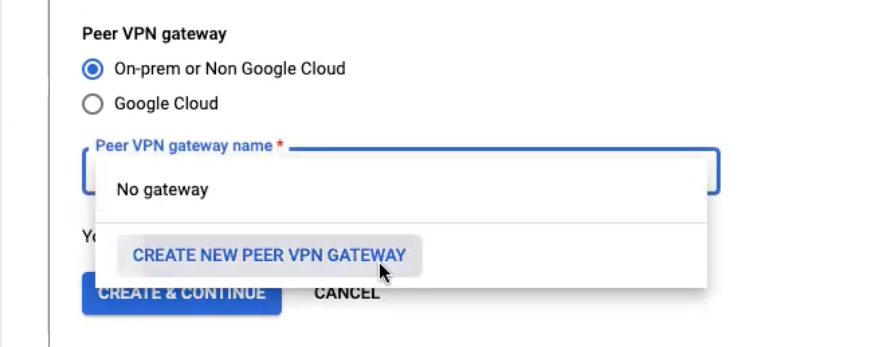
- Peer VPN gateway: Select On-prem or Non-Google Cloud.
- Click the drop-down menu next to "Peer VPN gateway name" and select "Create new peer VPN Gateway".
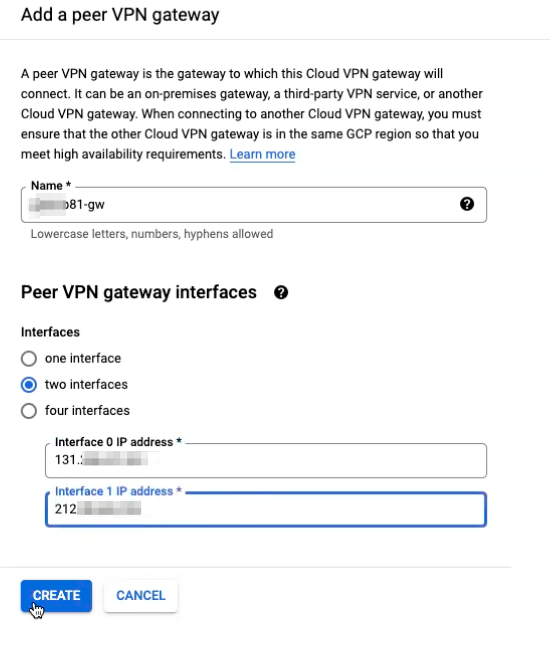
- Name the peer VPN gateway: This represents the Check Point SASE side of the setup.
- Under "Peer VPN gateway interfaces", select "two interfaces"
- Under Interface 0 IP address, paste the first Check Point SASE gateway IP.
- Under Interface 1 IP address, paste the second Check Point SASE gateway IP.
- Click "Create"
- Under High availability, make sure "Create a pair of VPN tunnels" is selected.
- Under "Routing options"; click the "Cloud Router" drop-down menu, and select "Create a new router".
- Name your Cloud router- This component in GCP will manage your BGP ASN routes.
- Set "Google ASN" to 65511 (This can be any value, please make note of this as it will be added to the Check Point SASE side later).
- **Optional- Complete the following steps only if you have a peered VPC you need to reach through the tunnel:
- Under “Advertised routes” select Create custom routes.
- Select Advertise all subnets visible to the Cloud Router.
- Under “Custom ranges” click on ADD CUSTOM ROUTE.
- Under “New custom route” insert the network CIDR for the peered VPC and click DONE.
- Repeat the last two steps for each range you need to route through the tunnel.
- Click create.
- Under VPN tunnel, select the first VPN tunnel and name it according to the gateway you created on Check Point SASE.
- Under IKE pre-shared key, click generate and copy IKE pre-shared key.
- Special characters are not permitted and should be removed from this field (with the exception of dots ".", and underscores "_").
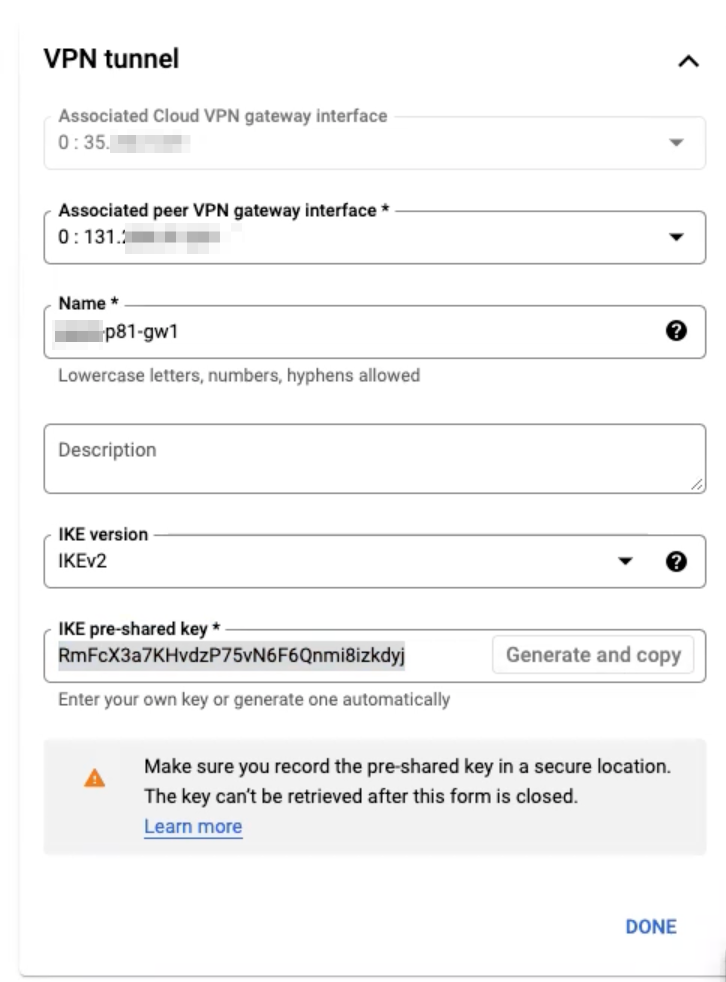
- Select the second VPN tunnel and name it according to the secondary gateway on Check Point SASE.
- Under IKE pre-shared key, paste the IKE pre-shared key you copied before
.png)
- Note: We will use this IKE Pre-shared key later to establish a handshake between the sites.
- Click Done.
- Under IKE pre-shared key, paste the IKE pre-shared key you copied before
- Click "Create and continue".
Configure BGP routes
- Click Configure next to the relevant tunnel.
.png)
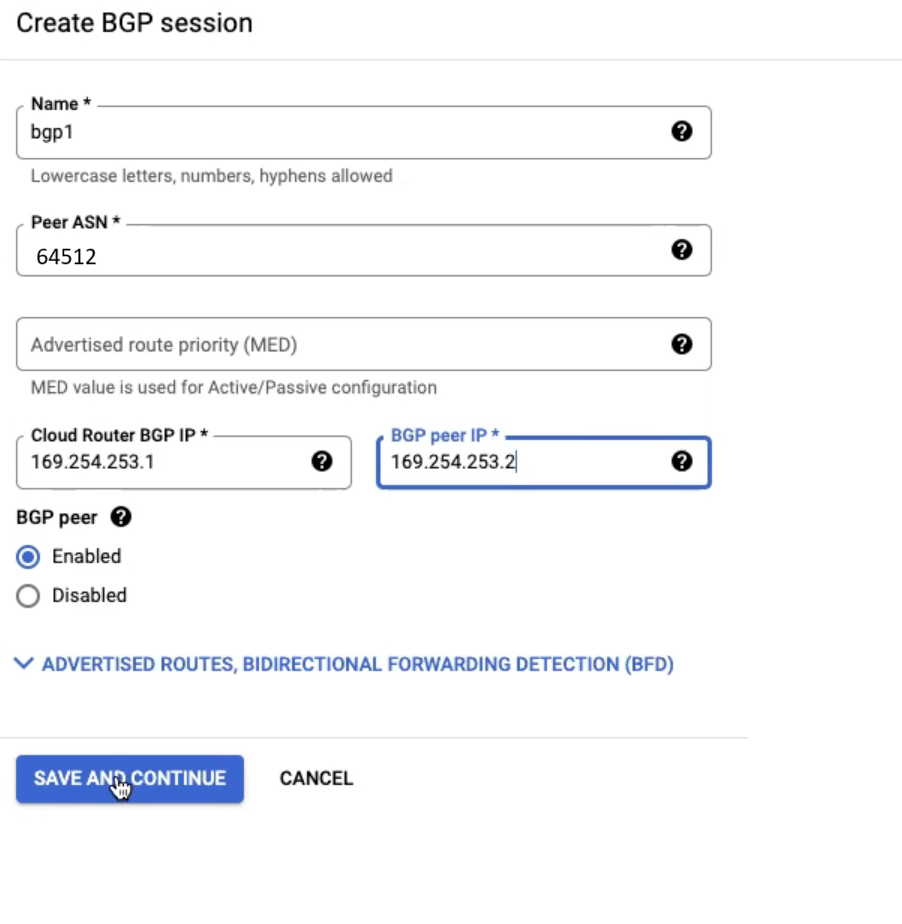
- Set BGP routes for Tunnel 1 according to the image below and click Save and Continue.
- Peer ASN is set to 64512 and represents the BGP route for Check Point SASE.
- For Cloud Router BGP IP and BGP Peer IP select a unique Link-local address.
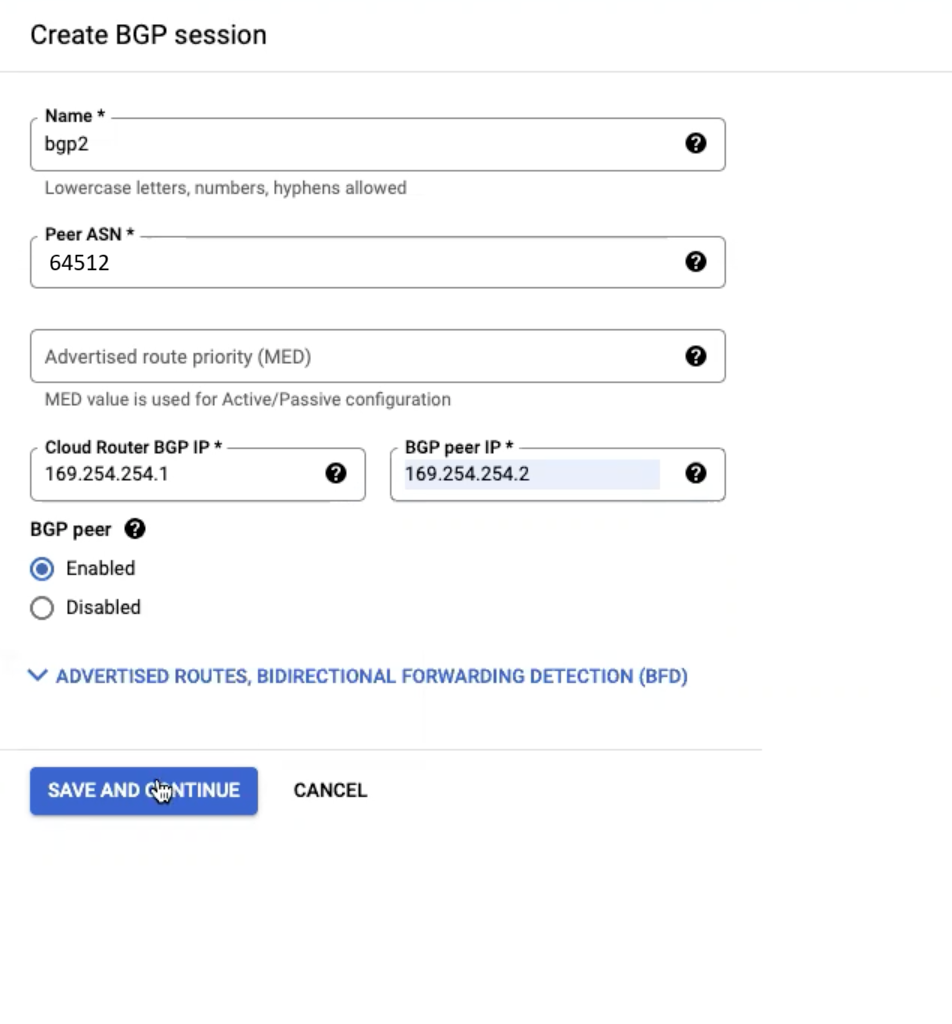
- Set BGP routes for Tunnel 2 according to the image below and click Save and Continue:
- Make sure that the Cloud Router BGP IP and BGP Peer IP use a different Link-local address than Tunnel1.
- The Peer ASN is the same 64512 since it represents the BGP route for Check Point SASE.
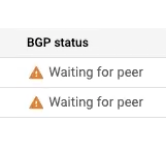
- Click Save BGP Configuration.
.png)
- Wait until done. When complete you will see "waiting for peer" next to each tunnel until the Check Point SASE setup is complete.
Creating the High Availability Check Point SASE Tunnel
- In Your Check Point SASE Admin console, Navigate to your network.
- Click "..." next to one of the gateways and select Add Tunnel.
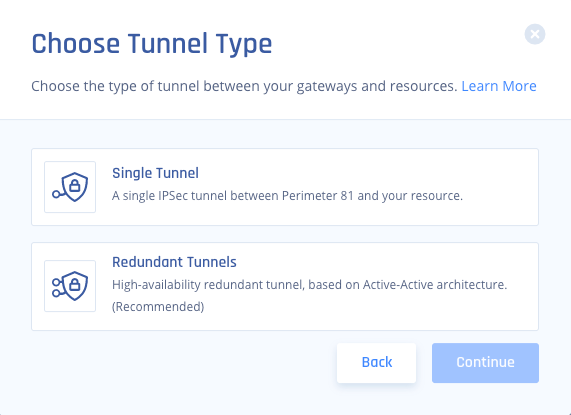
- Choose IPSEC Site-2-Site Tunnel > Continue.
.png)
- Select Redundant Tunnels > Continue.
- Select a logical name for your tunnel longer than 4 characters,
- For example, "GCPtunnel".
- In your GCP portal under Network Connectivity > VPN, Copy and Paste the values for Tunnel 1 and Tunnel 2 according to the image below. ASN - should be 65511 for both tunnels.
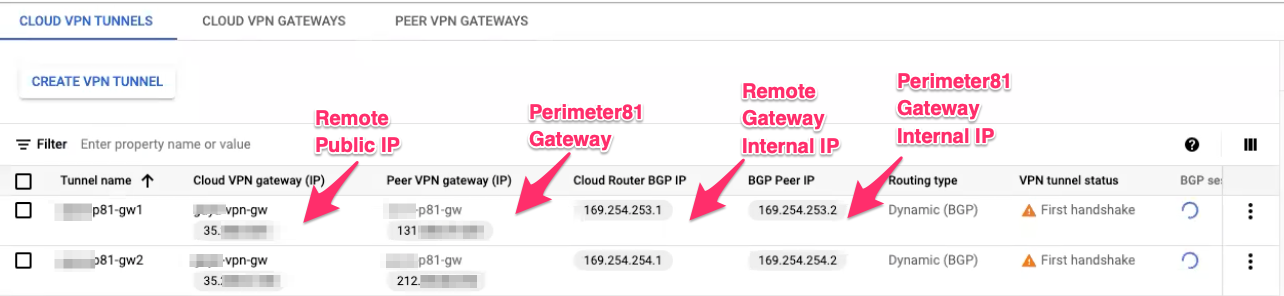 Tunnel 1:
- Gateway: Check Point SASE Gateway.
- Shared Secret: Character string of your own or click Generate.
- Check Point SASE Gateway Internal IP - BGP Peer IP.
- Remote Public IP - Cloud VPN Gateway IP.
- Remote Gateway Internal IP - Cloud Router BGP IP.
- Remote Gateway ASN - BGP ASN.
- Site ID - ID of the remote tunnel is the public IP of the tunnel.
.PNG) Tunnel 2 :
Tunnel 2 :- Gateway: Check Point SASE Gateway.
- Shared Secret: Character string of your own or click Generate.
- Check Point SASE Gateway Internal IP - BGP Peer IP.
- Remote Public IP - Cloud VPN Gateway IP.
- Remote Gateway Internal IP - Cloud Router BGP IP.
- Remote Gateway ASN - BGP ASN.
- Site ID - ID of the remote tunnel is the public IP of the tunnel.
.PNG)
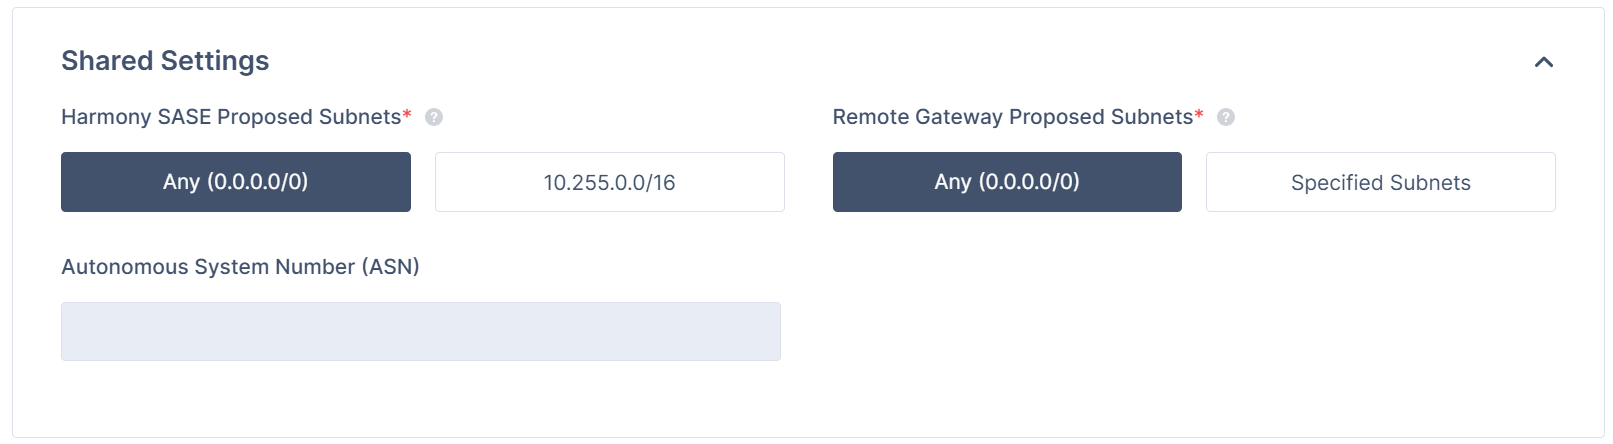
- Under Shared Settings:
- Set the ASN number to 64512 and represents the BGP route for Check Point SASE.
 Warning: The Check Point SASE AS Number cannot be edited after the tunnel's creation.
- Set the ASN number to 64512 and represents the BGP route for Check Point SASE.
- Under Advanced Settings:
- IKE Version: IKEv2
- IKE Lifetime: 8h
- Tunnel Lifetime: 1h
- Dead Peer Detection Delay: 10s
- Dead Peer Detection Timeout: 30s
- Phase 1
- Encryption (Phase 1): aes256
- Integrity (Phase 1): sha512
- Key Exchange Method: ecp521
- Phase 2
- Encryption (Phase 2): aes256
- Integrity (Phase 2): sha512
- Key Exchange Method: ecp521
.PNG)
- Click Add Tunnel and wait until the tunnel deployment is complete to add routes.
- Select "..." next to your network and then Routes Table.
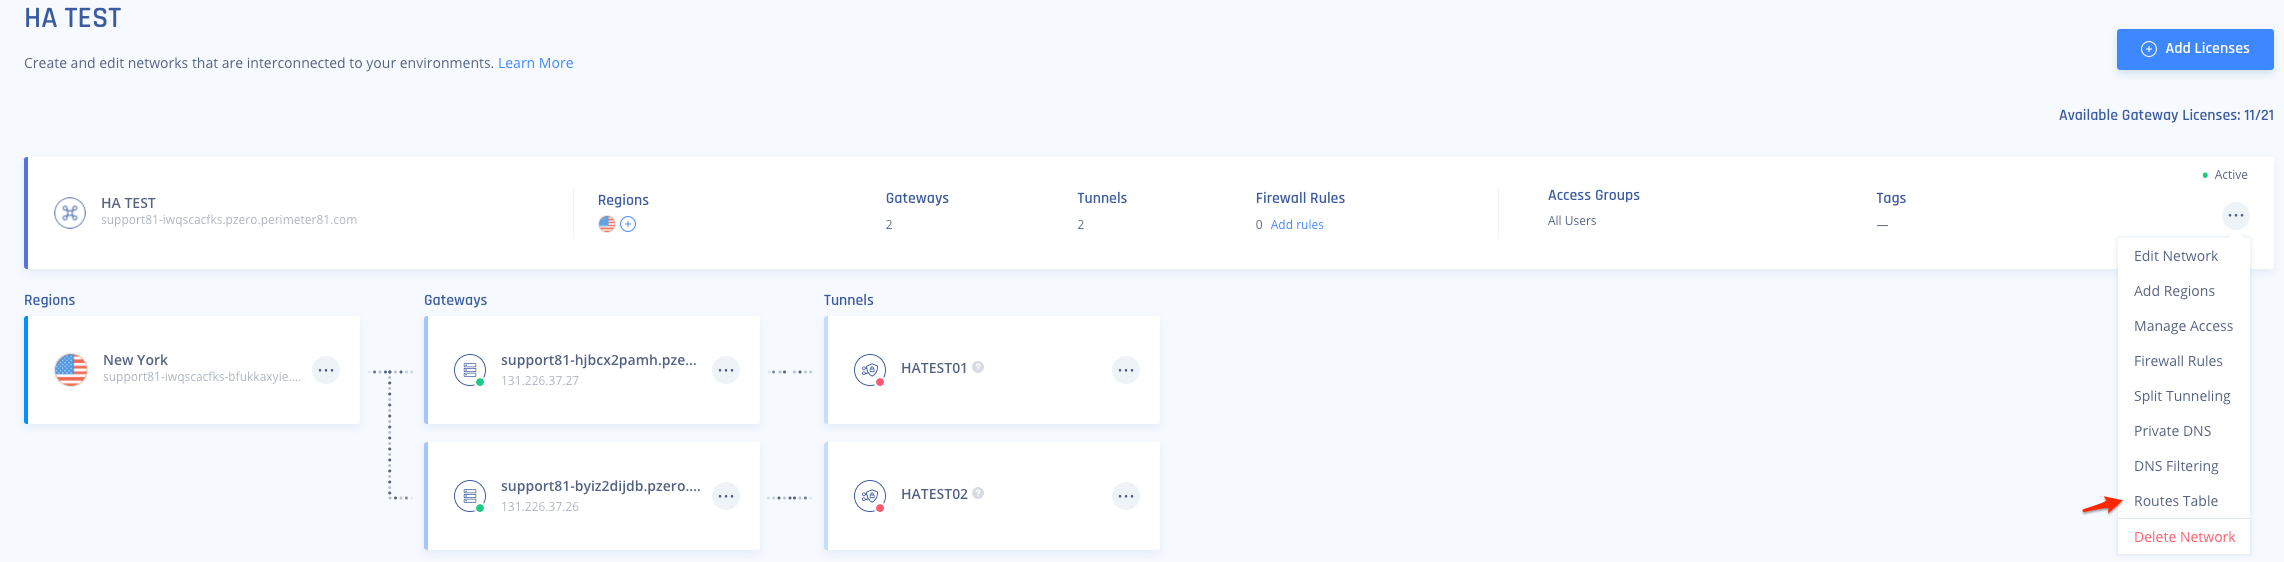
- Once that has been completed be sure to select "Apply Configuration" and let the route changes propagate on our side.

Verifying the Setup
Once both sides have completed the handshake, BGP routes should come UP on GCP:
- Navigate back to your GCP portal under Network Connectivity > VPN, and review the BGP Connection status:
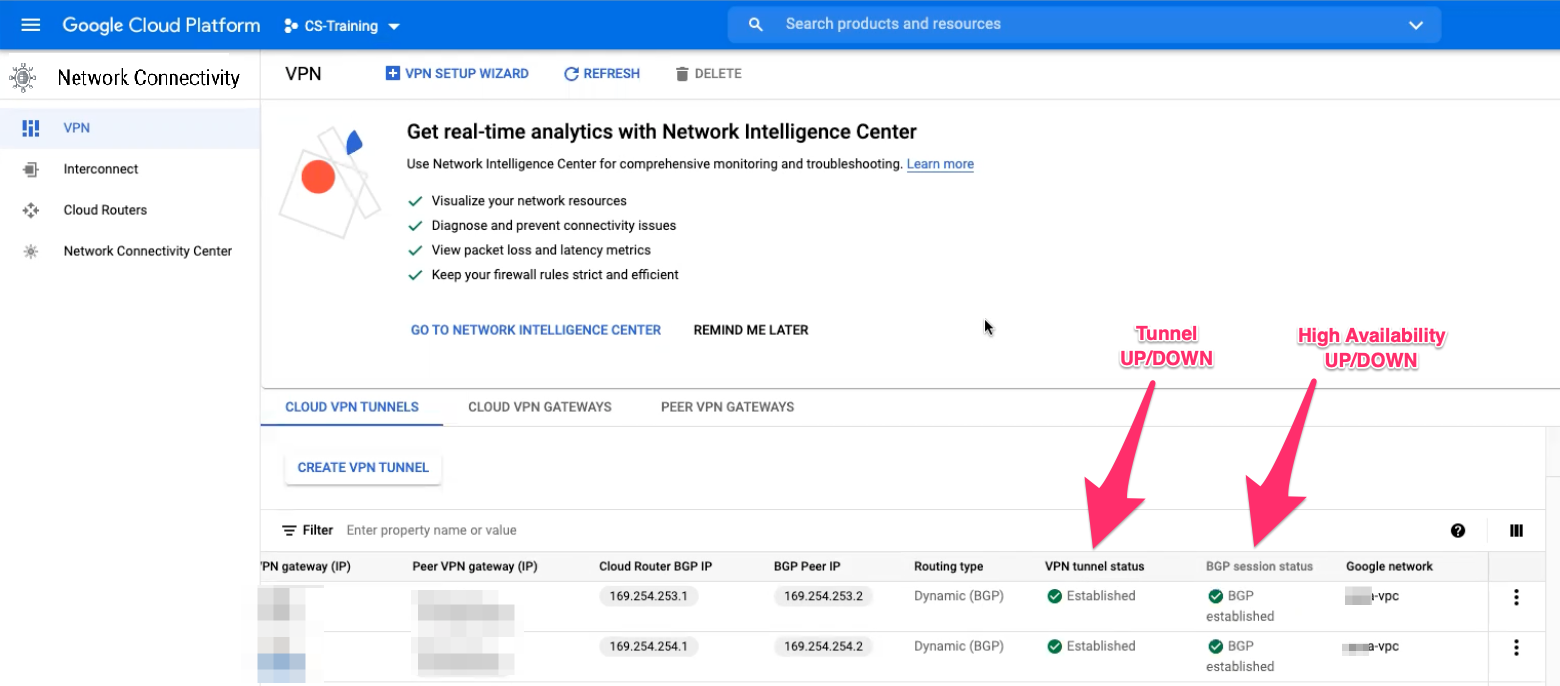 Both VPN tunnel Status and BGP Established should show a green checkmark.
After following the above steps, your tunnel should be active.
To verify, go to your Check Point SASE dashboard, locate the tunnel you just created, and check the tunnel status.
It should indicate that the tunnel is "Up", signifying a successful connection.
Next, connect to your network using the Check Point SASE agent and attempt to access one of the resources in your environment.
Troubleshooting
If you encounter issues during or after the setup, try reviewing your settings to ensure everything matches the instructions. In particular, check the IP addresses and other details you entered during setup. If issues persist, please consult our dedicated support.
Support Contacts
If you have any difficulties or questions, don't hesitate to contact Check Point SASE's support team. We offer 24/7 chat support on our website at sase.checkpoint.com, or you can email us at sase-support@checkpoint.com. We're here to assist you and ensure your VPN tunnel setup is a success