Introduction
This guide will lead you through the procedure to establish a Site-to-Site VPN tunnel between your Harmony SASE network and the UniFi USG environment.
Breakdown of topics
- Pre-requisites
- Configuration Steps
- Verifying the Setup
- Troubleshooting
- Support Contacts
Pre-requisites
To successfully follow this guide, ensure that:
- Have an active Harmony SASE account with an existing network.
- Have the Harmony SASE application installed on your devices.
- Maintain an operational UniFi USG setup with the necessary administrative privileges.
Configuration Steps
Configuring an IPSec tunnel in the Management Platform
- Under Network in the Management Platform on the left side, select the network name in which you'd like to set the tunnel.
- Locate the desired gateway, and select the three-dotted menu (...).

- Select Add Tunnel and then IPSec Site-2-Site Tunnel.
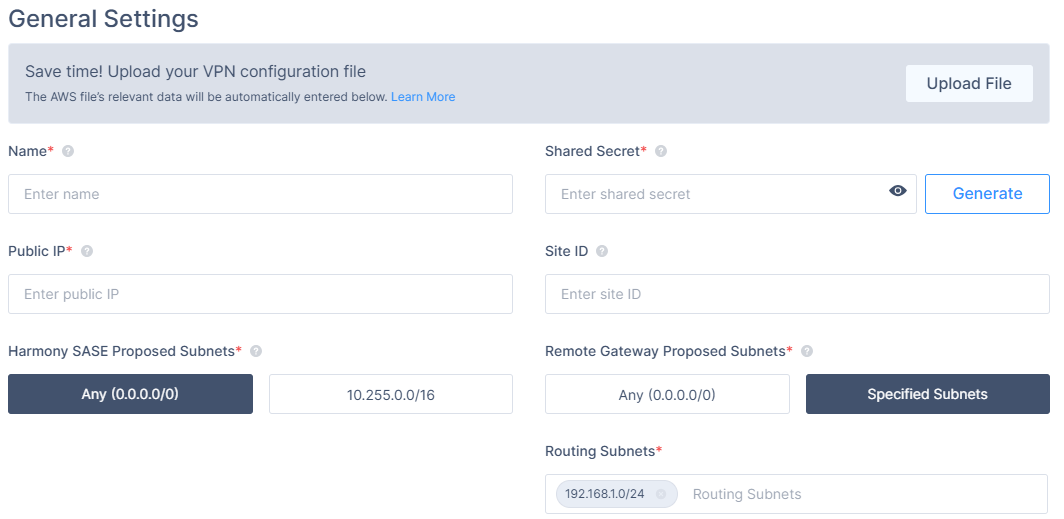
4. In the General Settings section, specify these:
- Name: Choose whatever name you find suitable for the tunnel.
- Shared Secret: Enter a string of your own or use Generate.
- Public IP: Enter the public IP of the UniFi USG device.
- Remote IP: Enter the public IP of the UniFi USG device.
- Perimeter 81 Gateway Proposal Subnets: By default, this should be set to 10.255.0.0/16.
- Remote Gateway Proposal Subnets: Click Specified Subnets and specify according to your local LAN Subnets.
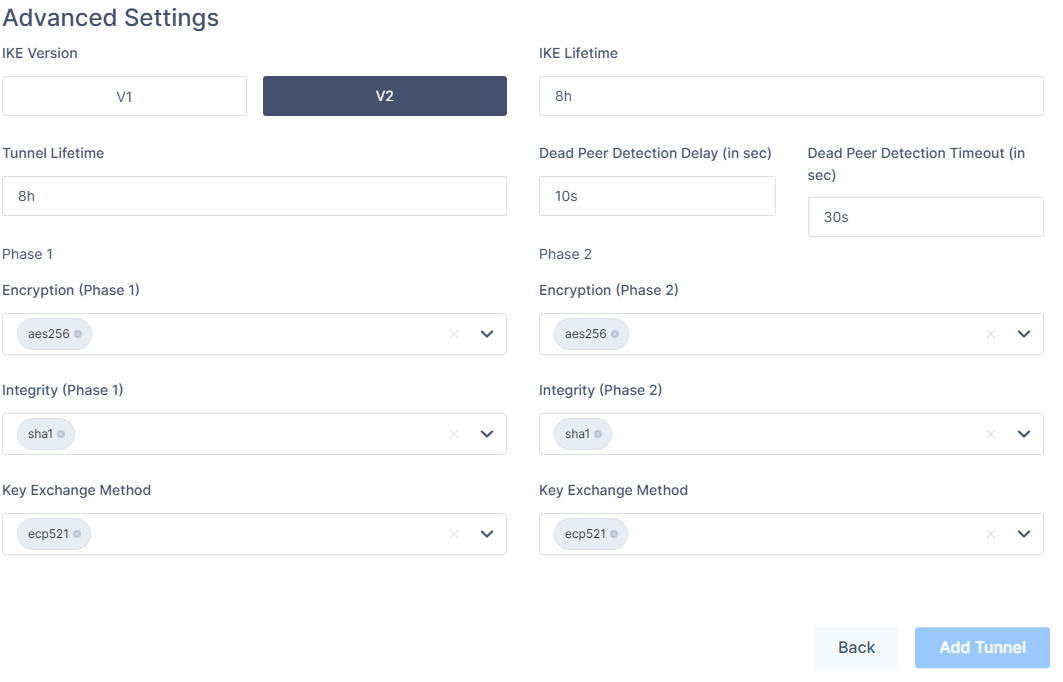
- In the Advanced Settings section, specify these:
- IKE Version: V2 if the Firewall version supports it, V1 otherwise.
- IKE Lifetime: 8h
- Tunnel Lifetime: 8h
- Dead Peer Detection Delay: 10s
- Dead Peer Detection Timeout: 30s
- Phase 1:
- Encryption (Phase 1): aes256
- Integrity (Phase 1): sha1
- Key Exchange Method: ecp521
- Phase 2:
- Encryption (Phase 2): aes256
- Integrity (Phase 2): sha1
- Key Exchange Method: ecp521
Leave the rest of the fields with the default values.
Configuring the tunnel in the UniFi - USG Management Interface
- Open the UniFi - USG management interface.
- In the left panel, select VPN, and then click the Site-to-Site VPN tab.
- In the VPN Type field, select IPsec.
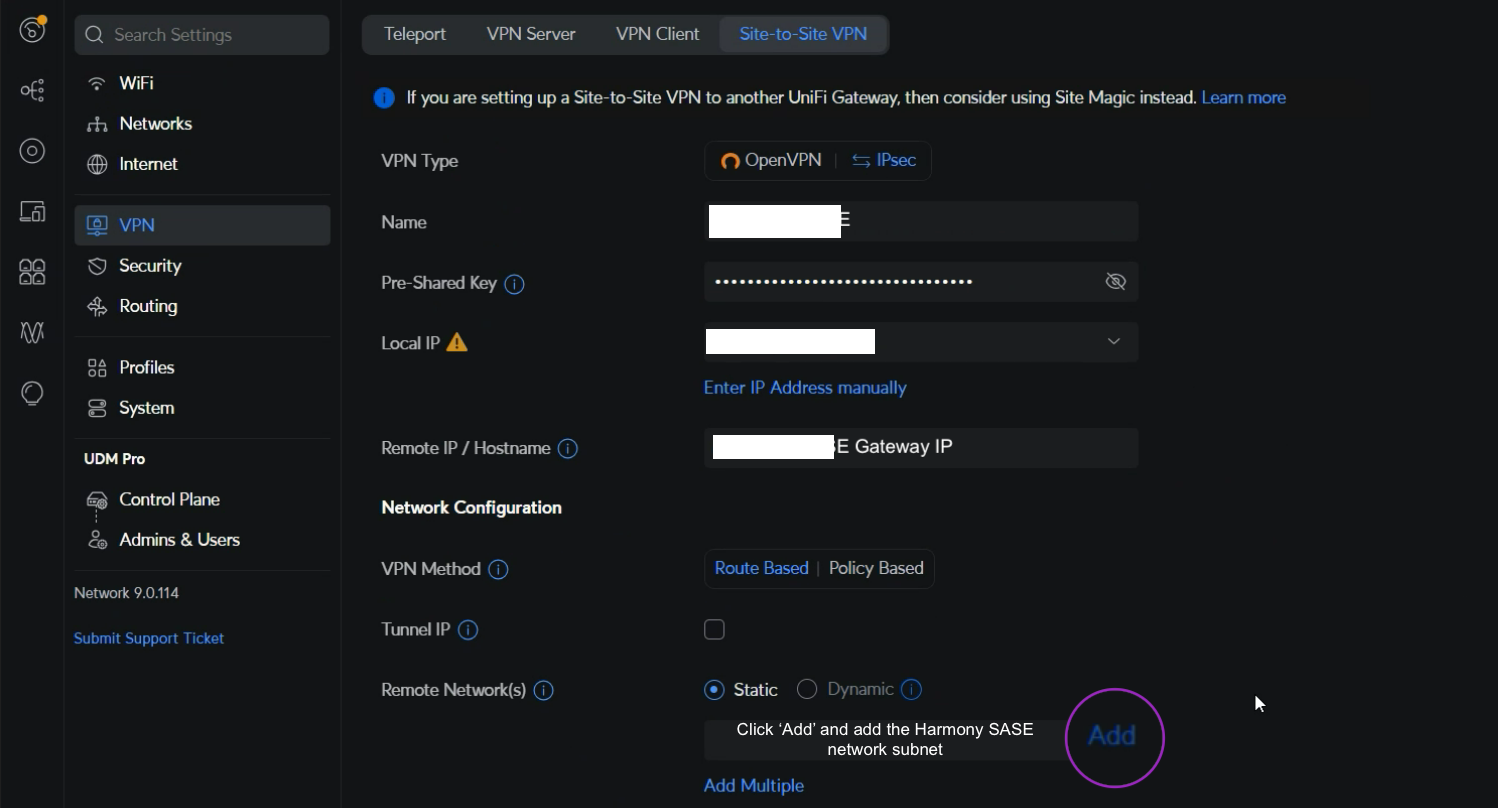
- In the Name field, enter a name for the network.
- In the Pre-shared key field, enter the shared key you chose on the management portal.
- In the Local IP field, enter the public IP of the UniFi USG firewall.
- In the Remote IP/ Hostname field, enter the Harmony SASE gateway IP.
- In the VPN Method field, select Route Based.
- In the Remote Network(s) field, select Static.
- Click Add.
- In the Subnet field, click Edit to enter the Harmony SASE network subnet. The default value is 10.255.0.0/16.
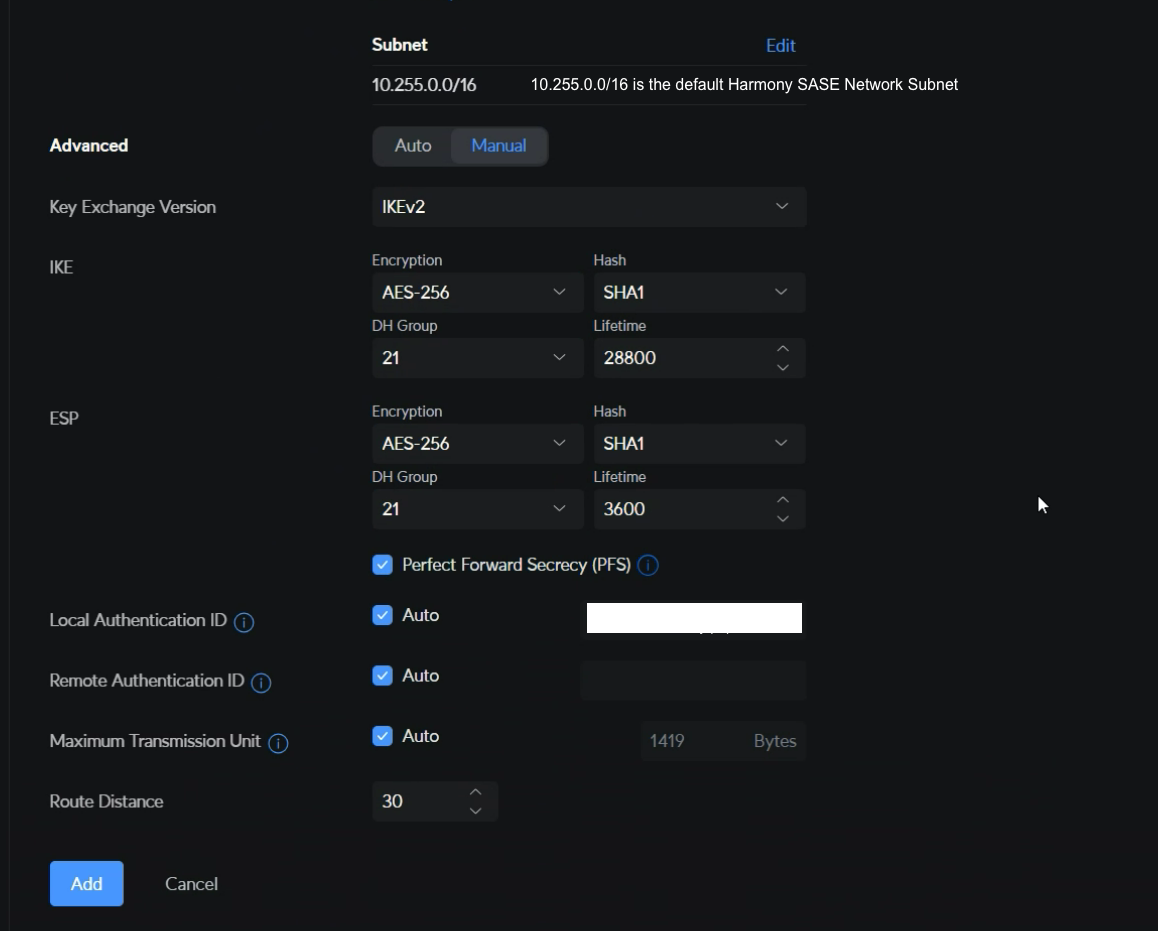
- In the Advanced field, select Manual.
- From the Key Exchange Version list, select IKEv2 if the firewall version supports, else select IKEv1.
- In the IKE field, specify these:
- Encryption - AES-256
- Hash - SHA1
- DH Group - 21
- Lifetime - 28800
- In the ESP field, specify these:
- Encryption - AES-256
- Hash - SHA1
- DH Group - 21
- Lifetime - 3600
- Select the Perfect Forward Secrecy (PFS) checkbox.
- In these fields, select the Auto checkbox:
- Local Authentication ID
- Remote Authentication ID
- Maximum Transmission Unit
- From the Route Distance list, set a distance.
- Click Add.
- After doing this, you must add any other Subnet used under "Remote Subnets" and ensure a reverse traffic route is created under Static Routes in the UniFi device for each connected subnet to go back via the Harmony SASE Interface.
- This would also require you to go back to the Harmony SASE Tunnel you created on the Perimeter81 Admin workspace and change "Perimeter 81 Gateway Proposal Subnets" and "Remote Gateway Proposal Subnets" to Any (0.0.0.0/0).
- You will also need to create separate Static Routing on Harmony SASE. More information can be found in the following article: How to Setup Interconnectivity (Cloud-Agnostic) Between Connected Sites.
Configuring firewall and static routing
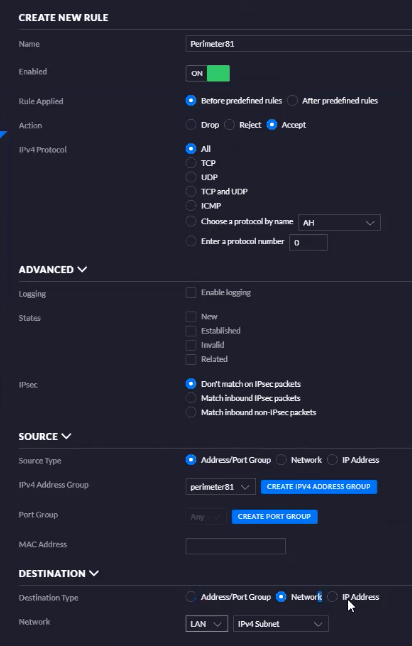
Next, let's add static routes from the Harmony SASE subnet (10.255.0.0/16) to the local network and from the local network to the Harmony SASE subnet (10.255.0.0/16) to the local network through the VPN tunnel gateway. Also, it's necessary to create firewall rules to allow this traffic.
- Go to Routing & Firewall > Static Routes > Create New Route.
- Choose a name.
- Enable the route.
- Enter the Harmony SASE subnet (by default it's 10.255.0.0/16) in Destination Network.
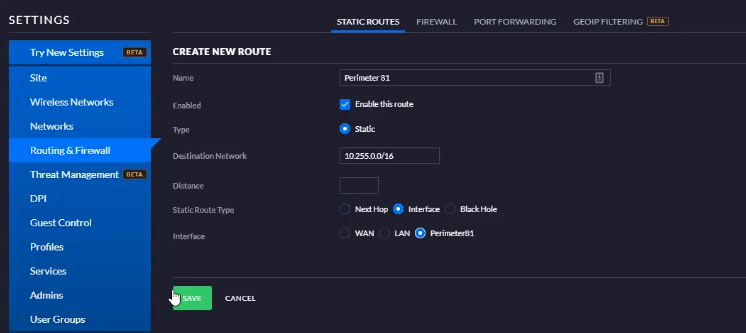
- Make sure to choose the interface you created in the previous section.
- Create a firewall rule that allows traffic from the Harmony SASE subnet to the LAN Network.
In case IPS/IDS is enabled on the UniFi:
To establish a tunnel with the Harmony SASE network in version 7 and above of the UniFi firewall, you must create an exception within your Threat detection system.
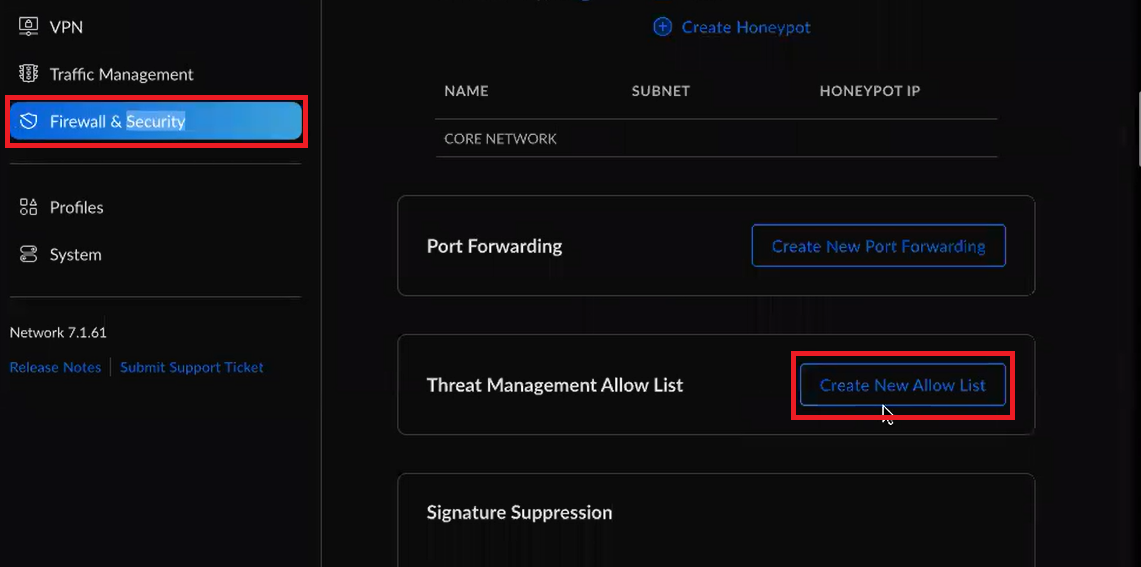
To add a "Threat Management Allow List" entry:
- Click on the Firewall & Security tab.
- Click Create New Allow List
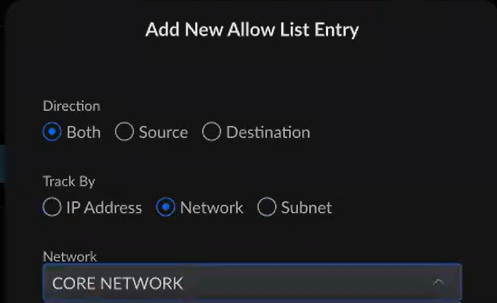
- Select the Site-2-Site network you created earlier (In the step titled "Configuring the tunnel in the UniFi - USG Management Interface")
- Save your changes.
Verifying the Setup
After following the above steps, your tunnel should be active.
To verify, go to your Harmony SASE dashboard, locate the tunnel you just created, and check the tunnel status.
It should indicate that the tunnel is "Up", signifying a successful connection.
Next, connect to your network using the Harmony SASE agent and attempt to access one of the resources in your environment.
Troubleshooting
If you encounter issues during or after the setup, try reviewing your settings to ensure everything matches the instructions. In particular, check the IP addresses and other details you entered during setup. If issues persist, please consult our dedicated support.
Support Contacts
If you have any difficulties or questions, don't hesitate to contact Harmony SASE's support team. We offer 24/7 chat support on our website at sase.checkpoint.com, or you can email us at sase-support@checkpoint.com. We're here to assist you and ensure your VPN tunnel setup is a success.
