
Introduction
This guide helps you establish a Site-to-Site VPN tunnel between your Check Point SASE network and your FortiGate Devices environment.
Breakdown of topics
Pre-requisites
To successfully follow this guide, ensure that:
- You have an active Check Point SASE account and network.
- The Check Point SASE app is installed on your devices.
- You have access to an active FortiGate Devices account with administrative permissions.
Configuration Steps
- Under Network in the Management Platform on the left side, select the name of the network in which you'd like to set the tunnel.
- Locate the desired gateway, and select the three-dotted menu (...).
.png)
- Select Add Tunnel and then IPSec Site-2-Site Tunnel.
- In the General Settings section, specify these:
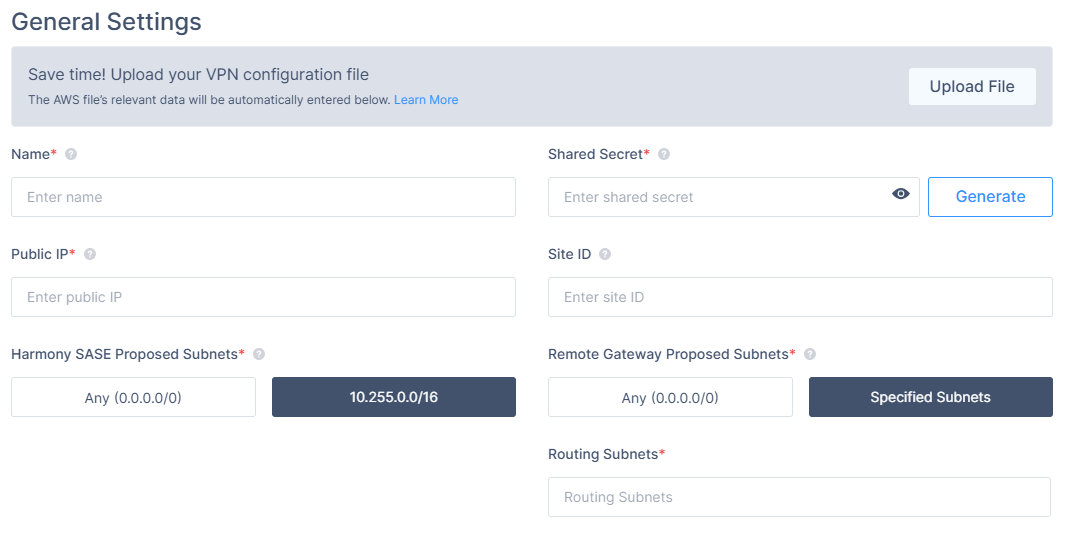
- Name: Enter a name for the tunnel.
- Shared Secret: Enter a string or select Generate.
- Public IP: Enter the public IP address of the FortiGate device.
- Remote ID: Enter the remote ID of the FortiGate device.
- Check Point SASE Gateway Proposal Subnets: By default, this value is 10.XXX.0.0/16. Do not set this value to any.
- Remote Gateway Proposal Subnets: Select Specified Subnets and enter the local LAN subnets.
- In the Advanced Settings section, specify these:
.PNG)
- IKE Version: V2
- Key Exchange Method: ecp521
- Key Exchange Method: ecp521
Leave the rest of the fields with the default values (as shown in the image).
Configuring the tunnel in the FortiGate Management Interface
- Open the FortiGate Management Interface.
- In the left panel, select VPN, then IPsec Tunnels, and select Create New.
.png)
- In the VPN Creation Wizard window set the Name to Check Point SASE (or any other name you desire), the Template Type to Custom tab, and select Next.

- Fill in the following information:
Network Section:- IP Version: IPv4
- Remote Gateway: Static IP Address
- IP Address: Insert the public IP of the location server
- Interface: select your WAN interface
- Mode Config: unchecked
- NAT Traversal: Disable
- Dead Peer Detection: On-Demand
Authentication section:
- Method: Pre-shared Key
- Pre-shared Key: Insert the Shared Key you chose in Step 1
- IKE Version: 2
- Mode: Main (ID protection)
Phase 1 Proposal section:
- Encryption: AES256
- Authentication: SHA256
- Diffie-Hellman Group: 21
- Key Lifetime (seconds): 28800
- Local ID: leave blank
- XAUTH Section: leave disabled
Phase 2 Selectors (+Advanced) section:
- Name: Check Point SASE
- Local Address: Your Local network Subnet
- Remote Address: Check Point SASE network Subnet, Usually: 10.255.0.0/255.255.0.0
- Enable Replay Detection: Unchecked
- Enable Perfect Forward Secrecy (PFS): Checked
- Diffie-Hellman Group:21
- Encryption: AES256
- Authentication: SHA256
- Local Port: Checked
- Remote Port: Checked
- Protocol: Checked
- Key Lifetime: Seconds
- Seconds: 3600
Configuring firewall and static routing
It is necessary to add static routes from the Check Point SASE subnet (10.XXX.0.0/16) to the local network and from the local network to the Check Point SASE subnet (10.XXX.0.0/16) to the local network through the VPN tunnel gateway..png)
Creating a static route
- Go to Network -> Routing -> Static Routes -> Create new -> Route.
.png)
- Set Destination to 10.XXX.0.0/16 and the Device: Check Point SASE (or any other name you chose for the tunnel).
- Click OK.
Creating a firewall policy
To enable traffic from the Check Point SASE subnet (10.255.0.0/16) to the local network, create a firewall policy.
- Go to Policy & Objects > IPv4 Policy.
- Click Create New.
- Configure the policy with the following settings:
- Name: Check Point SASE
- Incoming Interface: Check Point SASE
- Outgoing Interface: Your local network object
- Source: All
- Destination: All
- Schedule: Always
- Service: All
- NAT: Disabled
Leave any additional settings at their default values.
- Click OK.
Verifying the Setup
- In the FortiGate Management Interface, go to VPN > IPSec Tunnels. If the tunnel is up, the entry appears in the table.
.png)
- After you complete the steps, the tunnel is active.
- To verify the status, go to the Check Point SASE dashboard. Locate the tunnel and check the status.
- The status shows Up when the connection is successful.
- Next, connect to the network using the Check Point SASE agent and access a local resource.
Troubleshooting
If issues occur during or after setup, review all configuration values. Check the IP addresses and other entered details. Contact support if the issue persists.
Support Contacts
If you need help, contact the Check Point SASE support team. Use the chat on sase.checkpoint.com or email sase-support@checkpoint.com.