
Introduction
This guide will lead you through the process of setting up a Site-to-Site VPN tunnel between your Check Point SASE network and the Cisco Meraki environment.
Breakdown of topics
- Pre-requisites
- Configuration Steps
- Verifying the Setup
- Troubleshooting
- Support Contacts
Pre-requisites
To successfully follow this guide, ensure that:
- An active Check Point SASE account with a pre-configured network.
- The Check Point SASE app is installed on your devices.
- An active Cisco Meraki setup and the required administrative permissions..
Configuration Steps
Configuring an IPSec Tunnel in the Management Platform
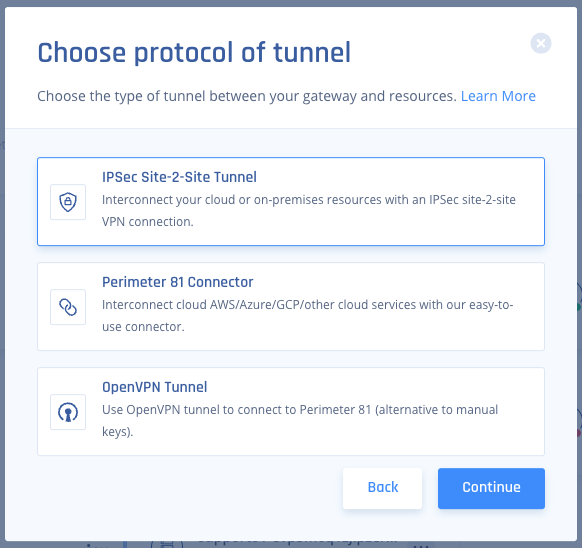
- Go to the Gateway in your network from which you want to create the tunnel to the Cisco Meraki Firewall.
- Select the three-dotted menu (...) and select Add Tunnel.

- Select IPSec Site-2-Site Tunnel and select Continue.
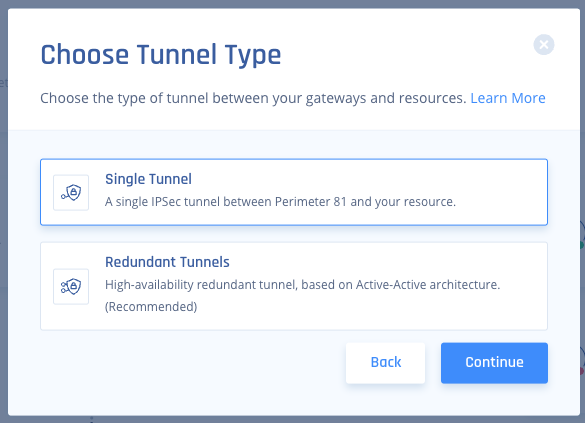
- Select Single Tunnel, and Click Continue.
- Under General Settings, enter the following:
- Name - Set the name for the Tunnel.
- Shared Secret - Put a shared secret or select Generate.
- Public IP and Remote ID - Input your Cisco Meraki Firewall Public WAN IP address.
- In Check Point SASE Gateway Proposal Subnets, choose your Check Point SASE Network Subnet.
- In Remote Gateway Proposal Subnets, input your internal LAN subnet.
.PNG)
- Under Advanced Settings:
- IKE Version: V1IKE VersionAccording to Cisco documentation, IKEv2 is only supported on Security Appliances running firmware version 15.12 or higher.
- IKE Lifetime: 8h
- Tunnel Lifetime: 1h
- Dead Peer Detection Delay: 10s
- Dead Peer Detection Timeout:50sDead Peer DetectionDPD settings on the Meraki device are set to 10 Seconds with 5 Max. Retries (Source)
- Phase 1:
- Encryption (Phase 1): aes256
- Integrity (Phase 1): sha1
- Key Exchange Method: modp1536
- Phase 2:
- Encryption (Phase 2): aes256
- Integrity (Phase 2): sha1
- Key Exchange Method: modp1536
.PNG)
- Select Add Tunnel.
- IKE Version: V1
Adding a new non-Meraki VPN site
Now, we must create a matching IPSEC handshake on Meraki's side of the tunnel.
- In your Cisco Meraki Admin Console, navigate to Security Appliance > Configure > Site-to-site VPN.
- Make sure that the local LAN you wish to reach from the Check Point SASE network is participating in the VPN:
- Scroll down to the Non-Meraki VPN peers section.
- Select Add a peer and enter the following information:
- A name for the remote device or VPN tunnel: Check Point SASE.
- IKE Version: IKEv1 (Unless you specified IKEv2 on the Check Point SASE side)
- Public IP: Public IP Address of the Check Point SASE Gateway.
- Remote ID: Public IP Address of the Check Point SASE Gateway.
- Private subnets: Your Check Point SASE network subnet (By default: 10.255.0.0/16).
- Preshared secret key (PSK): Enter the PSK you generated earlier in the Check Point SASE interface.

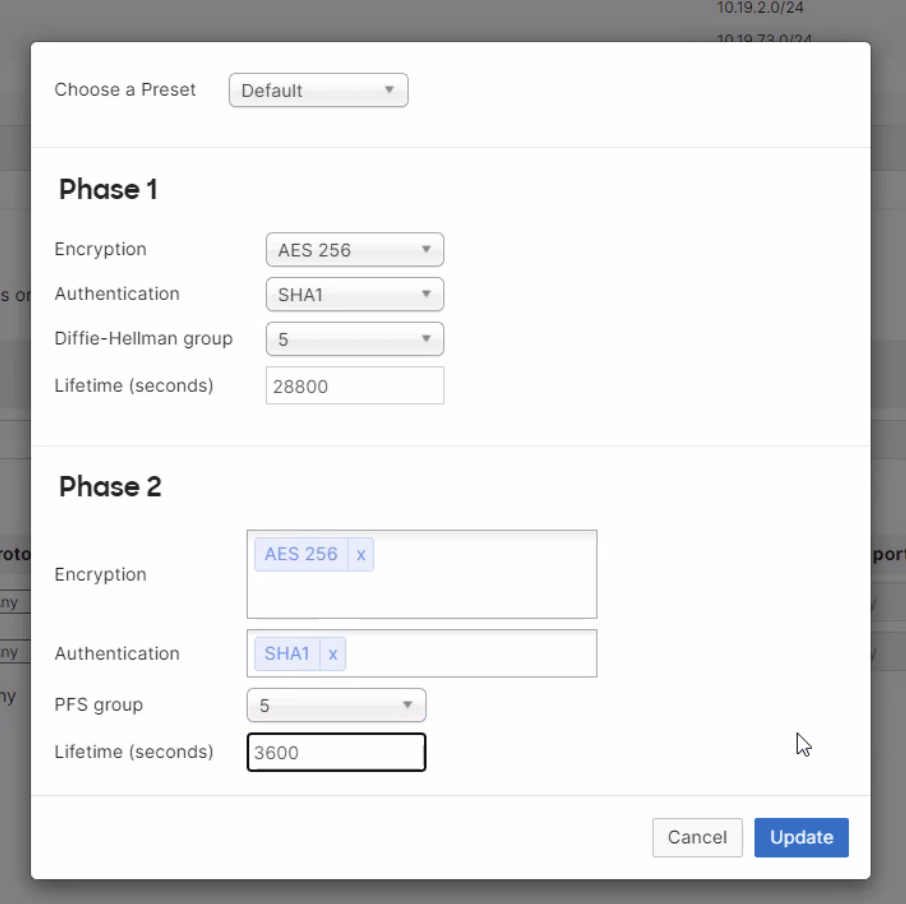
- The IPsec policy to use: Select Custom and enter the following information:
Phase 1:- Encryption: Select AES-256 encryption
- Authentication: Select SHA1 authentication
- Diffie-Hellman group: Select between Diffie-Hellman (DH) groups 5
- Lifetime (seconds): 28800
- Phase 2:
- Encryption: Select AES-256 encryption
- Authentication: Select SHA1 authentication
- PFS group: Select group 5 to enable PFS using that Diffie Hellman group.
- Lifetime (seconds): 3600
Editing firewall rules
You can add firewall rules to control what traffic is allowed to pass through the Check Point SASE tunnel.
- These rules will apply to inbound and/or outbound VPN traffic from all MX appliances in the Organization that participate in site-to-site VPN.
- To create a firewall rule, select Add a rule in the Site-to-site firewall section on the Security Appliance > Configure > Site-to-site VPN page. (These rules are configured in the same manner as the Layer 3 firewall rules)
Verifying the Setup
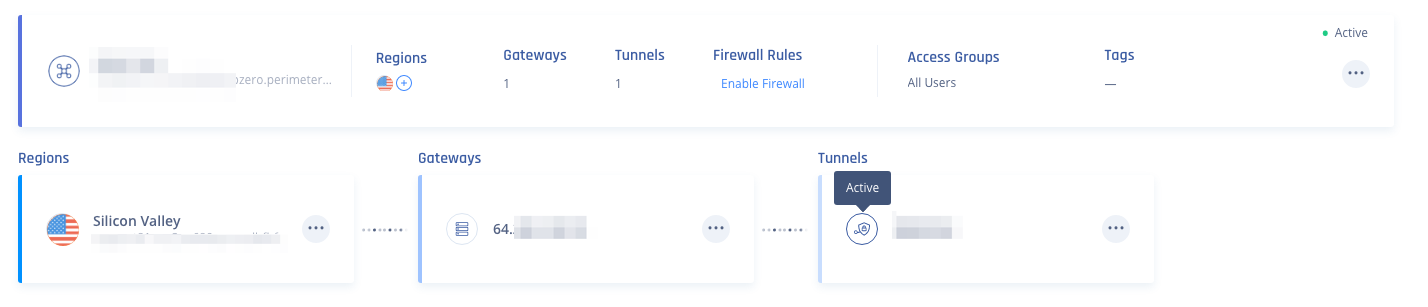
After following the above steps, your tunnel should be active.
To verify, go to your Check Point SASE dashboard, locate the tunnel you just created, and check the tunnel status.
It should indicate that the tunnel is "Up", signifying a successful connection.
Next, connect to your network using the Check Point SASE agent and attempt to access one of the resources in your environment.
Troubleshooting
- After establishing the tunnel, the Check Point SASE Admin Console will display an "active" indicator when you hover your mouse over it.
- The Tunnel status may also be viewed in the Meraki UI under Security & SD-WAN > VPN status.
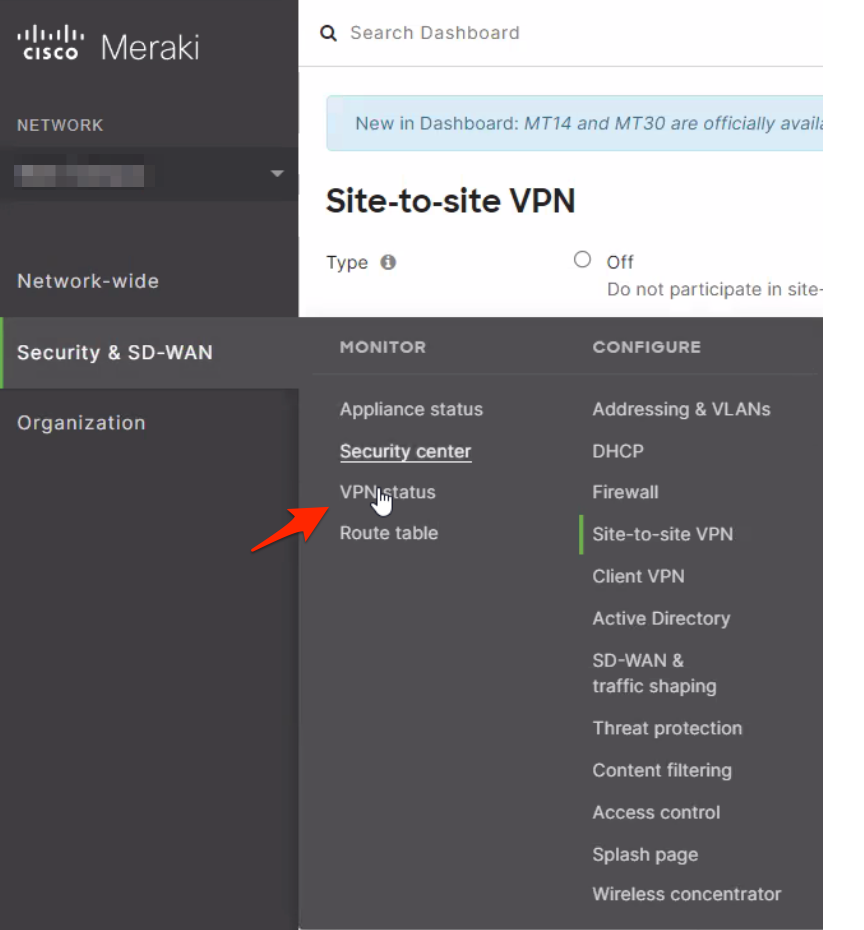
- Click on the Non-Meraki Peer box.

- You should ›see an "active" indicator next to your Check Point SASE tunnel.
- Click on the Non-Meraki Peer box.
Support Contacts
If you have any difficulties or questions, don't hesitate to contact Check Point SASE's support team. We offer 24/7 chat support on our website at sase.checkpoint.com, or you can email us at sase-support@checkpoint.com. We're here to assist you and ensure your VPN tunnel setup is a success.