
Introduction
This guide helps you establish a single Site-to-Site VPN tunnel between your Check Point SASE Network and Check Point Firewall.
Pre-requisites
- Check Point SASE Administrator Portal account.
- Make sure that you have installed the Check Point SASE Agent on your device.
- Administrator account with Firewall/Router/Cloud Management Portal.
Configuration Steps
Creating Interoperable Device Object in the Check Point SmartConsole
- Log in to the Check Point SmartConsole.
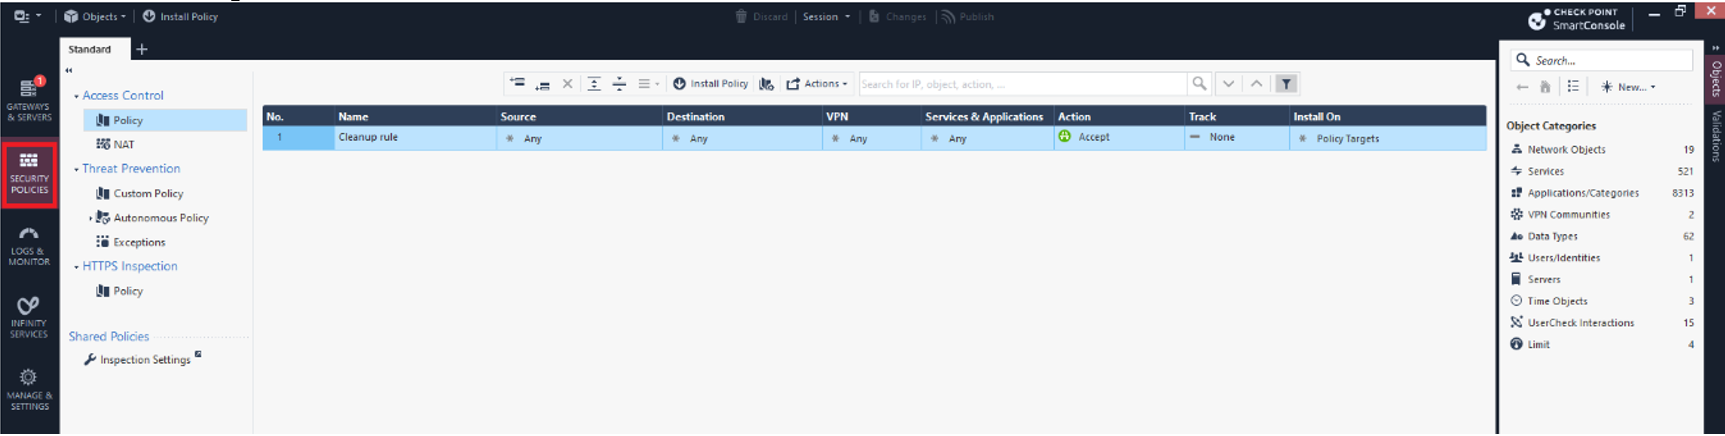
- Click Security Policies.
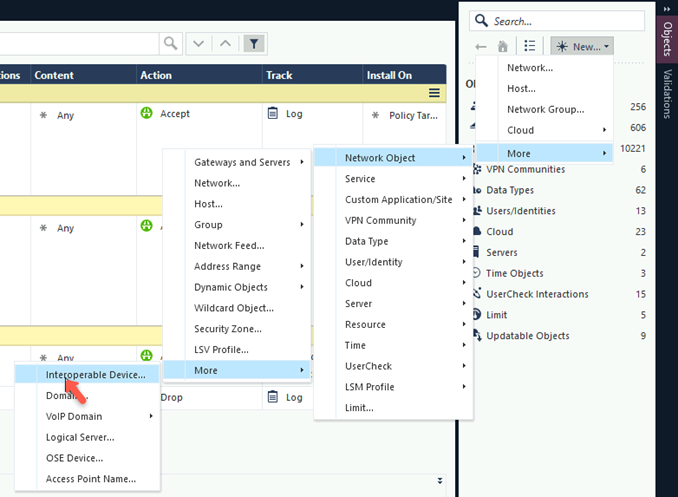
- On the top right, click New and select More > Network Object > More > Interoperable Device.
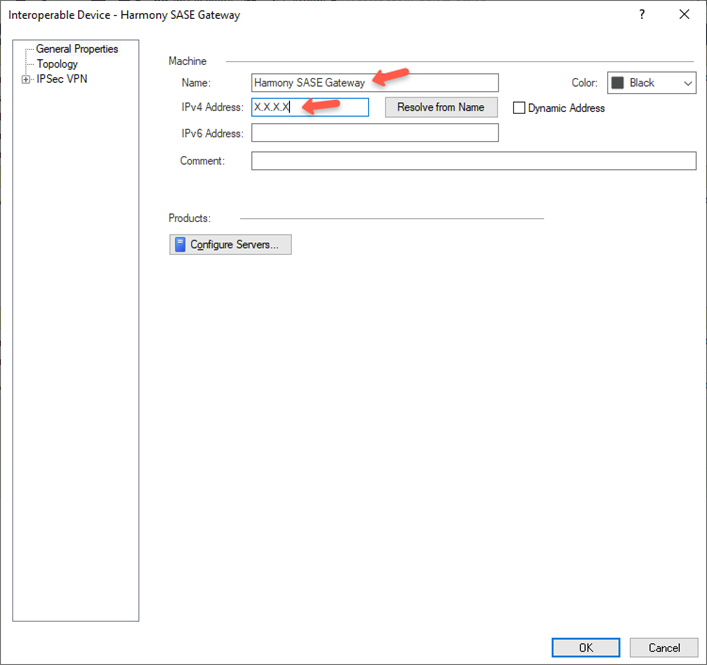
The Interoperable Device window appears.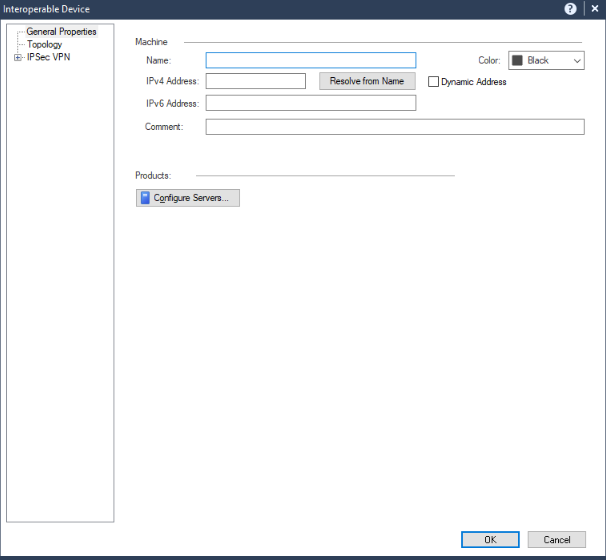
- In the Name field, enter a name for the Check Point SASE gateway, for example, Harmony_SASE_Gateway.
- In the IPv4 Address field, enter the Check Point SASE gateway public IP address.
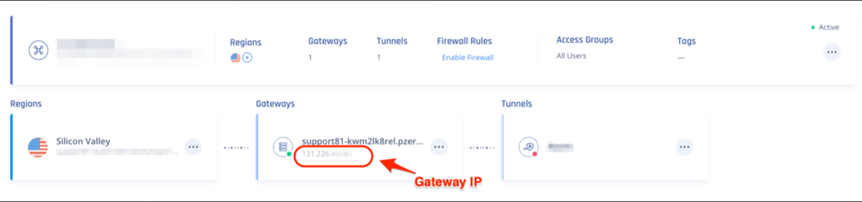
 To find the SASE Gateway public IP Address:
- Access the Check Point SASE Administrator Portal and click Networks.
- Select the network.
- Go to the Gateways section to find the Public IP address for setting up the single IPsec tunnel.
- Click OK.
Adding Check Point SASE Gateway IP Address and Remote Subnet To The Interoperable Device Object
- Log in to the Check Point SASE Administrator Portal.
- Click Networks.
- Verify the assigned network. The default value is 10.255.0.0/16.
To verify:- Select a network, scroll to the end of the row and click
 .
. - Select Edit Network.

- In the Edit Network section, check the Subnet field to verify the assigned network. The default value is 10.255.0.0/16.
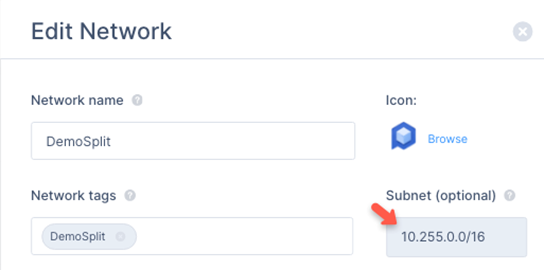
- Select a network, scroll to the end of the row and click
- Open the Interoperable Device object that you created.
- Click Topology > New.

- In the General tab, enter these:
- Name – Name of the topology, for example, Check Point SASE Network.
- IP Address – 10.255.0.0
- Net Mask– 255.255.0.0
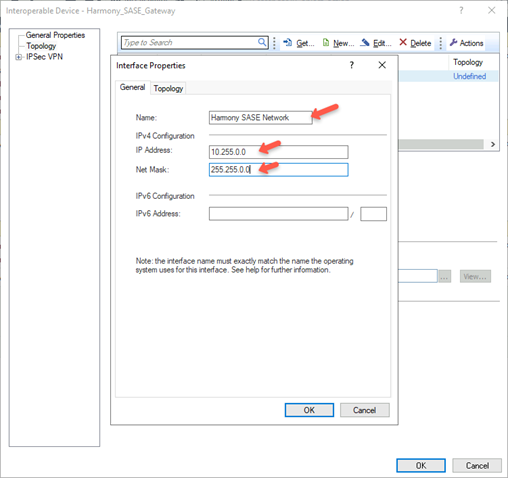
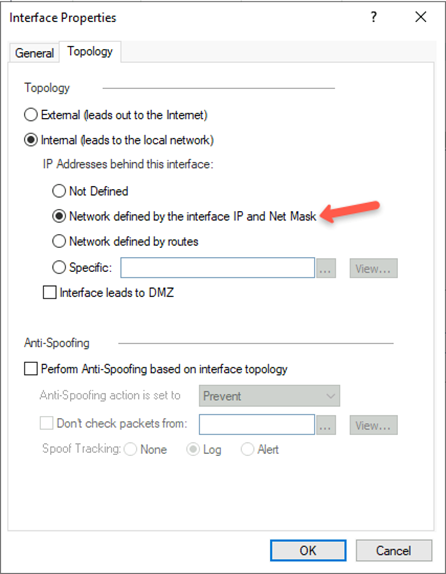
- In the Topology tab, select Internal (leads to the local network) and then select Network defined by the interface IP and Net Mask.
 Note:
Note:If the gateway is configured with an interface topology that includes a network range or a group overlapping with the encryption domain of the remote VPN peer, incoming decrypted traffic may be seen as coming from the wrong interface. This could trigger anti-spoofing measures, causing traffic to be dropped. To create an anti-spoofing exception, see sk151774.
- Click Topology > New.

- In the General tab, enter these:
- Name – Name for the topology, for example, Harmony_SASE_Gateway
- IP Address – Public IP address of the Check Point SASE gateway
- Net Mask – 255.255.255.255

- Click the Topology tab.
12. Select External (leads out to the internet).
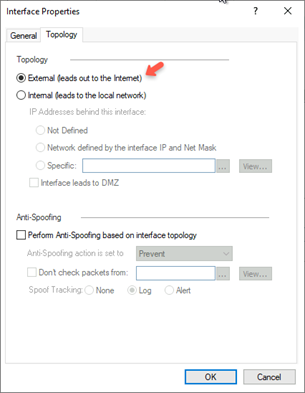
- Click OK.
- Click OK.
- Publish and install the policy.
Creating VPN Star community
- Log in to the Check Point SmartConsole.
- Click Security Policies.
- Go to Access Tools > VPN Communities.
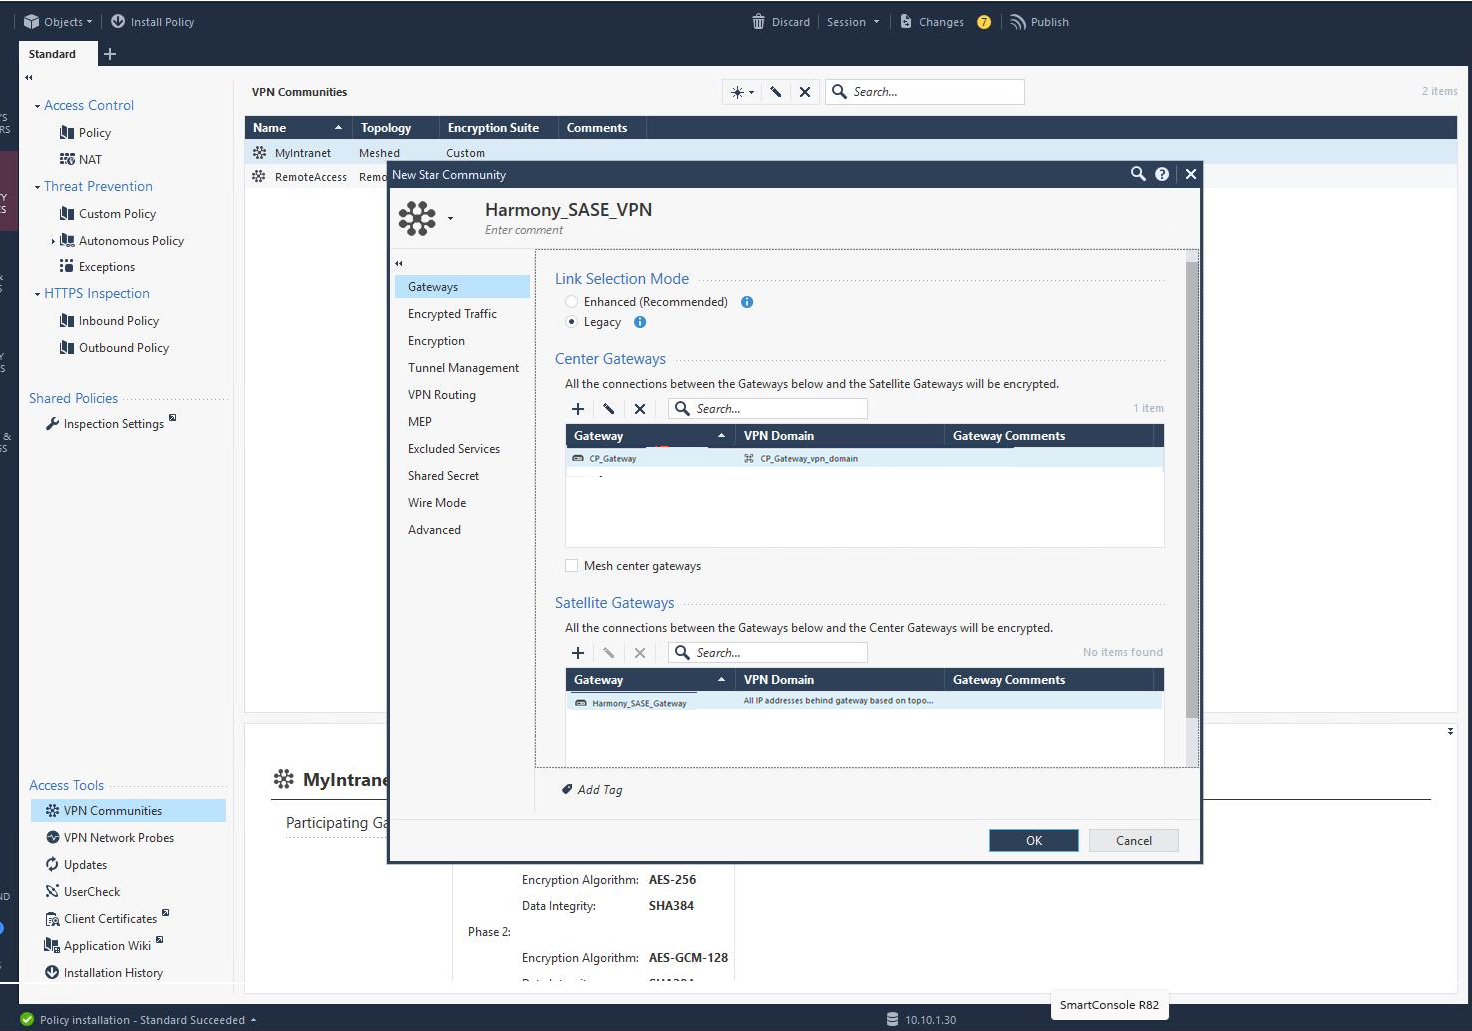
- Select an object, click New and go to More > VPN Community > Star Community.
The New Star Community window appears..png)
- In the Enter Object Name field, enter an object name for the VPN Star Community, for example, Harmony_SASE_VPN.
- In the Link Selection Mode section, select one of these:
- Enhanced (Recommended)- Uses dynamic, intelligent, probe-based logic to choose the optimal VPN link. It evaluates:
- Interface status
- Multiple external IP addresses
- Multiple ISP circuits
- Reachability through Next-Hop Probing
- SLA-like behavior for tunnel selection
- Legacy - Uses static or basic logic to select the VPN interface or IP address. Selection is based on:
- Main IP (default)
- Selected interface
- Selected IP
- IP address determined by topology
- Enhanced (Recommended)- Uses dynamic, intelligent, probe-based logic to choose the optimal VPN link. It evaluates:
- In the Centre Gateways section, click
 and add the Check Point Gateway.
 - In the Satellite Gateways section, click and add the previously created Interoperable Device Object for the Check Point SASE gateway. See step 3 in Creating An Interoperable Device Object in the Check Point SmartConsole.
- Go to Shared Secret.
- To edit the shared key, click
 .
..png)
- In the Enter secret field, enter an appropriate key. Make a note of it as it is used while configuring the IPsec Tunnel in the Check Point SASE Administrator Portal.
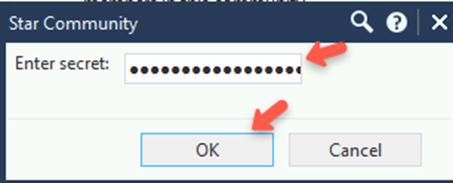 Note:Check Point recommends that the shared secret key is at least 20 characters in length.
 - Click OK.
- Go to Encryption and specify these:
- In the Encryption Settings section, from the Encryption Method list, select IKEv2 only.
- In the Encryption Suite section, select Custom encryption suite.
- In the IKE Security Association (Phase 1) section:
- From the Encryption Algorithm list, select AES-256.
- From the Data Integrity list, select SHA256.
- From the Diffie Hellman group list, select Group 14 (2048 bit).
- In the IKE Security Association (Phase 2) section:
- From the Encryption Algorithm list, select AES-256.
- From the Data Integrity list, select SHA256.
- Select Use Perfect Forward Secrecy.
- From the Diffie Hellman group list, select Group 14 (2048 bit).

- Go to Tunnel Management.
- In the Permanent Tunnels section, select the Set Permanent Tunnels checkbox and then select On all tunnels in the community.
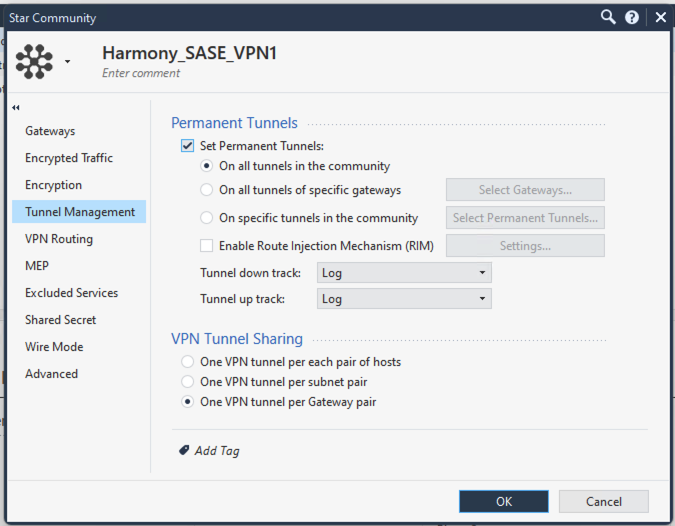
- In the VPN Tunnel Sharing section, select One VPN tunnel per Gateway pair.Note:Make sure that you enter the remote subnets specified here in the Check Point SASE Administrator Portal. A mismatch can disconnect the tunnel.
- Go to Advanced.
- In the IKE (Phase 1) section, set the Renegotiate IKE security associations every (minutes) field to 480.
- In the IPsec (Phase 2) section, set the Renegotiate IPsec security associations every (seconds) field to 3600.
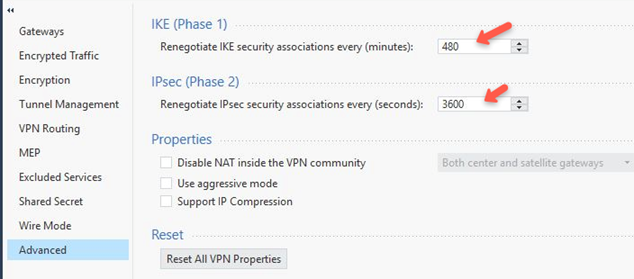
- Click OK.
Additional settings in Check Point SmartConsole
- To set up a Check Point firewall policy, add a rule for VPN traffic for the specific VPN Domain in the Check Point SmartConsole.
In the example below, we have created a policy to allow traffic from the Check Point SASE Network 10.255.0.0/16 to specific destinations and services. Note that the network configuration may differ if you have not changed the default settings during Check Point SASE network creation. For testing purposes, you should initially allow any/any or allow before making the firewall policy more restrictive.

- Publish and install the policy.
Configuring Tunnel and Routes Table
- Access the Check Point SASE Administrator Portal and click Networks.
.png)
- Select the network.
- Click .
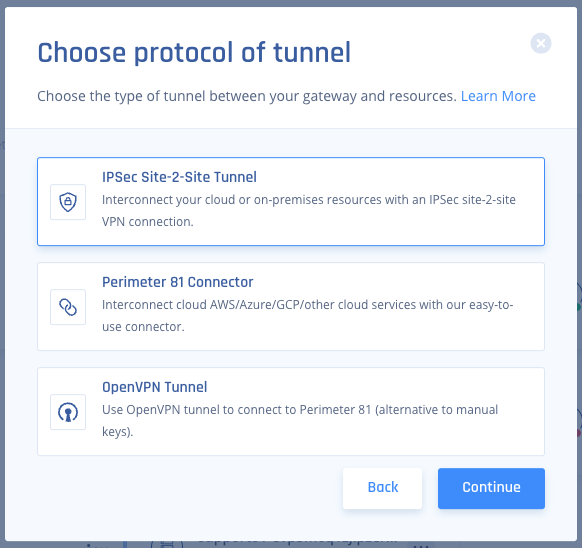
- Select Add Tunnelfor the gateway from which you want to add the IPSec Site-2-Site VPN tunnel.
- Click IPSec Site-2-Site Tunnel and click Continue.
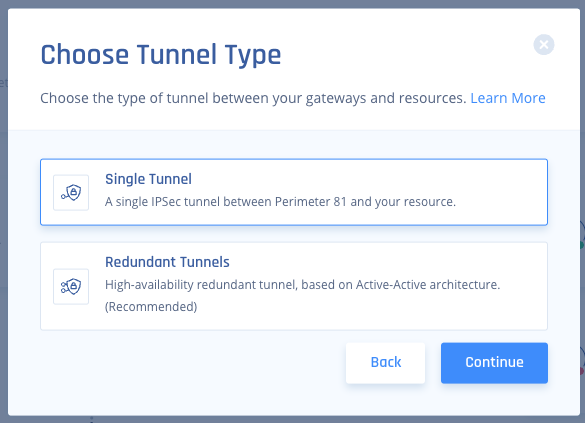
- Click Single Tunnel and click Continue.
- In the General Settings section, enter these:

- Name - Name for the tunnel.
- Shared Secret - Secure pre-shared key or click Generate to generate it.
- Public IP - Public or Egress IP address of Check Point Firewall.
- Remote ID - Public or Egress IP address of Check Point Firewall.
- Check Point SASE Gateway Proposal Subnets - Leave Any (0.0.0.0/0) selected.
- Remote Gateway Proposal Subnets - Leave Any (0.0.0.0/0) selected.
- In the Advanced Settings section, specify these:
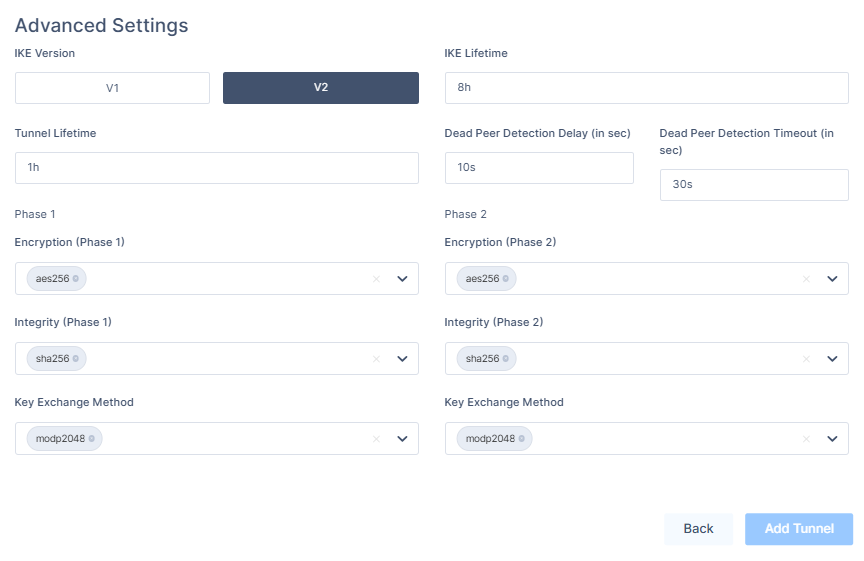
- IKE Version: V2
- IKE Lifetime: 8h
- Tunnel Lifetime: 1h
- Dead Peer Detection Delay: 10s
- Dead Peer Detection Timeout: 30s
- Phase 1:
- Encryption(Phase 1): aes256
- Integrity (Phase 1): sha256
- Key Exchange Method: modp2048
- Phase 2:
- Encryption(Phase 2): aes256
- Integrity (Phase 2): sha256
- Key Exchange Method: modp2048
- Click Add Tunnel.
- Click IPSec Site-2-Site Tunnel and click Continue.
- Select Routes Table:
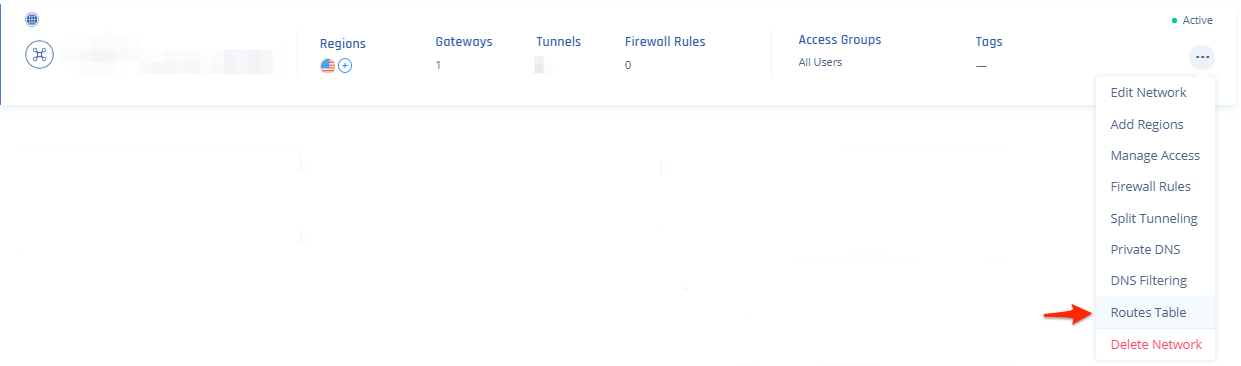
- Click Add Route.
The Add Route window appears.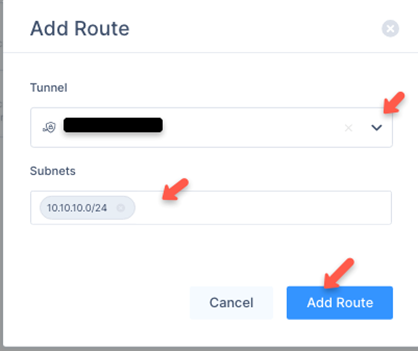
- Enter all the subnets on the remote side of the tunnel and then click Add Route.Note:Make sure that in the Tunnel list, you have selected the previously entered Tunnel name.
- Click Add Route.
- Click Apply Configuration.

Verifying the Setup
Once you complete the above steps, your tunnel should be active. To verify, go to your Check Point SASE dashboard, locate the tunnel you created, and check the tunnel status. It should indicate that the tunnel is Up, signifying a successful connection. Next, connect to your network using the Check Point SASE agent and attempt to access one of the resources in your environment.
Troubleshooting
If you encounter issues during or after the setup, review your settings to ensure everything matches the instructions. Check the IP addresses and other details you entered during setup. If issues persist, please consult our dedicated support.
Support Contacts
If you have any difficulties or questions, contact Check Point SASE's support team. We offer 24/7 chat support on our website at sase.checkpoint.com, or you can email us at sase-support@checkpoint.com.