
Introduction
This guide will lead you through the steps to establish a Site-to-Site VPN tunnel between your Check Point SASE network and the SonicWall Firewall environment.
Breakdown of topics
- Pre-requisites
- Configuration Steps
- Verifying the Setup
- Troubleshooting
- Support Contacts
Pre-requisites
To successfully follow this guide, ensure that:
- You have an active Check Point SASE account with an existing network.
- The Check Point SASE application is installed on your devices.
- You have an operational SonicWall Firewall setup with necessary administrative privileges.
Creating a Check Point SASE Site-to-Site Tunnel
- Go to the Gateway in your network from which you want to create the tunnel to the SonicWall Firewall.
- Select the three-dotted menu (...) and select Add Tunnel.

- Select IPSec Site-2-Site Tunnel and select Continue.
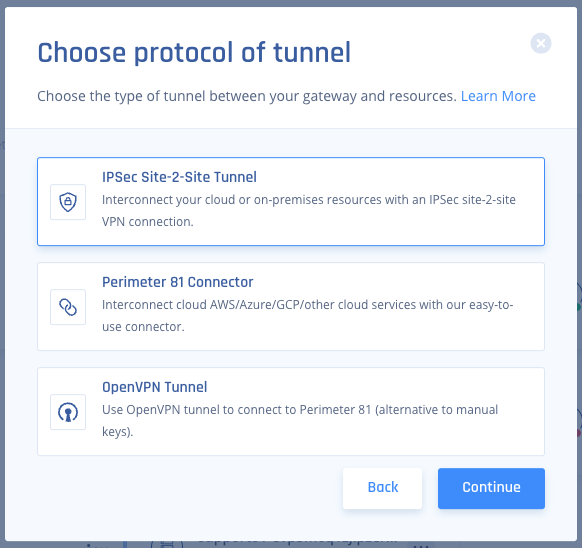
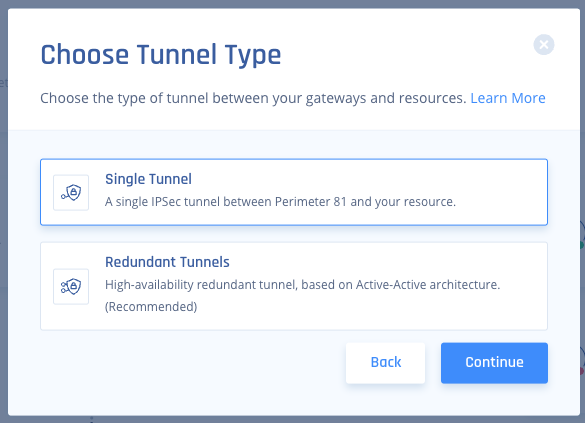
- Select Single Tunnel, and Click Continue.
- In the General Settings section, specify these:
- Name - Set the name for the Site.
- Shared Secret - Put a shared secret or select Generate.
- Public IP and Remote ID - Input your Sonicwall Firewall Public WAN IP address.Double NATIf the SonicWall firewall is behind another router, please input the local LAN IP of the SonicWall under Remote ID (for example: 192.168.1.2),
- In Check Point SASE Gateway Proposal Subnets Choose your Check Point SASE Network Subnet.
- In Remote Gateway Proposal Subnets, input your SonicWall internal LAN subnet.
.PNG)
- In the Advanced Settings section, specify these:
- IKE: V2Note - If you encounter stability issues, change this to Main Mode and update the Check Point SASE connection to V1.
- IKE Lifetime: 8h
- Tunnel Lifetime: 1h
- Dead Peer Detection Delay: 10s
- Dead Peer Detection Timeout: 30s
- Phase 1:
- Encryption (Phase 1): aes256
- Integrity (Phase 1): sha1
- Key Exchange Method: modp1024
- Phase 2:
- Encryption (Phase 2): aes256
- Integrity (Phase 2): sha1
- Key Exchange Method: modp1024
.PNG)
- IKE: V2
- Click Add Tunnel.
Creating objects in SonicWall
- Open the SonicWall user interface, and select Objects.
- Go to Address Objects.
- Click Add.
- Create an address object for your external Check Point SASE Gateway address.
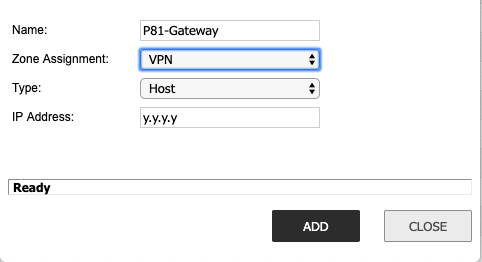
- Name: Select a logical name. For example, "P81-Silicon-Valley"
- Zone Assignment: VPN
- Type: Host
- IP Address: Input your Check Point SASE gateway address.
- Add another Object (steps 1-3) for your internal Check Point SASE Subnet.
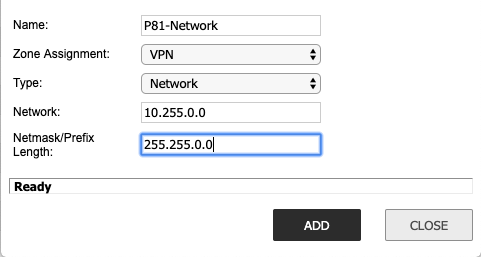
- Name: Select a logical name. Example: "P81-Network"
- Zone Assignment: VPN
- Type: Network
- Network: Your Check Point SASE Subnet (usually 10.255.0.0).
- Netmask/Prefix Length: Your Check Point SASE Subnet mask (usually 255.255.0.0).Finding your Check Point SASE Subnet
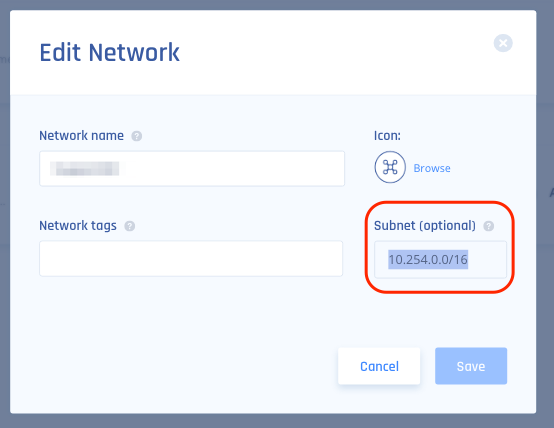
- Go to your Check Point SASE Admin console, and navigate to the network.
- Click the ellipses ("...") -> Edit network.
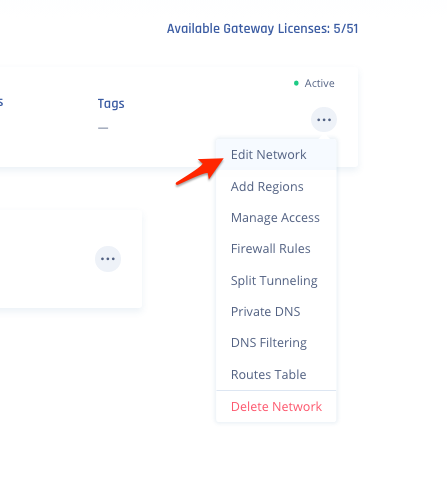
- Your Check Point SASE Subnet should be under Subnet (optional).
Defining firewall Policies in the SonicWall Interface
- VPN to WAN Rule
- Go to Policy -> Rules.
- Select Add.
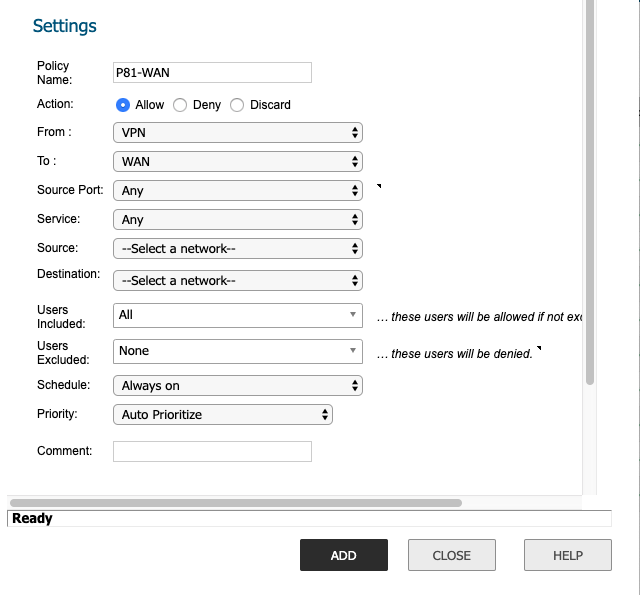
- Policy Name: P81-WAN
- Action: Allow
- From: VPN
- To: WAN
- Source Port: Any
- Service: Any
- Source: P81-Gateway object
- Destination: Your external internet interface object
- Select Add.
- VPN to LAN Rule
- Go to Policy:-> Rules.
- Select Add.
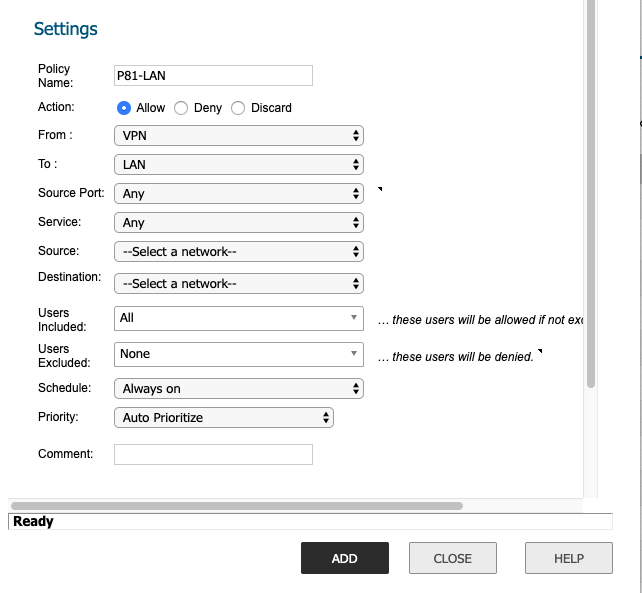
- Policy Name: P81-LA
- Action: Allow
- From: VPN
- To: LAN
- Source Port: Any
- Service: Any
- Source: P81: P81-Network (the Check Point SASE subnet) Object
- Destination: Your internal subnet object
- Select Add.
Crating a Site-to-Site connection in the SonicWall interface
- In the SonicWall interface, navigate to VPN.
- Under Base Settings, add a VPN Policy.
- General Tab
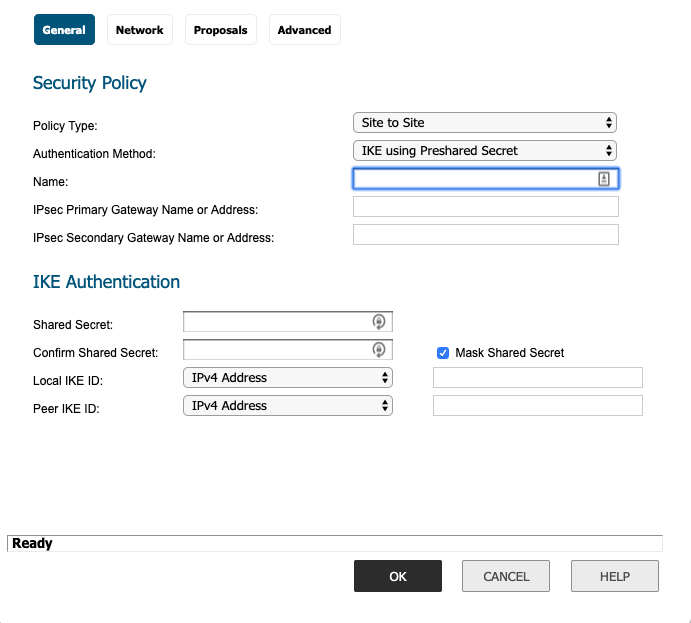
- Security Policy
- Policy Type: Site to Site
- Authentication Method: IKE using Preshared Secret.
- Name: Give it a name ex. "P81-Silicon Valley"
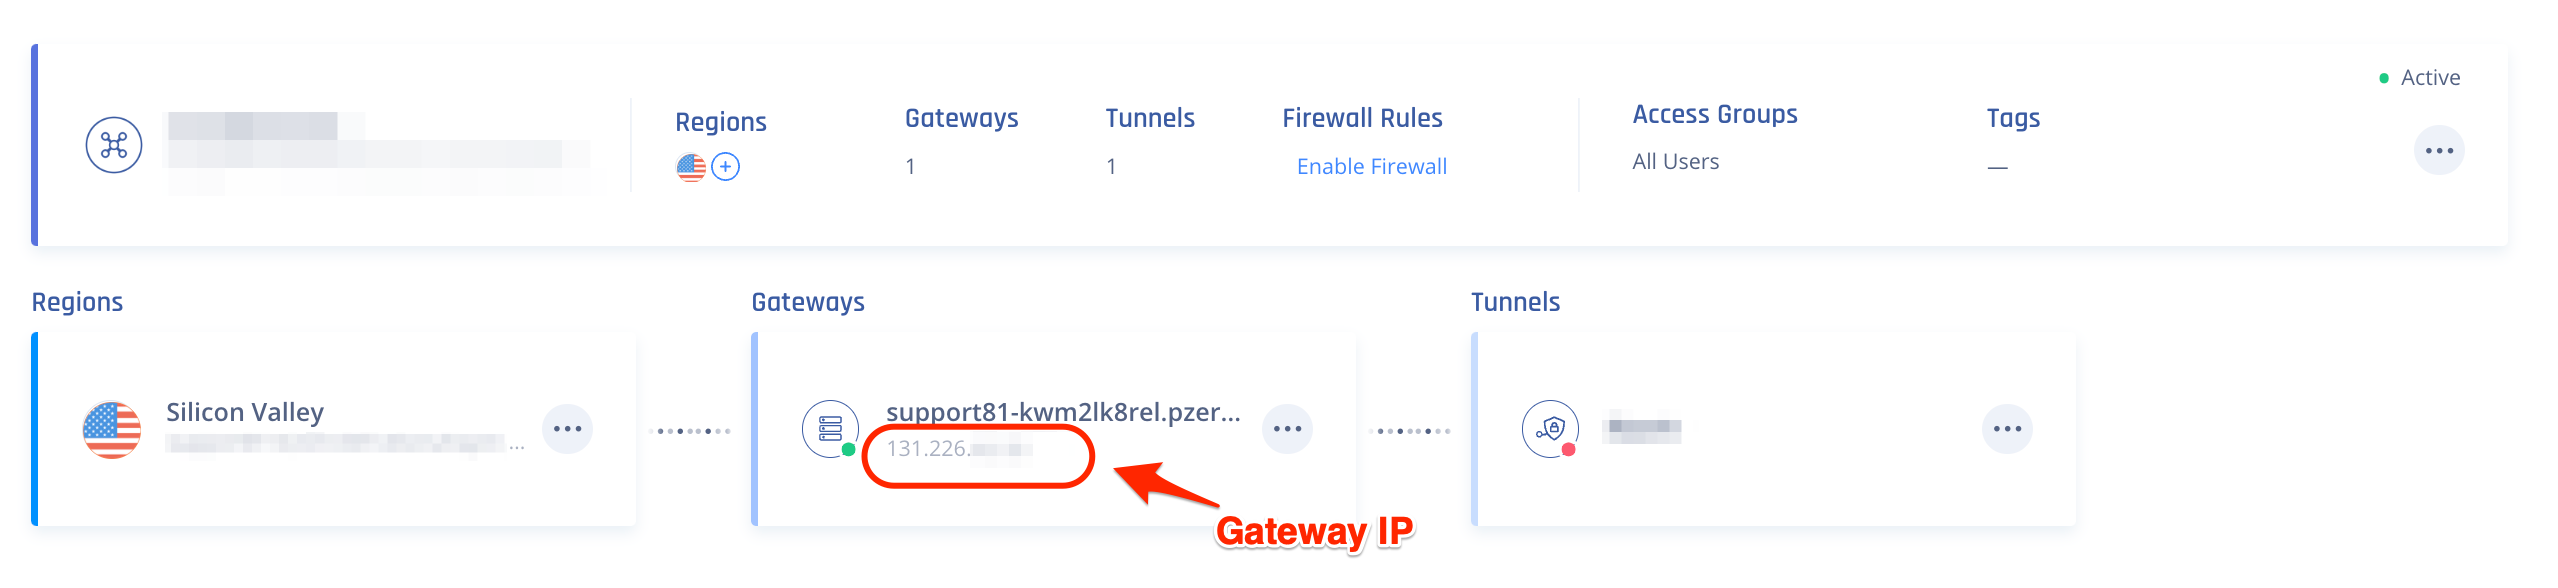
- IPsec Primary Gateway Name or Address: Input your P81 gateway address.
- IPsec Secondary Gateway Name or Address: Leave blank.
- IKE Authentication
- Shared Secret: Input the same shared secret you set in Check Point SASE tunnel configuration.
- Confirm Secret: Input the secret again.
- Local IKE ID: "IPv4 Address: put your local external internet address.
- Peer IKE ID: "IPv4 Address:" put your P81 gateway address.
- Security Policy
- Network Tab
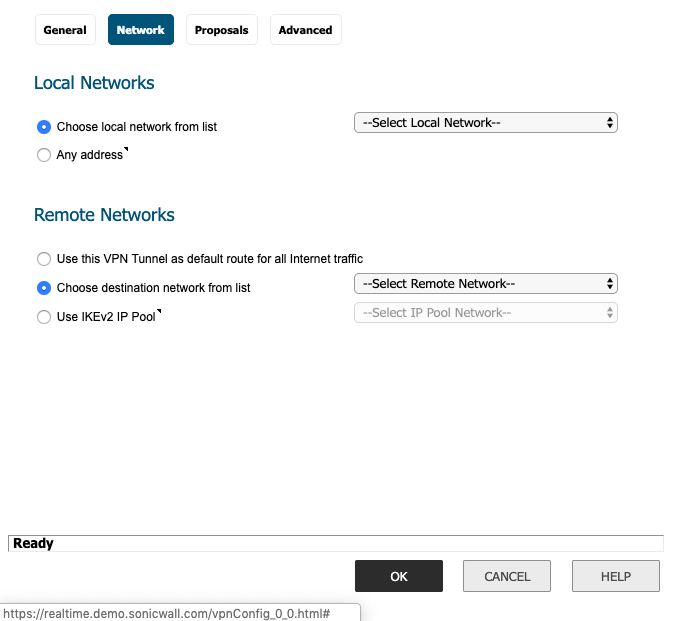
- Local Networks
- Choose a local network from the list:Select your local LAN network from the dropdown listChoosing your Local Interface:Typically, this will be the subnet labeled "X0 (LAN)" in your SonicWall Network Interface portal.
- Choose a local network from the list:Select your local LAN network from the dropdown list
- Remote Networks
- Choose destination network from the list: Select the P81-Network (Check Point SASE subnet) object
- Local Networks
- Proposals Tab
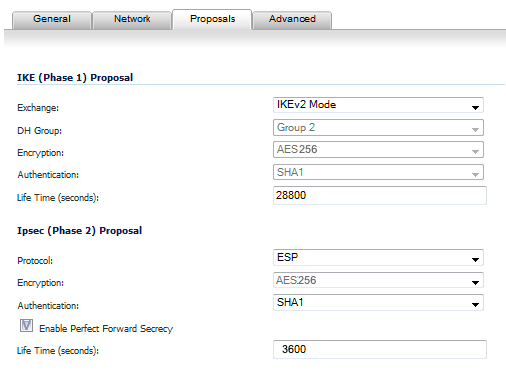
- IKE (Phase 1) Proposal
- Exchange: IKEv2 Mode
- DH Group: Group 2
- Encryption: AES-256
- Authentication: SHA1
- Life Time (seconds): 28800
- IPSEC (Phase 2) Proposal
- Protocol: ESP
- Encryption: AES-256
- Authentication: SHA1
- Enable "Enable Perfect Forward Security"
- DH Group: Group 2
- Life Time (seconds): 3600
- IKE (Phase 1) Proposal
- Advanced Tab
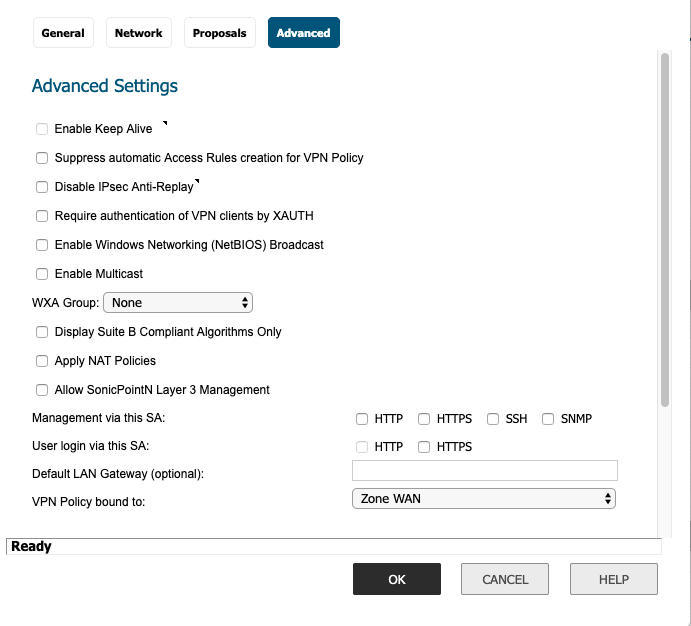
- Advanced Setting
- Check the Enable Keep Alive box.
- Advanced Setting
- General Tab
- Select OK to create the new VPN Policy.
You can select the Play (►) button to the right of the Currently Active VPN Tunnels, and you should see that your new tunnel is up.
If the tunnel won't start you can navigate to the Event Logs and check for errors regarding the new VPN policy you've created.
Verifying the Setup
After following the above steps, your tunnel should be active.
To verify, go to your Check Point SASE dashboard, locate the tunnel you just created, and check the tunnel status.
It should indicate that the tunnel is "Up", signifying a successful connection.
Next, connect to your network using the Check Point SASE agent and attempt to access one of the resources in your environment.
Troubleshooting
If you encounter issues during or after the setup, try reviewing your settings to ensure everything matches the instructions. In particular, check the IP addresses and other details you entered during setup. If issues persist, please consult our dedicated support.
Support Contacts
If you have any difficulties or questions, don't hesitate to contact Check Point SASE's support team. We offer 24/7 chat support on our website at sase.checkpoint.com, or you can email us at sase-support@checkpoint.com. We're here to assist you and ensure your VPN tunnel setup is a success.