
Change your DNS settings in Windows 10
- Using the Control Panel
- Using Settings
- Using a Command Prompt
Using the Control Panel
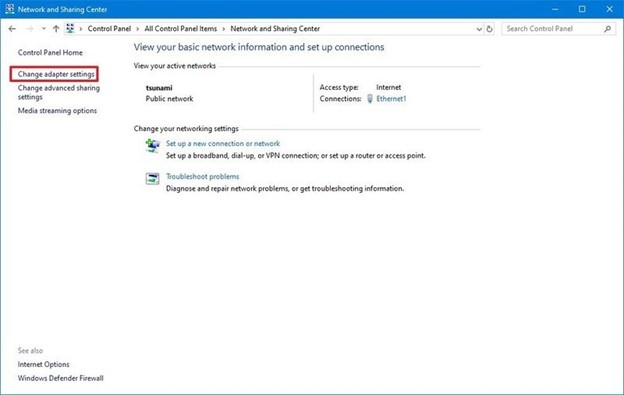
To change the DNS settings on Windows 10 using Control Panel, use these steps:
- Open the Control Panel.
- Click on Network and Internet.
- Click on Network and Sharing Center.
- Click the Change adapter settings option in the left pane.
5. Right-click the network interface that connects Windows 10 to the internet, and select the Properties option.
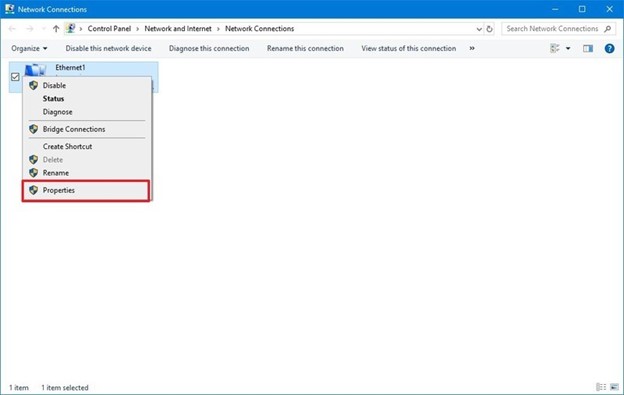
You'll know which adapter is connected to the network because it won't have a "Disabled" or "Network cable unplugged" label.
6. Select and check the Internet Protocol Version 4 (TCP/IPv4) option.
7. Click the Properties button. 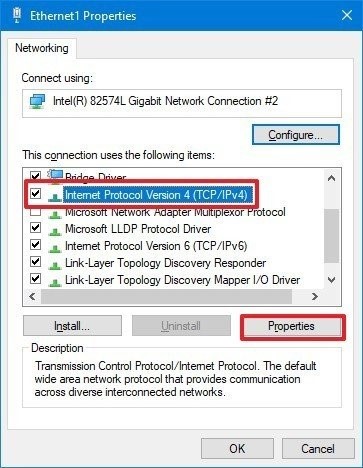
8. Select the Use the following DNS server addresses option.
When you select the option to specify the DNS settings manually, the device will continue to receive the TCP/IP address from the DHCP server (router).
9. Type your "preferred" and "alternate" DNS addresses.

If you want to use Cloudflare, Google Public DNS, or Cisco OpenDNS, you can use these settings:
- Cloudflare: 1.1.1.1 and 1.0.0.1
- Google Public DNS: 8.8.8.8 and 8.8.4.4
- OpenDNS: 208.67.222.222 and 208.67.220.220
10. (Optional) Click the Advanced button.
11. Click the DNS tab.
12. Click the Add button.
13. Specify the alternate DNS server address.
14. Click the Add button.
In addition to adding more addresses, from this tab, you can also edit and remove resolvers, and you even have an option on the side to change their priority.
15. Click the OK button.
16. Click the Close button.
Once you complete the steps, the device will immediately start using the DNS settings that you specified.
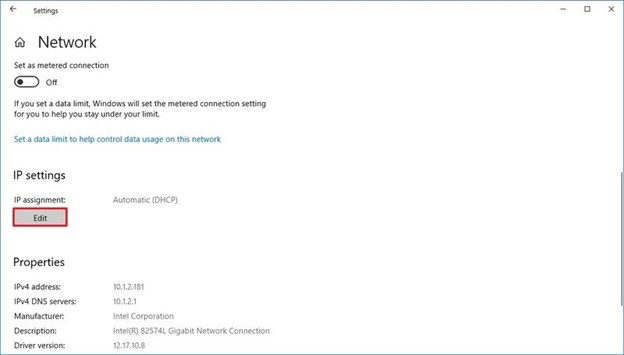
Using Settings
To change the DNS addresses using the Settings app, use these steps:
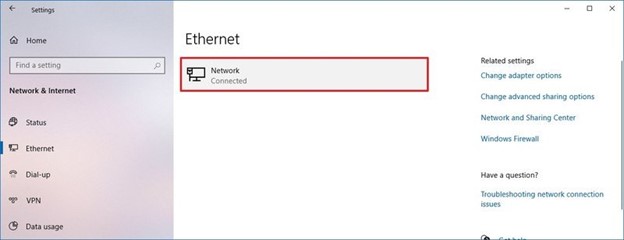
1. Open Settings.
2. Click on Network & Internet.
3. Click on Ethernet (or Wi-Fi depending on your connection).
4. Select the connection that connects Windows 10 to the network.
5. Under the "IP settings" section, click the Edit button.
6. Use the "Edit IP settings" drop-down menu and select the Manual option.
7. Turn on the IPv4 toggle switch.
8. Confirm your "Preferred DNS" and "Alternate DNS" addresses. 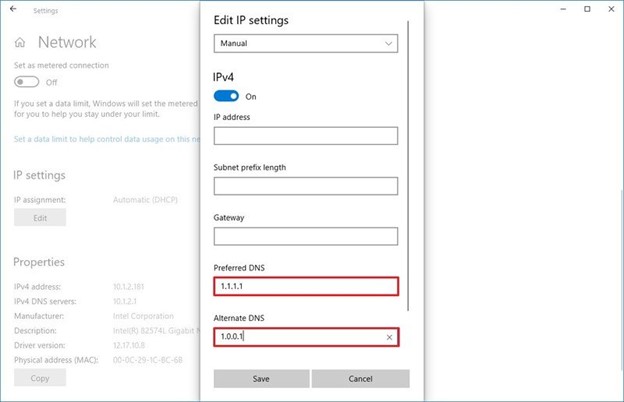
If you want to use Cloudflare, Google Public DNS, or Cisco OpenDNS, you can use these settings:
- Cloudflare: 1.1.1.1 and 1.0.0.1
- Google Public DNS: 8.8.8.8 and 8.8.4.4
- OpenDNS: 208.67.222.222 and 208.67.220.220
9. Click the Save button.
After you complete the steps, you should now be able to connect to the internet using the new resolvers.
Although the Settings app should be the recommended experience to change the DNS settings on your computer, we're not listing this option first because it can be confusing for some people.
Using the Command Prompt
Alternatively, you can also use Command Prompt to change the DNS settings on Windows 10.
To use the Command Prompt to change the device DNS settings, use these steps:
1. Open Start.
2. Search for Command Prompt, right-click the top result, and select the Run as administrator option.
3. Type the following command to launch the tool to change the networking settings and press Enter:
netsh
4. Type the following command to identify the names of the network adapters and press Enter:
interface show interface
5. Type the following command to set the primary DNS IP address and press Enter:
interface ip set dns name="ADAPTER-NAME" source="static" address="X.X.X.X"
In the command, remember to change ADAPTER-NAME with the name of your network adapter you identified on step No. 4, and change X.X.X.X with the IP address of the DNS server that you want to use.
If you want to use Cloudflare, Google Public DNS, or Cisco OpenDNS, you can use these settings:
- Cloudflare: 1.1.1.1 and 1.0.0.1
- Google Public DNS: 8.8.8.8 and 8.8.4.4
- OpenDNS: 208.67.222.222 and 208.67.220.220
For example, this command sets the primary DNS address to 1.1.1.1:
interface ip set dns name="Ethernet1" source="static" address="1.1.1.1"

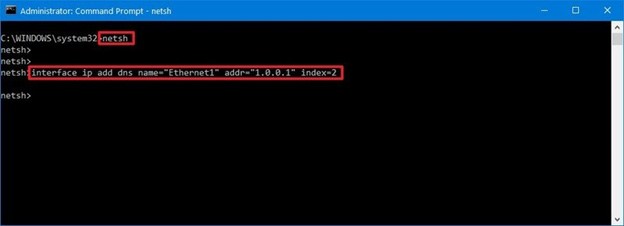
6. Type the following command to add an alternative DNS IP address and press Enter:
interface ip add dns name="ADAPTER-NAME" addr="X.X.X.X" index=2
In the command, remember to change ADAPTER-NAME with the name of your network adapter you queried on step No. 4, and change X.X.X.X with the secondary address that you want to use.
For example, this command sets the secondary DNS addres to 1.0.0.1:
interface ip add dns name="Ethernet1" addr="1.0.0.1" index=2
If you need to add even more DNS addresses, you can repeat the above steps, but increase the number of the index option by 1.
For instance, interface ip add dns name="Ethernet1" addr="8.8.8.8" index=3
Once you complete the steps, Windows 10 will start using the new DNS server addresses to resolve domain names to numeric addresses that your device can understand.
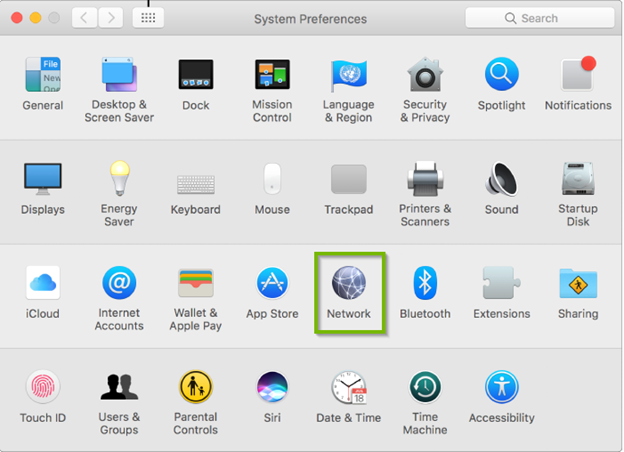
Change your DNS settings in Mac
Your home router is likely set by default to use your ISP's DNS servers, which may or may not be very reliable. There are a number of third-party DNS servers available as well.
What you need before you start:
Your computer should be connected to the Internet. (wired or wireless)
Configure DNS
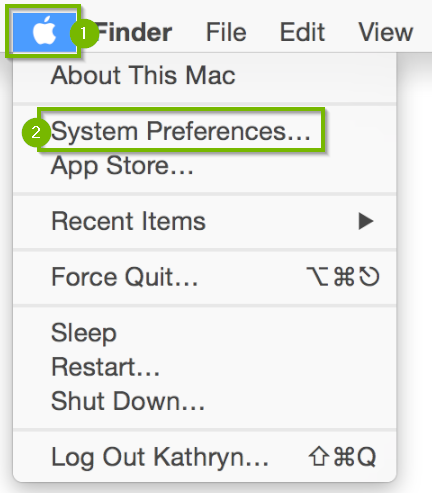
1. Choose Apple menu > System Preferences.
2. Click Network.
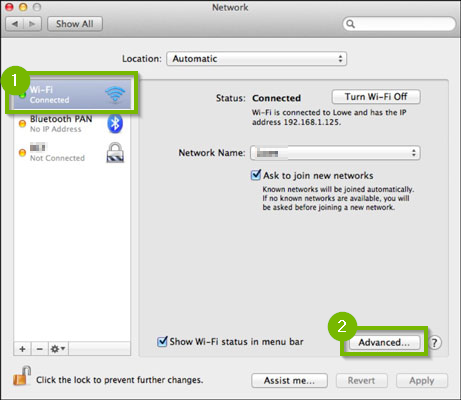
3. In the list at the left, select the network connection service you want to use (such as WiFi or Ethernet), then click Advanced.
4. Click DNS, then click the Add button at the bottom of the DNS Servers list.

5. Enter the IPv4 or IPv6 address for the DNS server. Below is a short list of commonly used public DNS servers. Secondary DNS servers can be added to add a layer of redundancy.
Provider Primary DNS Server Secondary DNS Server
Google 8.8.8.8 8.8.4.4
Dyn 216.146.35.35 216.146.36.36
OpenDNS Home 208.67.222.222 208.67.220.220
Verisign 64.6.64.6 64.6.65.6
Level3 209.244.0.3 209.244.0.4
6. Click the Add button at the bottom of the Search Domain list, then enter the search domain - for example, apple.com.

7. When you're finished, click OK.
8. Domains are searched in the order you list them; the search stops when a valid name is found.