Edgemax
- 13 Feb 2024
- 3 Minutes to read
- Contributors


Edgemax
- Updated on 13 Feb 2024
- 3 Minutes to read
- Contributors
Article Summary
Share feedback
Thanks for sharing your feedback!
Introduction
This guide will walk you through the steps needed to establish a Site-to-Site VPN tunnel between your Harmony SASE network and the EdgeMAX Device environment.
Breakdown of topics
- Pre-requisites
- Configuration Steps
- Verifying the Setup
- Troubleshooting
- Support Contacts
Pre-requisites
To successfully follow this guide, ensure that:
- An active Harmony SASE account with a previously configured network.
- The Harmony SASE app installed on your devices.
- An active EdgeMAX Device setup along with the necessary administrative permissions.
Configuration Steps
Configuring Harmony SASE Site-To-Site with Edgemax Device
- Go to the Gateway in your network from which you want to create the tunnel to Edgemax.
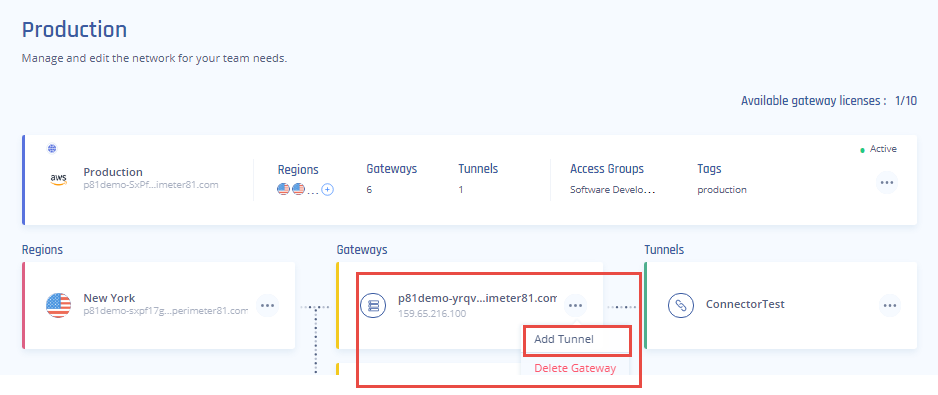
- Select the three-dotted menu (...) and select Add Tunnel.
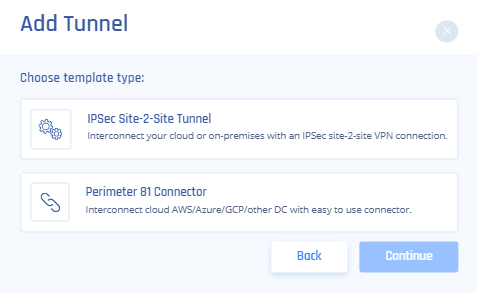
- Select IPSec Site-2-Site Tunnel and select Continue.


General Settings
Enter General settings:
Name: Set the name for the Tunnel.
Shared Secret: Put the same Shared secret you set in Edgemax.
Public IP and Remote ID: enter Edgemax VPN Gateway Public IP address.
In Harmony SASE Gateway Proposal Subnets select Any or Specific Subnet.
In Remote Gateway Proposal Subnets put your Edgemax subnet/s.
Advanced Settings
Enter the Advanced settings:

IKE Version: V1
IKE Lifetime: 8h
Tunnel Lifetime: 1h
Dead Peer Detection Delay: 15s
Dead Peer Detection Timeout: 30s
Encryption (Phase 1): aes256
Encryption (Phase 2): aes256
Integrity (Phase 1): sha1
Integrity (Phase 2): sha1
Deffie-Hellman Groups (Phase 1): 14
Deffie-Hellman Groups (Phase 2): 14
- Select Add Tunnel.
Configuring the Edgemax device
- On the Edgemax router go to the CLI and enter configuration mode.
- Enable the auto-firewall-nat-exclude feature which automatically creates the IPsec firewall/NAT policies in the iptables firewall.
set vpn ipsec auto-firewall-nat-exclude enable
- Create IKE / Phase 1 (P1) Security Associations (SAs).
set vpn ipsec ike-group FOO0 lifetime 28800
 set vpn ipsec ike-group FOO0 proposal 1 dh-group 14
 set vpn ipsec ike-group FOO0 proposal 1 encryption aes256
 set vpn ipsec ike-group FOO0 proposal 1 hash sha1
set vpn ipsec ike-group FOO0 dead-peer-detection interval 15
set vpn ipsec ike-group FOO0 dead-peer-detection timeout 30
- Create the ESP / Phase 2 (P2) SAs and enable Perfect Forward Secrecy (PFS).
 set vpn ipsec esp-group FOO0 lifetime 3600
 set vpn ipsec esp-group FOO0 pfs enable
 set vpn ipsec esp-group FOO0 proposal 1 encryption aes256
 set vpn ipsec esp-group FOO0 proposal 1 hash sha1
- Define the remote peering address (replace <secret> with your desired passphrase and <Your Harmony SASE Gateway IP> with the Gateway IP you got from Harmony SASE).
set vpn ipsec site-to-site peer <Your Harmony SASE Gateway IP> authentication mode pre-shared-secret
 set vpn ipsec site-to-site peer <Your Harmony SASE Gateway IP> authentication pre-shared-secret <secret>
 set vpn ipsec site-to-site peer <Your Harmony SASE Gateway IP> description ipsec
 set vpn ipsec site-to-site peer <Your Harmony SASE Gateway IP> local-address <Your Edgerouter WAN IP>
- Link the SAs created above to the remote peer and bind the VPN to a virtual tunnel interface (vti0).
set vpn ipsec site-to-site peer <Your Harmony SASE Gateway IP> ike-group FOO0
 set vpn ipsec site-to-site peer <Your Harmony SASE Gateway IP> vti bind vti0
 set vpn ipsec site-to-site peer <Your Harmony SASE Gateway IP> vti esp-group FOO0
- Configure the virtual tunnel interface (vti0) and assign it an IP address (this is just an internal IP address for the Virtual Tunnel Interface - IP can be anything that you do not use on any of your sites)
set interfaces vti vti0 address 192.168.20.20/32
- Create a static route for the Harmony SASE subnet (in this case the default 10.255.0.0/16)
set protocols static interface-route 10.255.0.0/16 next-hop-interface vti0
- Commit the changes and save the configuration.
commit ; save
- Go back to the GUI, click VPN -> site to site connection.
- Verify that the peer associated with the Gateway IP you got from Harmony SASE has:
Remote subnet: 10.255.0.0/16 (or the local Harmony SASE gateway that you selected)
Local subnet: All the subnet range (CIDR) of your LAN devices
Verifying the Setup
After following the above steps, your tunnel should be active.
To verify, go to your Harmony SASE dashboard, locate the tunnel you just created, and check the tunnel status.
It should indicate that the tunnel is "Up", signifying a successful connection.
Next, connect to your network using the Harmony SASE agent and attempt to access one of the resources in your environment.
Troubleshooting
If you encounter issues during or after the setup, try reviewing your settings to ensure everything matches the instructions. In particular, check the IP addresses and other details you entered during setup. If issues persist, please consult our dedicated support.
Support Contacts
If you have any difficulties or questions, don't hesitate to contact Harmony SASE's support team. We offer 24/7 chat support on our website at Perimeter81.com, or you can email us at support@perimeter81.com. We're here to assist you and ensure your VPN tunnel setup is a success.
Was this article helpful?