
Introduction
Welcome to our guide on establishing a Site-to-Site VPN tunnel between your Check Point SASE network and the Juniper JunOS environment.
Breakdown of topics
- Pre-requisites
- Configuration Steps
- Verifying the Setup
- Troubleshooting
- Support Contacts
Pre-requisites
To successfully follow this guide, ensure that:
- Have an active Check Point SASE account and an established network.
- Have the Check Point SASE application installed on your devices.
- Possess an active Juniper ScreenOS setup with the necessary administrative rights.
Configuration Steps
Configuring an IPSec tunnel in the Management Platform
- Go to the Gateway in your network from which you want to create the tunnel to Juniper SRX Firewall.
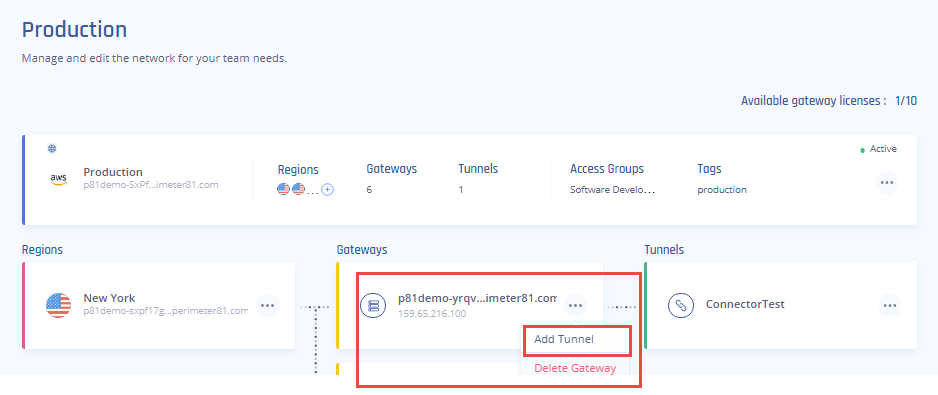
- Select the three-dotted menu (...) and select Add Tunnel.
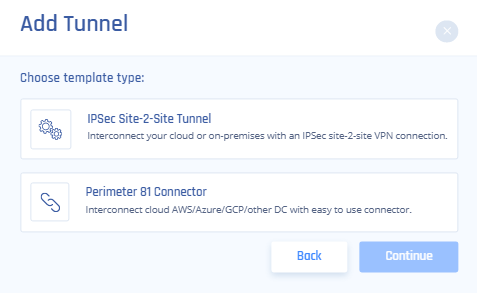
- Select IPSec Site-2-Site Tunnel and select Continue.
- In the General settings section, specify these:
.PNG)
- Name: Set the name for the Tunnel.
- Shared Secret: Enter the shared secret that you set in Juniper.
- Public IP and Remote ID: Enter Edgemax VPN Gateway Public IP address.
- In Check Point SASE Gateway Proposal Subnets, select Any or Specific Subnet.
- In Remote Gateway Proposal Subnets, enter your Juniper subnet/s.
- In the Advanced settings section, specify these:
.PNG)
- IKE Version: V2
- IKE Lifetime: 8h
- Tunnel Lifetime: 1h
- Dead Peer Detection Delay: 10s
- Dead Peer Detection Timeout: 30s
- Phase 1
- Encryption (Phase 1): aes256
- Integrity (Phase 1): sha256
- Key Exchange Method: modp2048
- Phase 2
- Encryption (Phase 2): aes256
- Integrity (Phase 2): sha256
- Key Exchange Method: modp2048
- Click Add Tunnel.
Configuration in the Juniper SRX Firewall Interface
Please follow the steps below. Each step is accompanied by a command that needs to be executed at the JunOS interface.
1. Create a tunnel interface. Do not assign an IP address but make sure it’s enabled for layer 3 communication.
set interfaces st0 unit 0 family inet
2. Set up the IKE Proposal.
set security ike proposal p81 description Perimeter81-SRXTunnel
set security ike proposal p81 authentication-method pre-shared-keys
set security ike proposal p81 dh-group group14
set security ike proposal p81 authentication-algorithm sha-256
set security ike proposal p81 encryption-algorithm aes-256-cbc
set security ike proposal p81 lifetime-seconds 28800
3. Set up the IKE policy configuration.
4. Replace SHARED_SHARED_STRING with the shared secret you generated at the Check Point SASE platform.
set security ike policy p81-policy proposals p81
set security ike policy p81-policy pre-shared-key ascii-text SHARED_SHARED_STRING
5. Set up the IKE gateway configuration.
6. Replace P81_GW_ADDRESS with your Check Point SASE gateway IP, LOCAL_ADDRESS with your local public IP.
The external interface is the interface on which the above IP is configured (Local Identity Inet).
set security ike gateway p81-ike-gateway ike-policy p81-policy
set security ike gateway p81-ike-gateway address P81_GW_ADDRESS
set security ike gateway p81-ike-gateway local-identity inet LOCAL_ADDRESS
set security ike gateway p81-ike-gateway external-interface ge-0/0/0
set security ike gateway p81-ike-gateway version v1-only
7. Set up the IPSec proposal.
set security ipsec proposal p81-proposal description Perimeter81
set security ipsec proposal p81-proposal protocol esp
set security ipsec proposal p81-proposal authentication-algorithm hmac-sha-256-128
set security ipsec proposal p81-proposal encryption-algorithm aes-256-cbc
set security ipsec proposal p81-proposal lifetime-seconds 3600
8. Set up the IPSec policy configuration.
Perfect Forward Secrecy must be enabled and reference the previously defined proposal.
set security ipsec policy ipsec-p81-policy perfect-forward-secrecy keys group14
set security ipsec policy ipsec-p81-policy proposals p81-proposal
9. Bind your tunnel interface and apply configurations. If your Check Point SASE network subnet is not 10.255.0.0/16 make sure to change the appropriate line.
set security ipsec vpn p81-ipsec bind-interface st0.0
set security ipsec vpn p81-ipsec ike gateway p81-ike-gateway
set security ipsec vpn p81-ipsec ike ipsec-policy ipsec-p81-policy
set security ipsec vpn p81-ipsec establish-tunnels on-traffic immediately
set security address-book global address p81_internal 10.255.0.0/16
10. Set Firewall security policies.
If you place the tunnel interface into your trust zone or a zone where everything is allowed, then this step can be omitted. Otherwise, you'll need to adjust according to your network topology and particular use case.
In this example, we are allowing icmp and ssh from zone “vpn” with a source address of 10.255.0.0/16 to any address in zone “trust”.
set security policies from-zone vpn to-zone trust policy vpn-internal match source-address p81_internal
set security policies from-zone vpn to-zone trust policy vpn-internal match destination-address any
set security policies from-zone vpn to-zone trust policy vpn-internal match application junos-icmp-all
set security policies from-zone vpn to-zone trust policy vpn-internal match application junos-ssh
set security policies from-zone vpn to-zone trust policy vpn-internal then permit
11. Set host inbound services. We must allow services destined to the firewall interfaces as well. IKE is a must in this case. Not only the tunnel interface must have it, but also your public-facing interface.
set security zones security-zone vpn interfaces st0.0 host-inbound-traffic system-services ike
set security zones security-zone untrust interfaces ge-0/0/0.0 host-inbound-traffic system-services ike
12. Define a static route to the Check Point SASE network.
set routing-options static route 10.255.0.0/16 next-hop st0.0
Verifying the Setup
After following the above steps, your tunnel should be active.
To verify, go to your Check Point SASE dashboard, locate the tunnel you just created, and check the tunnel status.
It should indicate that the tunnel is "Up", signifying a successful connection.
Next, connect to your network using the Check Point SASE agent and attempt to access one of the resources in your environment.
Troubleshooting
If you encounter issues during or after the setup, try reviewing your settings to ensure everything matches the instructions. In particular, check the IP addresses and other details you entered during setup. If issues persist, please consult our dedicated support.
Support Contacts
If you have any difficulties or questions, don't hesitate to contact Check Point SASE's support team. We offer 24/7 chat support on our website at sase.checkpoint.com, or you can email us at sase-support@checkpoint.com. We're here to assist you and ensure your VPN tunnel setup is a success.