Check Point - Redundant Tunnel
- 24 May 2024
- 6 Minutes to read
- Contributors


Check Point - Redundant Tunnel
- Updated on 24 May 2024
- 6 Minutes to read
- Contributors
Article summary
Did you find this summary helpful?
Thank you for your feedback
Introduction
This guide will guide you through the steps needed to establish a Site-to-Site redundant VPN tunnel between your Harmony SASE network and your Check Point environment.
Breakdown of topics
- Pre-requisites
- Configuration Steps
- Verifying the Setup
- Troubleshooting
- Support Contacts
Pre-requisites
To successfully follow this guide, ensure that:
- You have an active Harmony SASE account and network.
- The Harmony SASE app is installed on your devices.
- An active Check Point account with administrative permissions is accessible.
- A cluster of two Quantum gateways, each with a public IP.
Configuration Steps
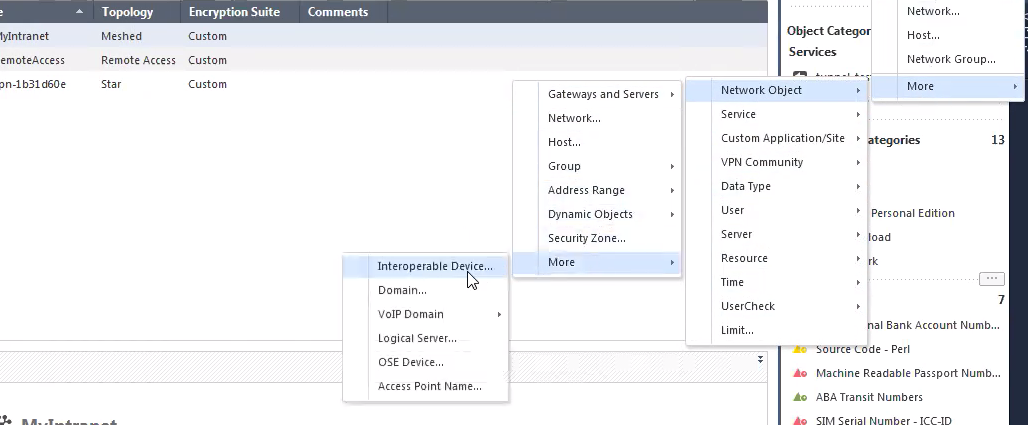
Creating a gateway object in the Check Point Smart Console
- Open the Check Point Smart Console.
- Go to Security Policies.
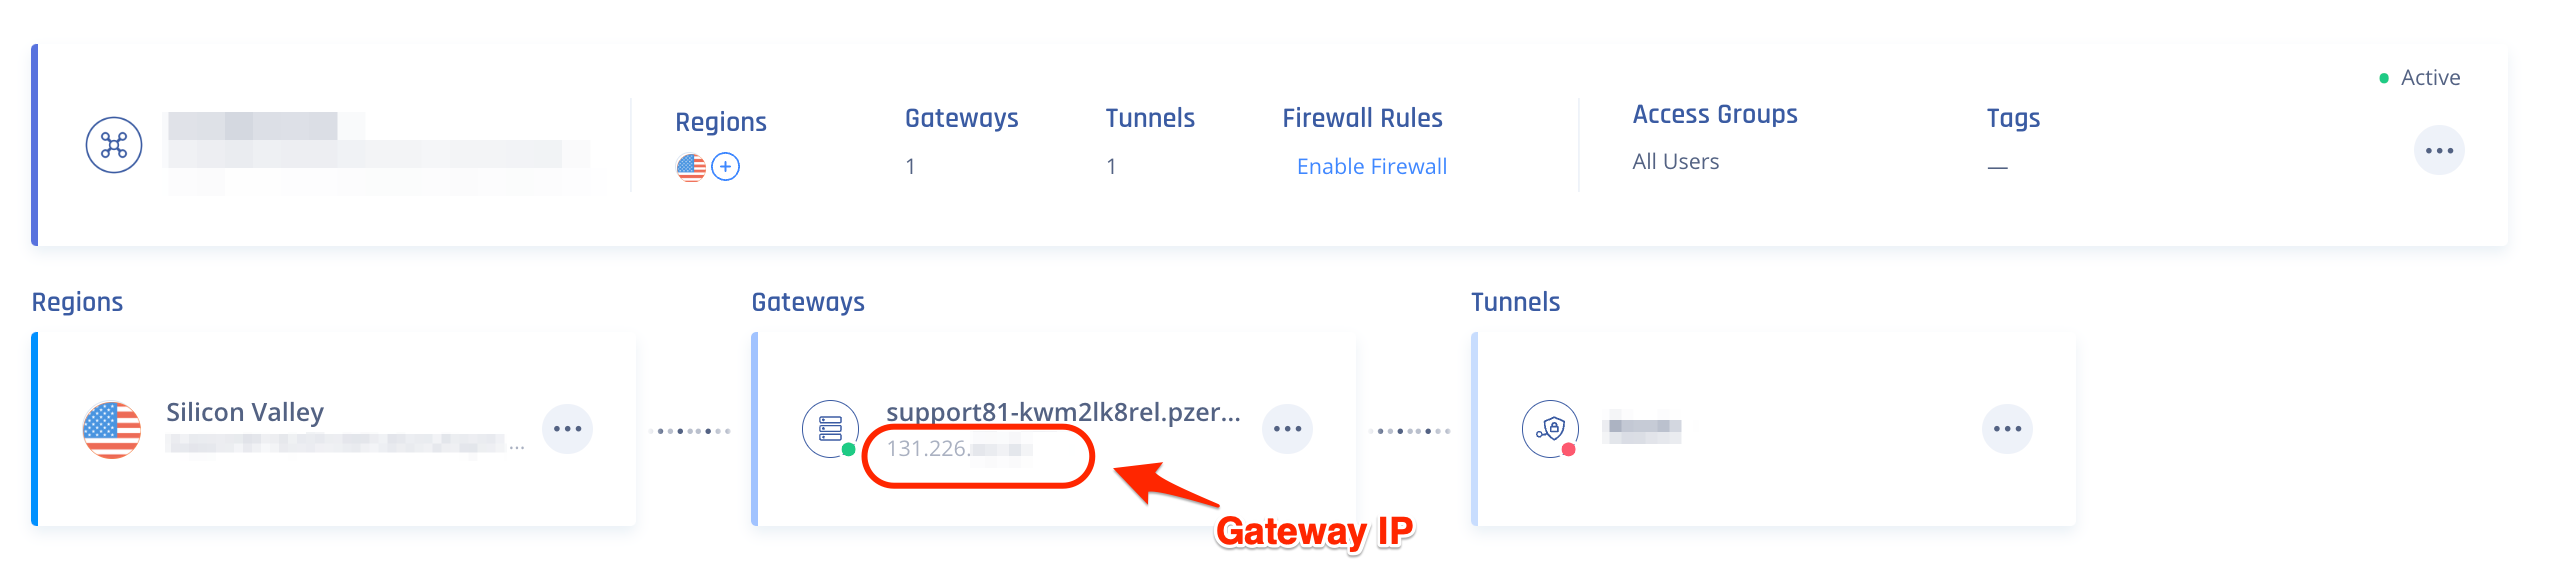
- Add the first Harmony SASE Gateway as an object as shown in the image below. Please make sure you have your gateway IP (which can be found in the Network tab in your Management Platform).


Adding the Harmony SASE gateway IP and remote subnet
- Open the Harmony SASE object you created.
- Go to Topology.
- Select New at the top.
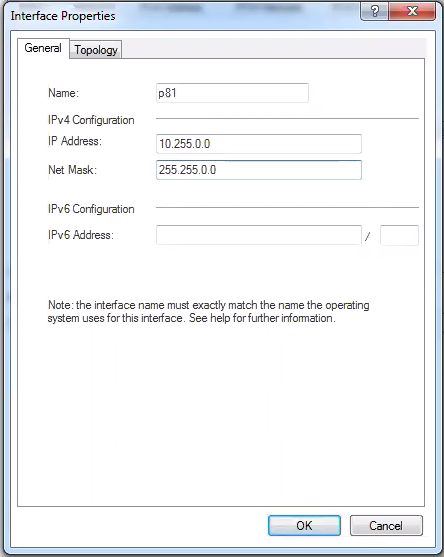
- Under the General tab, fill in Name, IP Address, and Net Mask.
- Add Harmony SASE remote subnet 10.255.0.0 as IP Address.
- Add "255.255.0.0" as Net Mask.
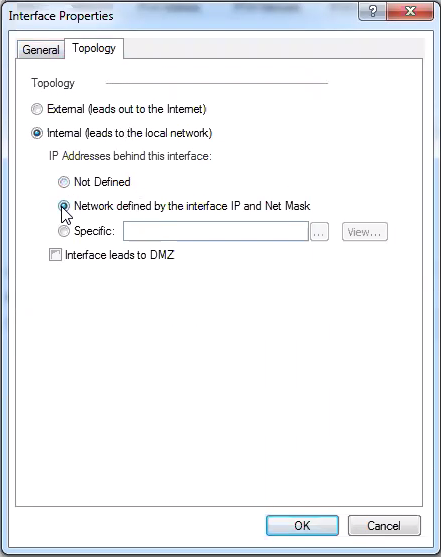
- Open the Topology tab. Select the Network defined by the interface IP and Net Mask.
- Select OK.
- Go to Topology.
- Select New at the top.
- Under the General tab, fill in Name, IP Address, and Net Mask.
- Add Harmony SASE gateway IP xxx.xxx.xxx.xxx as IP Address.
- Add "255.255.255.255" as Net Mask.
- Open the Topology tab. Select External (leads out to the internet).
- Select OK.
- Repeat steps 1-15 for the second Harmony SASE Gateway.


Creating a VPN Star community
- Create a new Star Community.
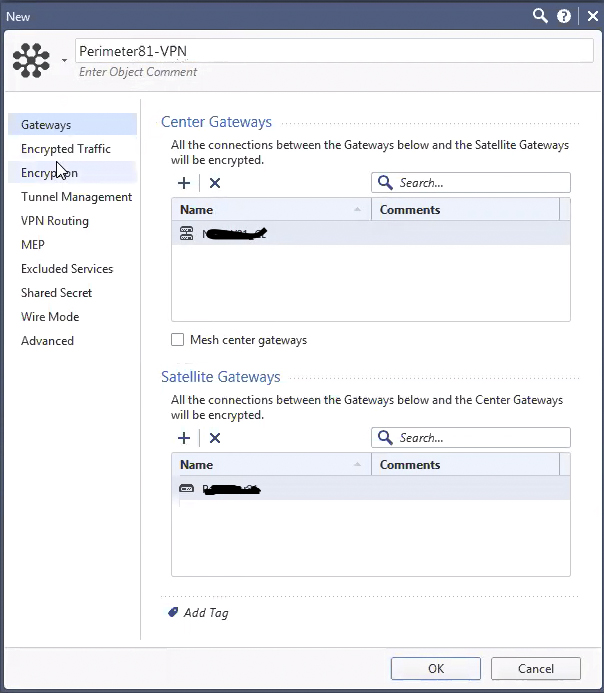
2. Fill in the following information:
- Specify an Object Name of your own choice.
- Add your first external Firewall IP as Center Gateway.
- Add your first Harmony SASE gateway as Satellite Gateways.
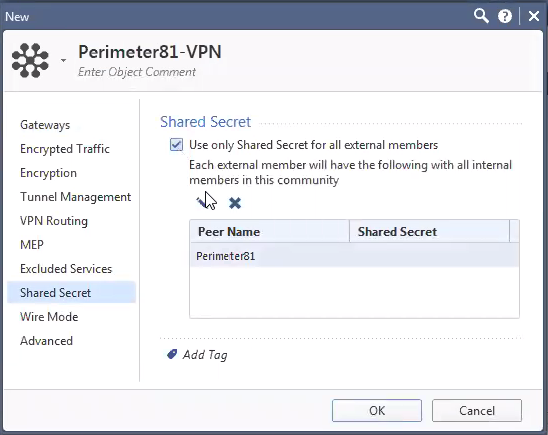
- Go to Shared Secret.
- Add a Shared Secret and write it down as it will also be used in configuring the tunnel at the Management Platform. Please note: Check Point recommends choosing a shared secret that contains at least 20 characters.
5. Go to Encryption and set IKE Security. Note that you'll need to set these exact preferences while configuring the tunnel at the Management Platform.

- Go to Tunnel Management.
- Set VPN Tunnel Sharing to One VPN tunnel per Gateway pair.
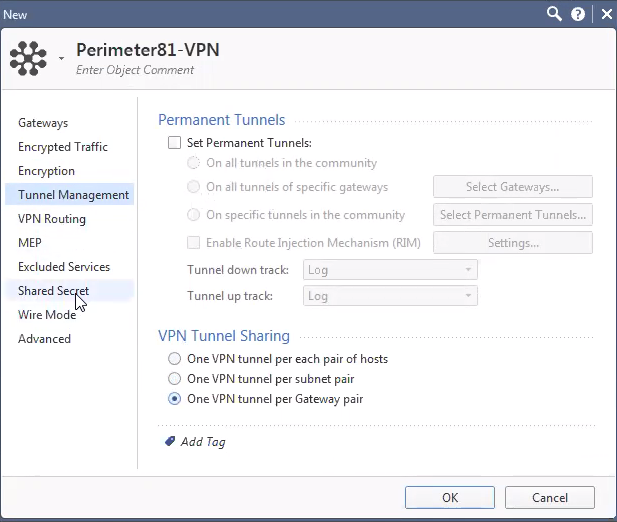
- Important: The remote subnets you defined need to match exactly to the remote subnets entered within the Harmony SASE side (if additional subnets are added, it can cause the tunnels to break from time to time).
- Select OK.
- Perform steps 1-9 for the second Firewall IP and second Harmony SASE Gateway.
Additional settings in Check Point Smart Console
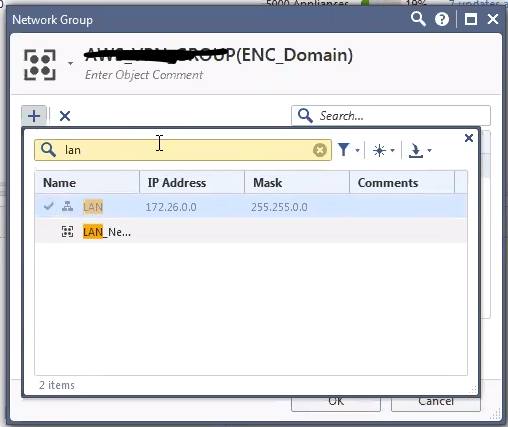
- Under Check Point firewall policy, add a rule for any to any, in and out to 10.255.0.0/16 (this may vary if you did not set the default subnet during Harmony SASE network creation).
- Create a Network group with All local networks to be trusted with the VPN tunnels.
- Publish and Install Policy.

Adding the VPN Tunnel Interface and BGP Configuration
- Sign in to the UI of the first quantum gateway.
- Under Network Management, select Network Interfaces.
- Click on Add and select VPN Tunnel.
- In the Add VPN Tunnel screen add the following details:
- VPN Tunnel ID - Choose a unique ID.
- Peer - This should be the name of the interoperable device previously created for the first Harmony SASE Gateway.
- VPN Tunnel Type - Numbered
- Local Address - Internal address for the Quantum Gateway (within 169.254.x.x/30 ranges).
- Remote Address - Internal address for the Harmony SASE Gateway (within 169.254.x.x/30 ranges, corresponding to the above).

- Click on OK to save the settings.
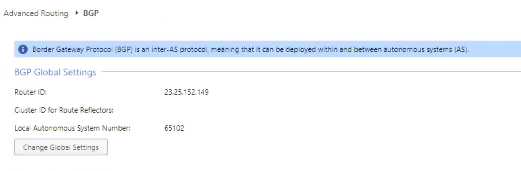
- Under Advanced Routing, select BGP.
- Make sure that under the BGP Global Settings, the Router ID and Local Autonomous System Number are set correctly.
- Under the Peer Groups click on Add and add the following details:
- Peer AS Number - The AS Number of the Harmony SASE network If not set already, you can use 65000)
- Peer Group Type - External
- Local Address - The local address set under the VTI configuration above
- Peers - Click to add the remoteaddress set under the VTI configuration above. Make sure that under the Advanced Settings, Graceful Restart is checked.
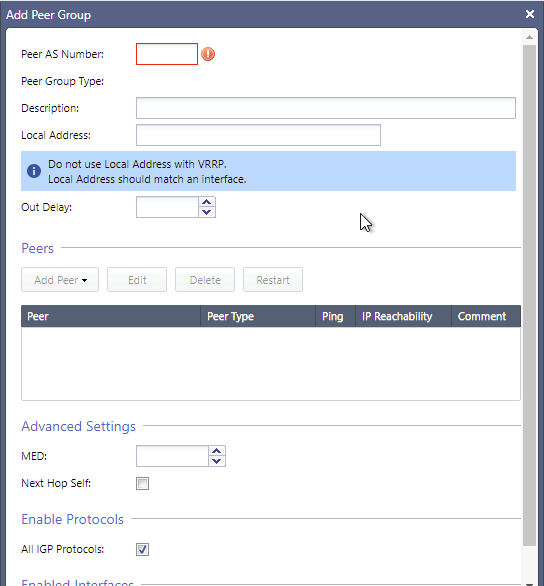
- Click to save the settings.
- Under Inbound Route Filters, select Add and select Add BGP Policy Filter (Based on AS)
- In the opened screen, set the following parameters:
- Add BGP Policy - set a number from the available range
- AS Number - set the AS Number of the Harmony SASE Network
- Action - Accept
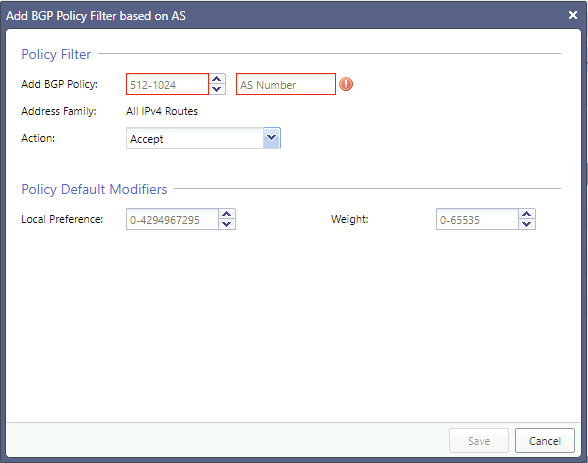
- Click to save the changes.
- Under Route Redistribution, select Add Redistribution From and select BGP Based on AS
- In the opened screen, set the following parameters:
- To Protocol - select the AS of the Harmony SASE network
- From BGP AS - select the appropriate peer AS.
- Route - select All IPv4 Routes
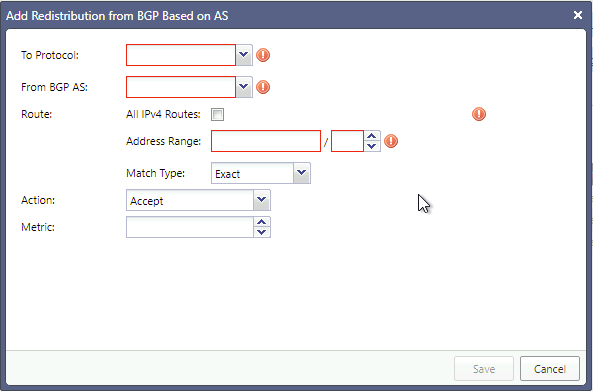
- Click to save the settings.
- Perform steps 1-15 for the second Quantum Gateway and Harmony SASE Gateway.


Configuring the tunnel in the Management Platform
- Open your Management Platform and go to the Networks tab.
.png)
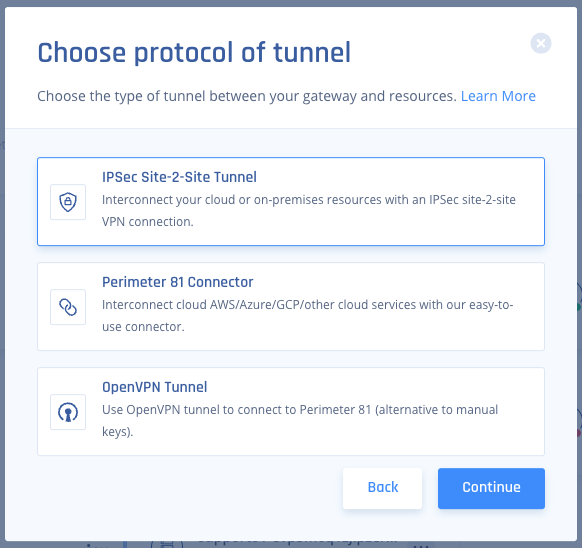
- Go to the gateway in your network from which you want to create the tunnel to Check Point, select the three-dotted menu (...) beside it, and select Add Tunnel.
- Select IPSec Site-2-Site Tunnel and select Continue
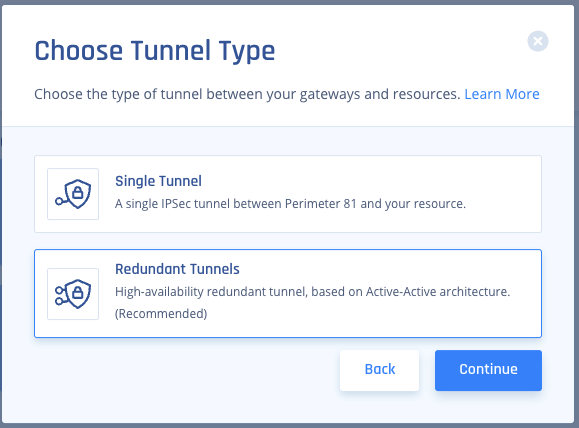
- Select Redundant Tunnels, and Click Continue.
- Select a logical name for the tunnel
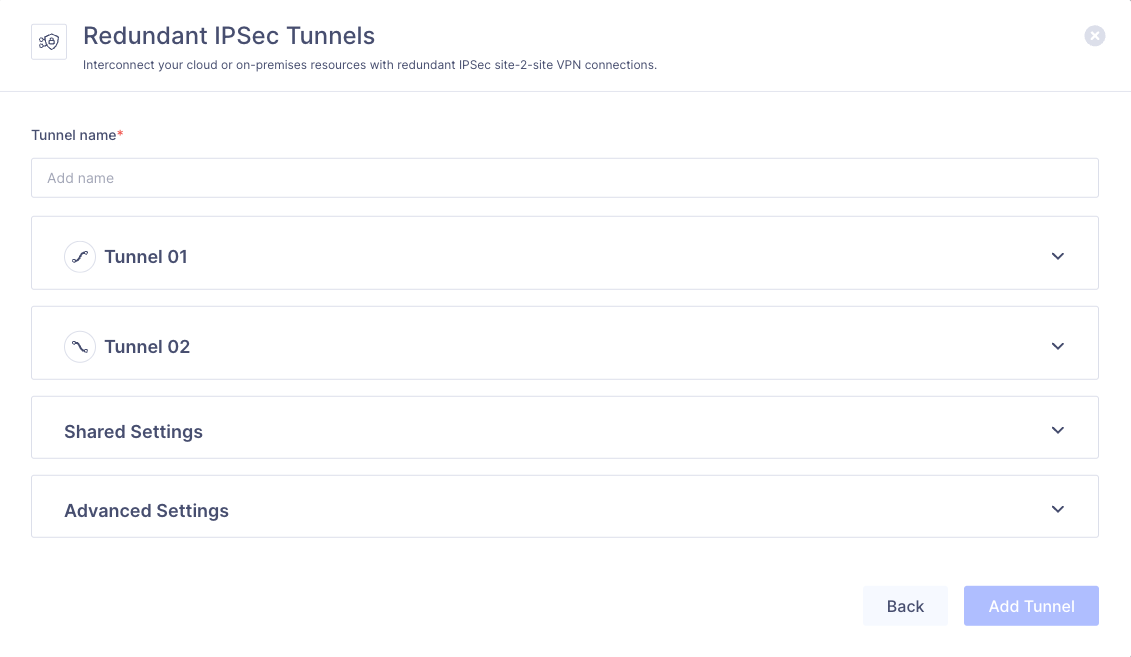
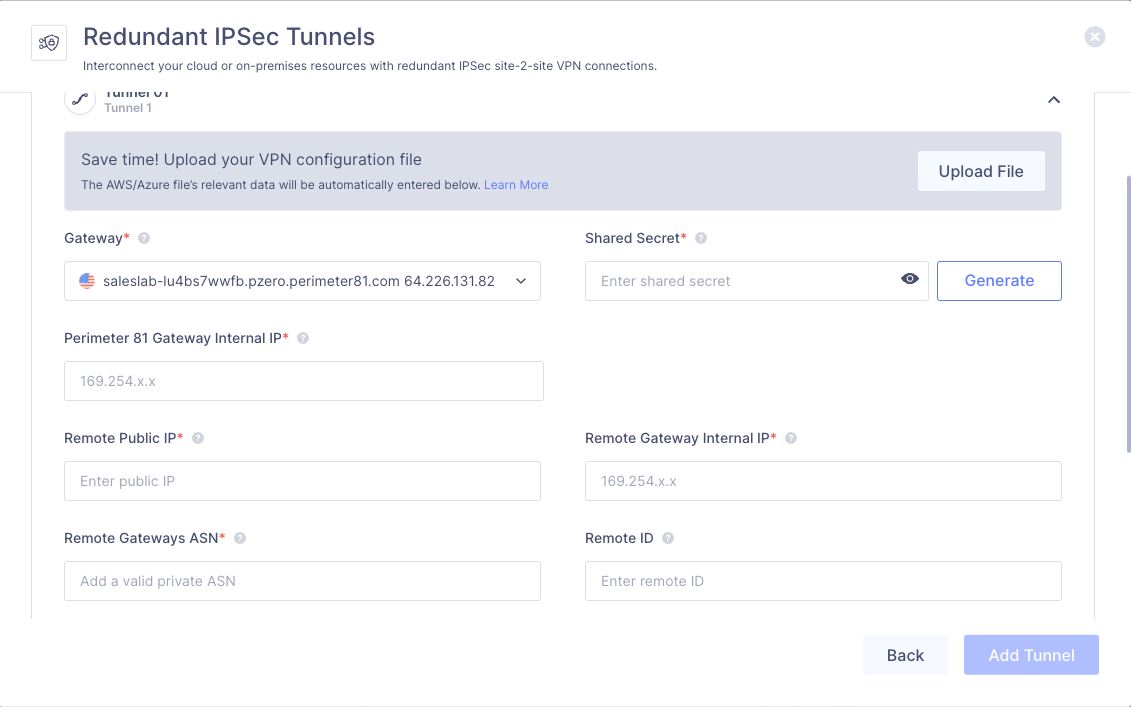
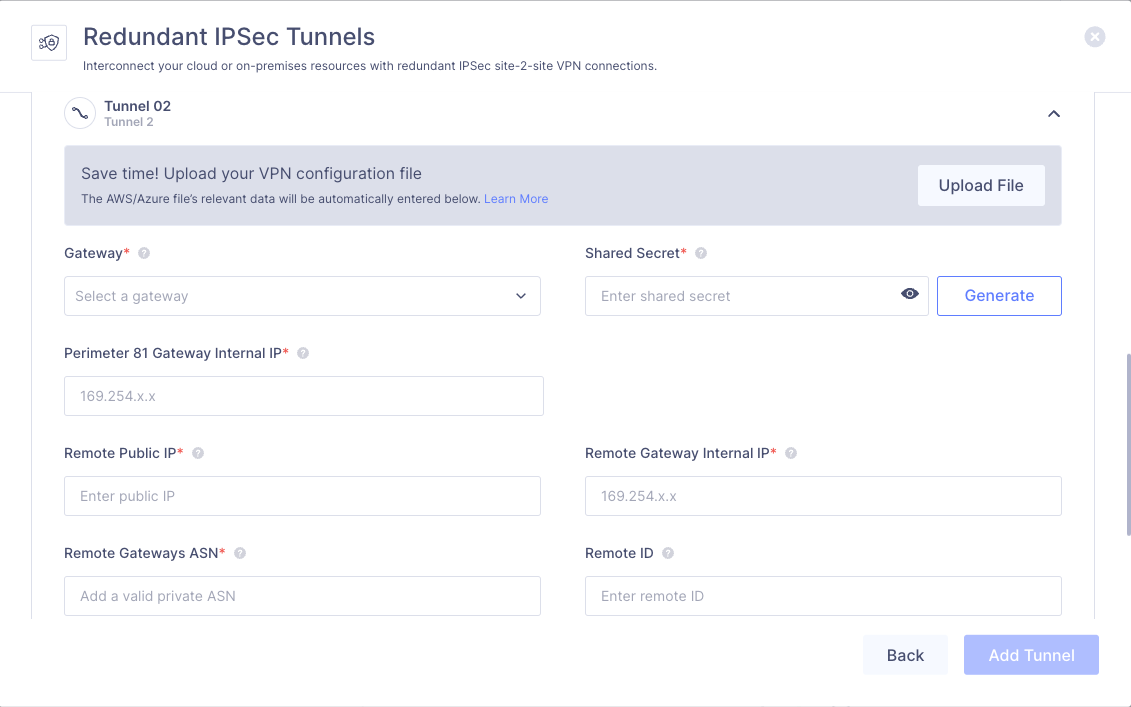
- Expand Tunnel 01 and fill in the following information:
- Shared Secret - the value previously set on the first star policy.
- Perimeter 81 Gateway Internal IP - The remote addressof the first Quantum Gateway used under the VTI settings above.
- Remote Public IP - The public IP of the first Quantum Gateway.
- Remote Gateway Internal IP -The local addressof the first Quantum Gateway used under the VTI settings above.
- Remote Gateways ASN - the ASN of the first Quantum Gateway.
- Remote ID - The router IDof the first Quantum Gateway used under the BGP settings above.
- Expand Tunnel 02 and fill in the following information:
- Gateway - Select the second Harmony SASE Gateway for the tunnel.
- Shared Secret - the value previously set on the second star policy.
- Perimeter 81 Gateway Internal IP - The remote addressof the second Quantum Gateway used under the VTI settings above.
- Remote Public IP - The public IP of the second Quantum Gateway.
- Remote Gateway Internal IP -The local addressof the second Quantum Gateway used under the VTI settings above.
- Remote Gateways ASN - the ASN of the second Quantum Gateway.
- Remote ID - The router IDof the second Quantum Gateway used under the BGP settings above.
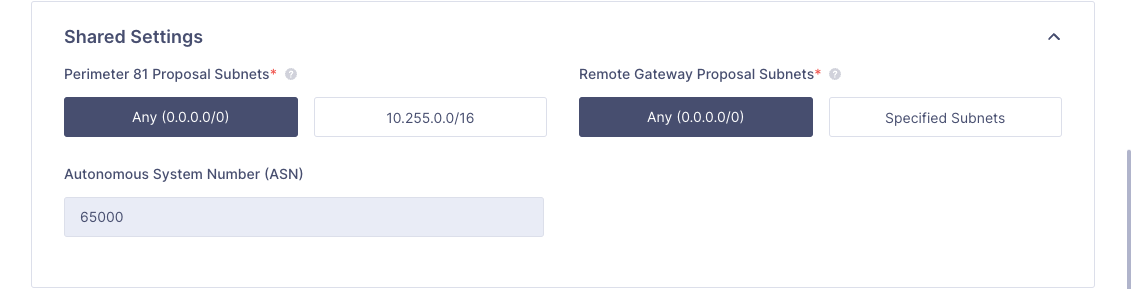
- Expand Shared Settings and fill in the following information:
- Harmony SASE Gateway Proposal Subnets - Leave Any (0.0.0.0/0) selected here.
- Remote Gateway Proposal Subnets - Leave Any (0.0.0.0/0) selected here.
- Autonomous System Number (ASN) - if not set already, set to the AS Number for the Harmony SASE network,
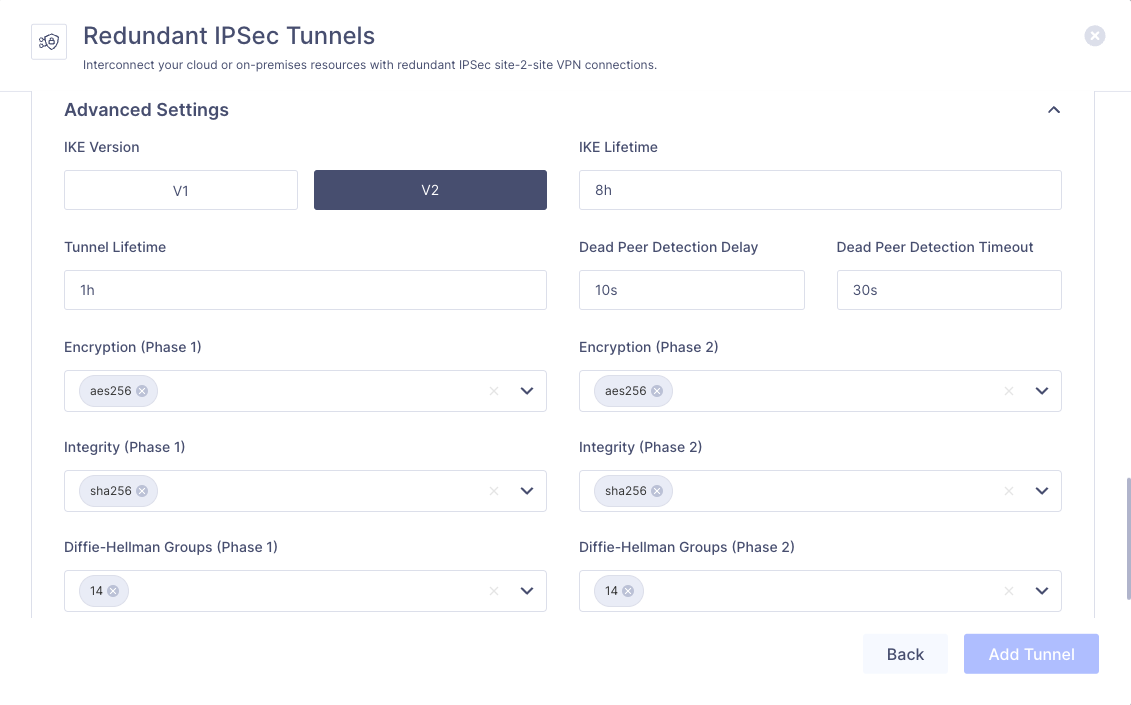
- Expand the Advanced Settingssection, fill in the following information:
- IKE Version: V2
- IKE Lifetime: 8h
- Tunnel Lifetime: 1h
- Dead Peer Detection Delay: 10s
- Dead Peer Detection Timeout: 30s
- Encryption(Phase 1): aes256
- Encryption(Phase 2): aes256
- Integrity (Phase 1): sha256
- Integrity (Phase 2): sha256
- Diffie-Hellman Groups (Phase 1): 14
- Diffie-Hellman Groups (Phase 2):14
- Click on Add Tunnel.
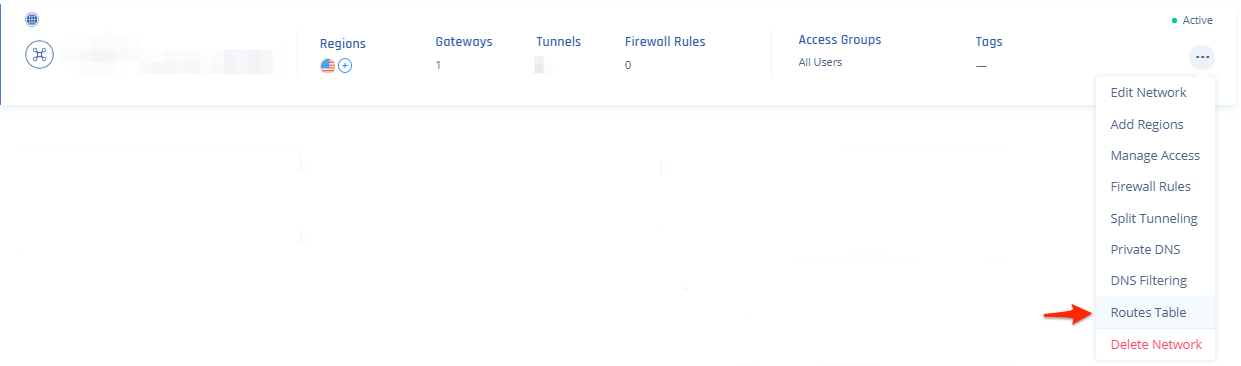
- On your network select your three dots and click on Routes Table:
- Click the Add Route button on the top right, then on this popup fill out accordingly (Tunnel will match the name above, and Subnets will be the subnets you want to reach on the Check Point Configuration of the tunnel) and click the Add Route button:
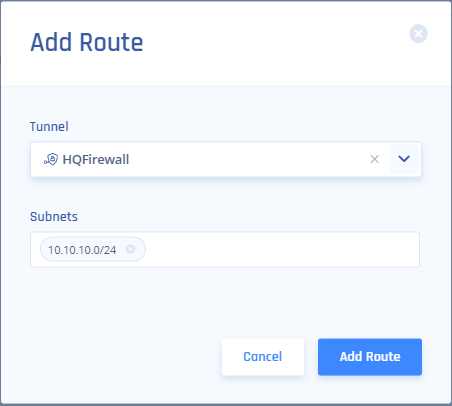
- Be sure to click Apply Configuration when done.

.png)


Verifying the Setup
After following the above steps, your tunnel should be active.
To verify, go to your Harmony SASE dashboard, locate the tunnel you just created, and check the tunnel status.
It should indicate that the tunnel is "Up", signifying a successful connection.
Next, connect to your network using the Harmony SASE agent and attempt to access one of the resources in your environment.
Troubleshooting
If you encounter issues during or after the setup, try reviewing your settings to ensure everything matches the instructions. In particular, check the IP addresses and other details you entered during setup. If issues persist, please consult our dedicated support.
Support Contacts
If you have any difficulties or questions, don't hesitate to contact Harmony SASE's support team. We offer 24/7 chat support on our website at Perimeter81.com, or you can email us at sase-support@checkpoint.com. We're here to assist you and ensure your VPN tunnel setup is a success
Was this article helpful?